ACCESSING YOUR GDrive
A important tool in your Digital Success Package is the GDrive as it contains access to your logo, style guide and several more things you may find useful. All that’s great but if you don’t know where to find it, what good is it to you? Well with this tutorial we are going to locate your GDrive and explore some of the tools and functions it contains.
(Image 1)
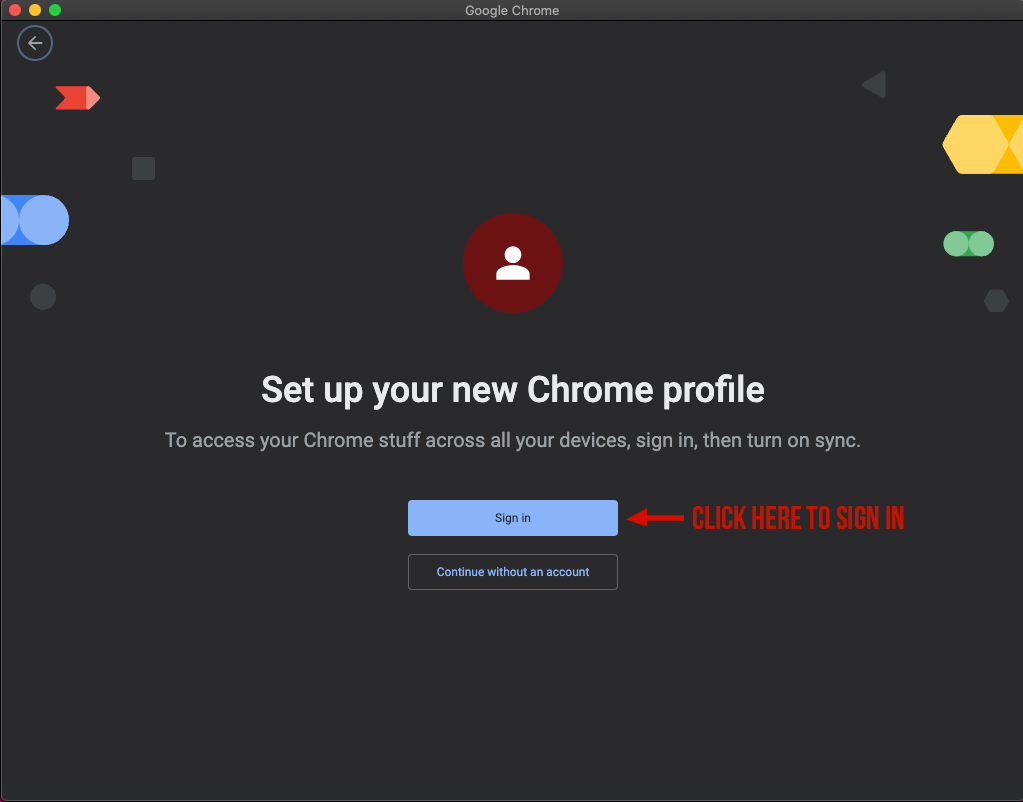
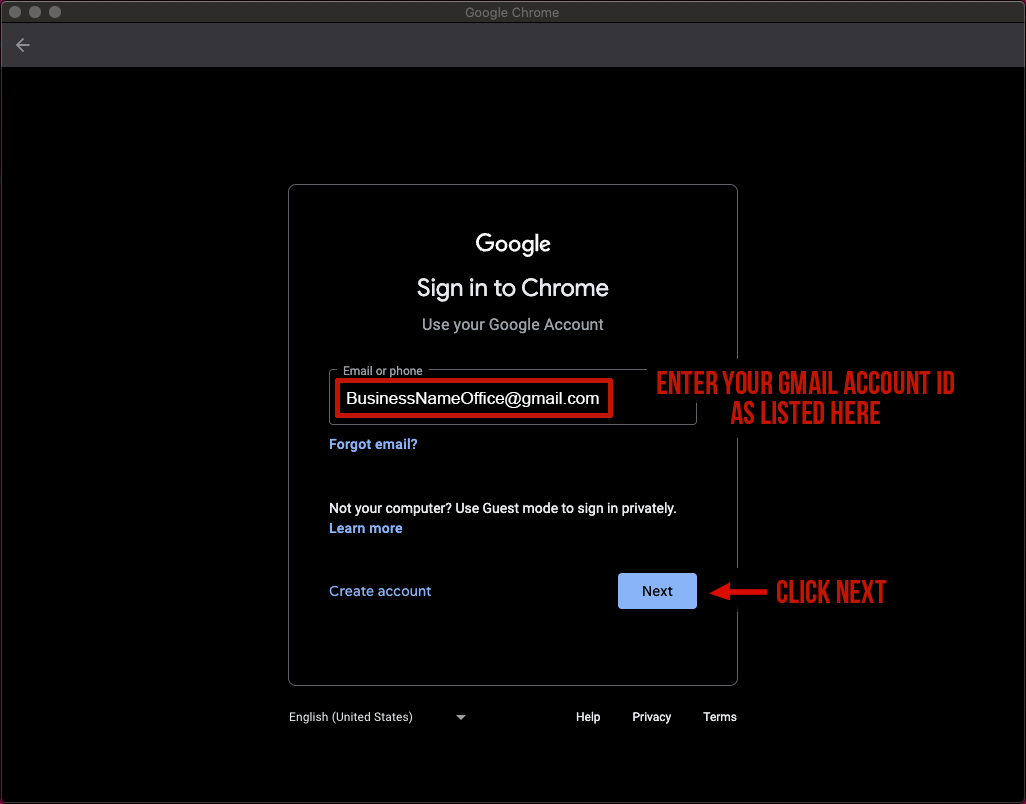
First you must login to Google Chrome with the credentials provided to you by the Lil’ Bubba Print Shop Staff. Click the Sign in button (Image 1), to load the login screen (Image 2) posted in the image below. There you will enter your Gmail Address then click the Next button.
(Image 2)
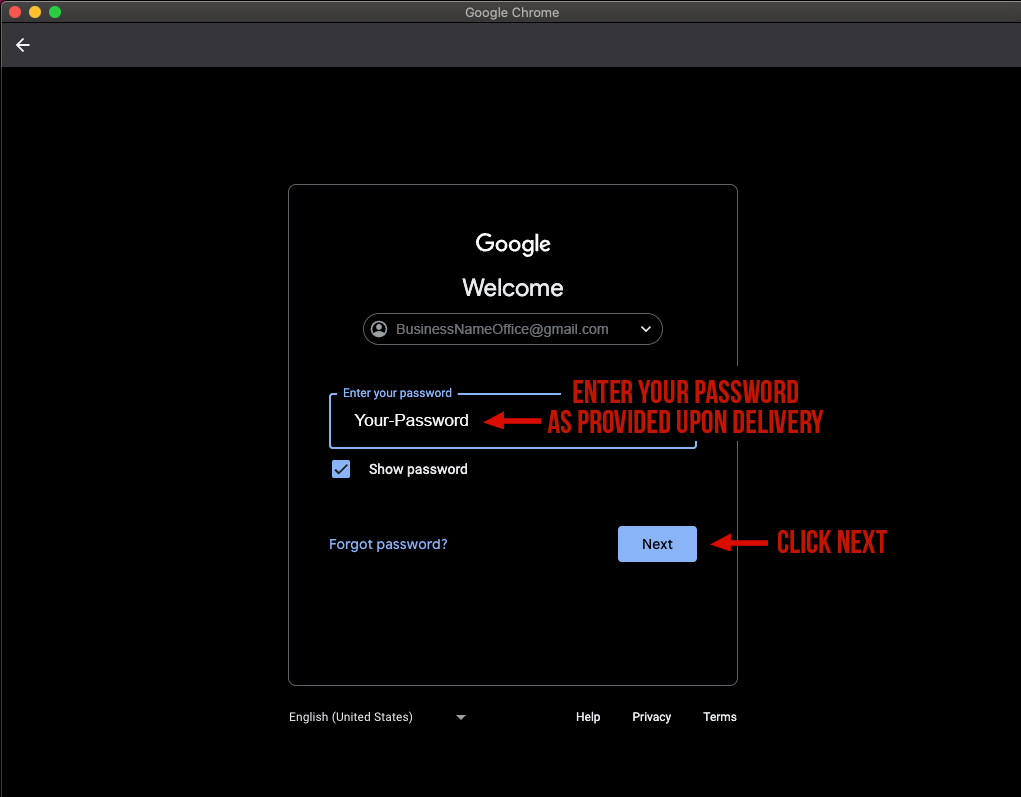
Once you the click Next button, the screen will refresh again, now displaying the Enter your password “text field” where you will type the password provided to you. After doing so you will again click the Next button (Image 3). After doing so successfully, you will be taken inside your new Google Account where you will find several Bookmarks previously saved for your ease of access (Image 4).
(Image 3)
Welcome to your Google Dashboard. Again, there are a few pre-loaded Bookmarks previously saved in your Bookmark Bar. You can add or delete bookmarks at will, but I suggest keeping these as they are specific to your business. By clicking these links you will be taken to the location they represent instantly.
Your dash may appear a little different once loaded but the functions remain the same. The Lil’ Bubba Print Shop has taken the liberty of creating you a brand specific background image to greet you with your companies branding elements. This is merely for an aesthetic and in no way effects the usage of the software.
For the purposes of this tutorial we are going to focus on the GDrive Tab. Clicking this will take you directly inside your GDrive associated with your account. Also, by clicking the Waffle Iron menu in the top right corner of the browser you will reveal a drop-down menu that contains many tools provided to your Google Account, including a link to your GDrive (Image 4). Press either of these links you choose to enter the GDrive now.
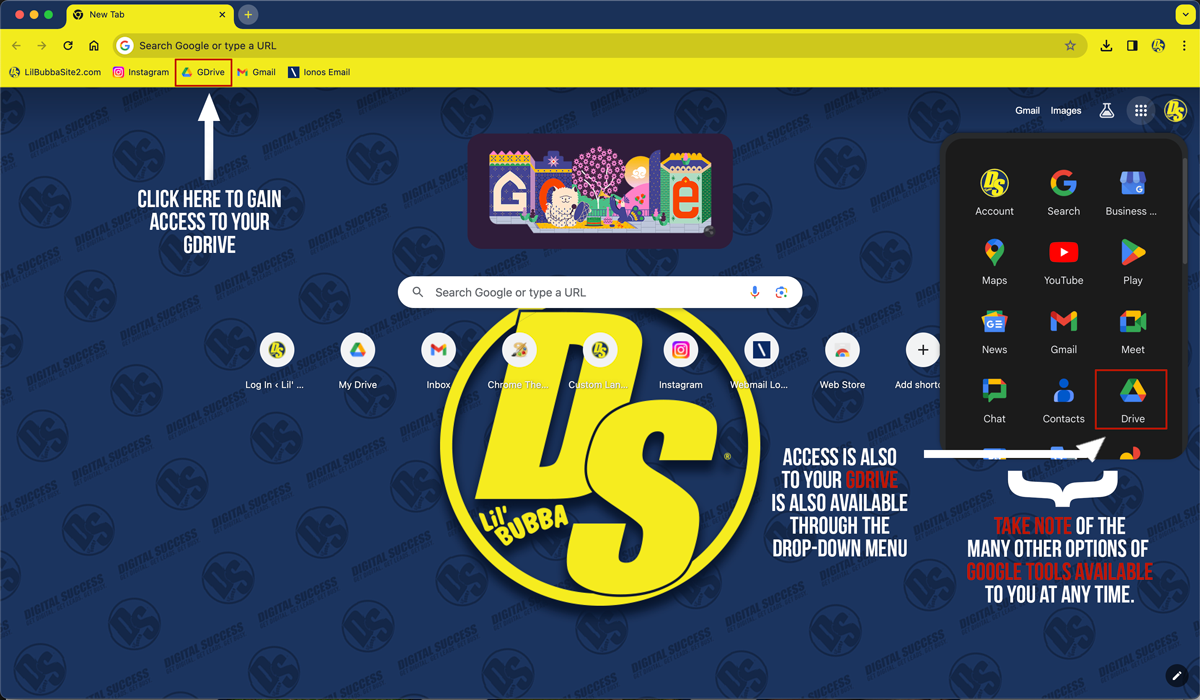
(Image 4)
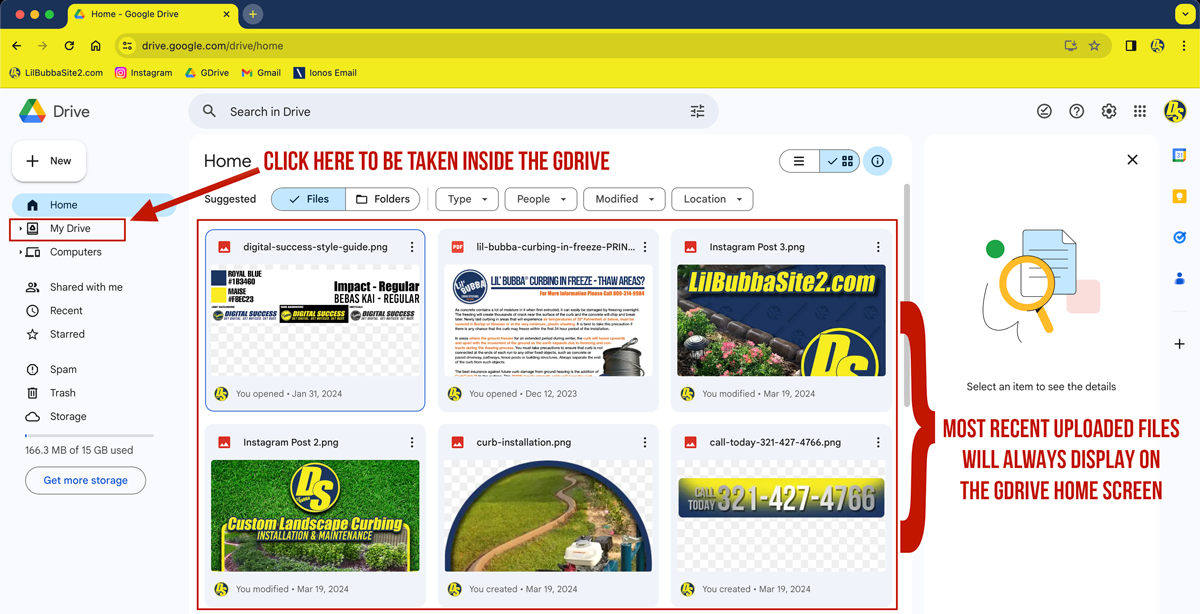
Once you click the GDrive link you will be taken inside your accounts online drive. To access the GDrive folders you must click the My Drive button on the left of the screen.
The current screen you are on is the Drive Homepage (Image 5). Displayed will be the most recent files uploaded to your drive for quick reference. These items will change from time to time but you will always be able to find the items in their respective folders.
(Image 5)
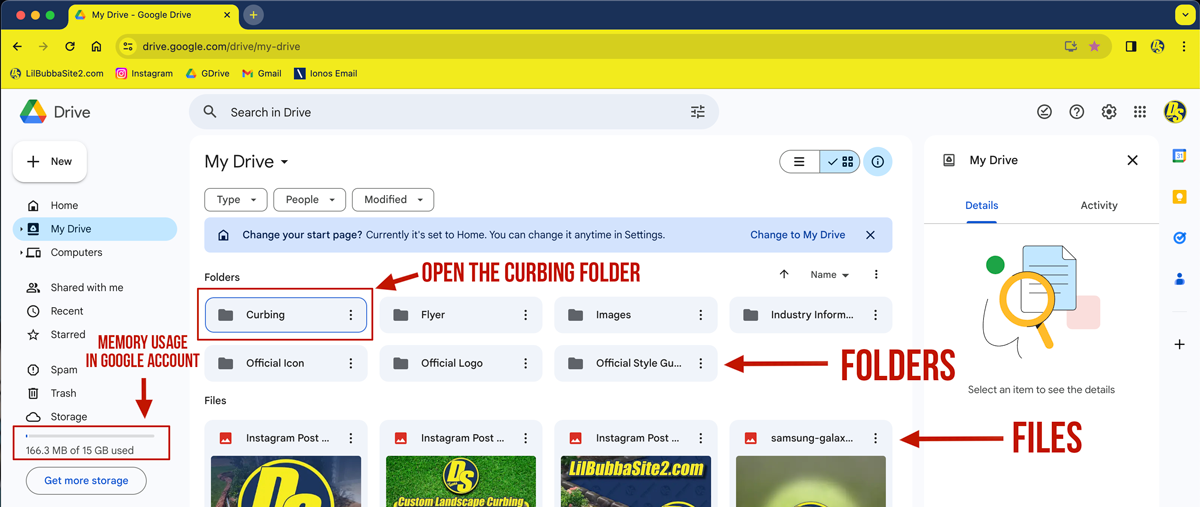
Now you are officially inside the actual GDrive and you will now notice there are several folders here already. Each one is titled to let you know it’s contents. By clicking on any of these folders you can open them, share them, and/or delete them. You have full control of these items and you can also create your own folders.
Please Note*** in the bottom left corner you will see the Memory used in your Account Storage, this information also contains the amount of memory being used in your Gmail account, so keep that in mind. To start, your account has 15 Gigabytes of free memory.
You will also notice two different displays in the window. The small title rectangles are folders containing individual file collections. The squares that have display windows are individual files. To get started, click the Curbing folder to go inside (Image 6).
(Image 6)
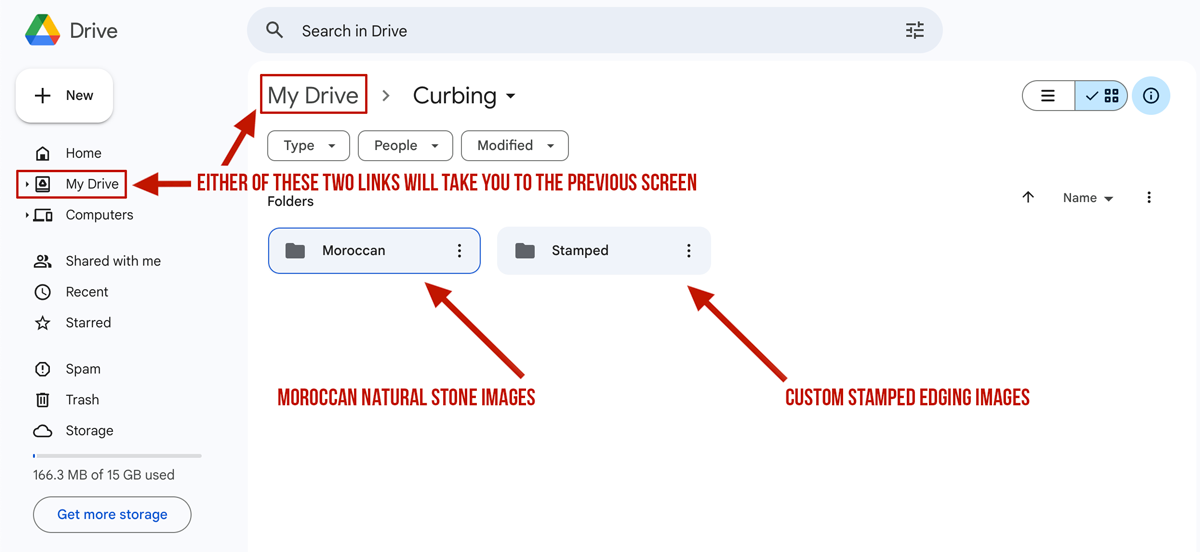
Inside the Curbing folder there will be two additional folders. One for Moroccan Natural Stone and a second for Custom Stamped Edging. I would suggest updating these folders accordingly with your own pictures as you take them.
At any time you can return to the previous screen using the two links titled My Drive. The menu on the left of the screen will remain constant while the menu at the top will expand as you go deeper into folders.
Click the Moroccan folder to go inside and view it’s contents (Image 7).
(Image 7)
Here in the Moroccan folder you will see all the starter curbing images utilized in your gallery. It is good practice to save your own images in these folder for easy access both on a computer and on your tablet.
Ultimately as you are taking pictures of your work you will want to add those photos to your website. Many people make the mistake of upload images with file names like “IMG_2042” or something to the like. This can cause damage to your website when you use such generic naming conventions.
Organizing your images with file names similar to the ones you see here will help boost your website when you load them there. So it is good practice to start the naming process early in your effort. As you prepare to upload your images here, be sure to name each image prior.
Once your images are all properly labeled, you can simply “drag & drop” them directly into the online folder, from the folder you have created for your images on your computer.
You can see the information pertaining to any file by selecting the file and looking on the right of the screen. Here the size of the file, name of the file, date it was created and other information will display (Image 8).
You can delete duplicate files or anything else by clicking the three dots located in the top right corner of each file. Clicking this will reveal a drop-down menu with Move to trash located on the bottom. Moving an item to the Trash Bin does not permanently delete the item though. If you accidentally delete something, simply go to the Trash Bin and retrieve the deleted item. More on this later.
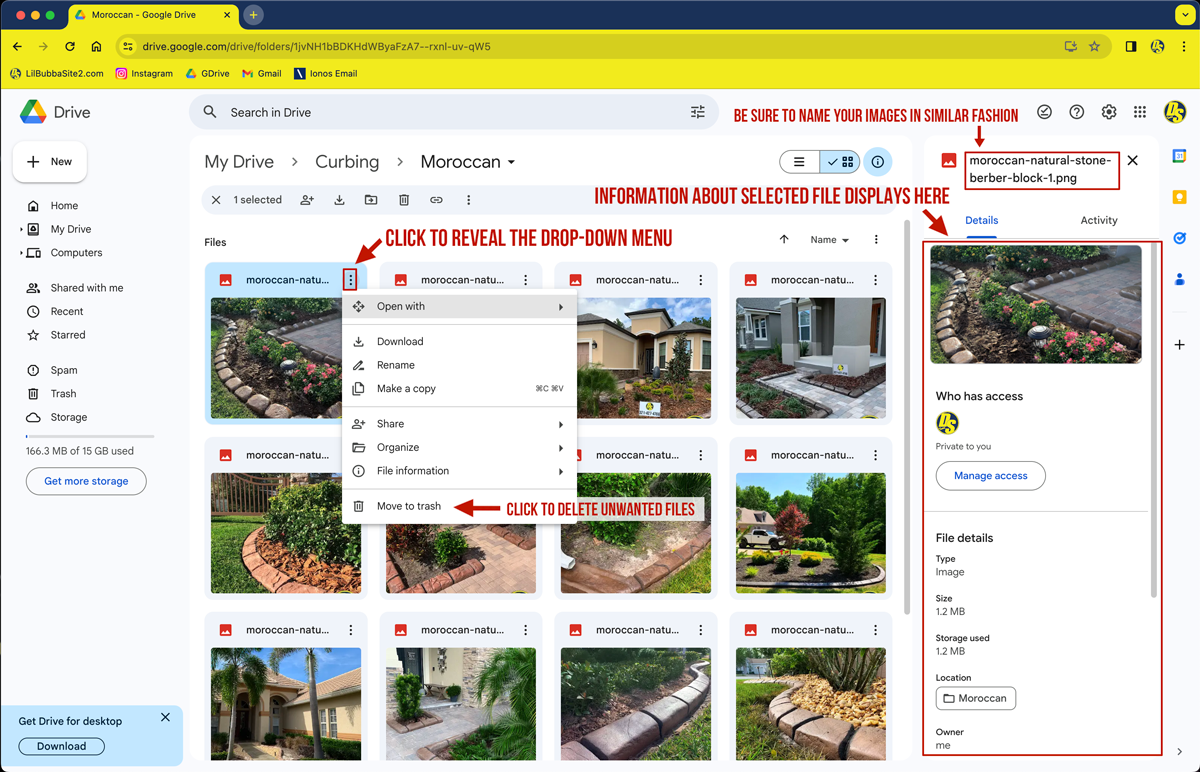
(Image 8)
Now lets return to the main folder by clicking the My Drive tab of your choice. Once you have returned to the main GDrive folder you will now learn how to share a file or folder.
As you see in the image below (Image 9), by clicking the three dots in the top right corner, you reveal another drop-down menu. By scrolling to the Share tab another pop-out will appear with two options.
- Share which will allow you to send an email to multiple email accounts granting permission to the contents of the folder.
- Copy link which will give you a link you can then place inside of an email manually to send to any one you choose.
Whichever you choose, you will be granting access to that item or folder to the recipient. You can remove their permission at any time. The reason this would be beneficial is, should you need to send your logo to someone so that they can create a T-shirt (Lil’ Bubba Print Shop can handle all your printing needs) you can simply send the permission to the folder to the printer where they can download a copy of your logo to get to work.
I would personally suggest using the Share tab as it gives you the ability to also add the recipient to your contacts list and upload multiple recipients. You are even able to send a custom message with permission. For this excercise, click the Share tab (Image 9).
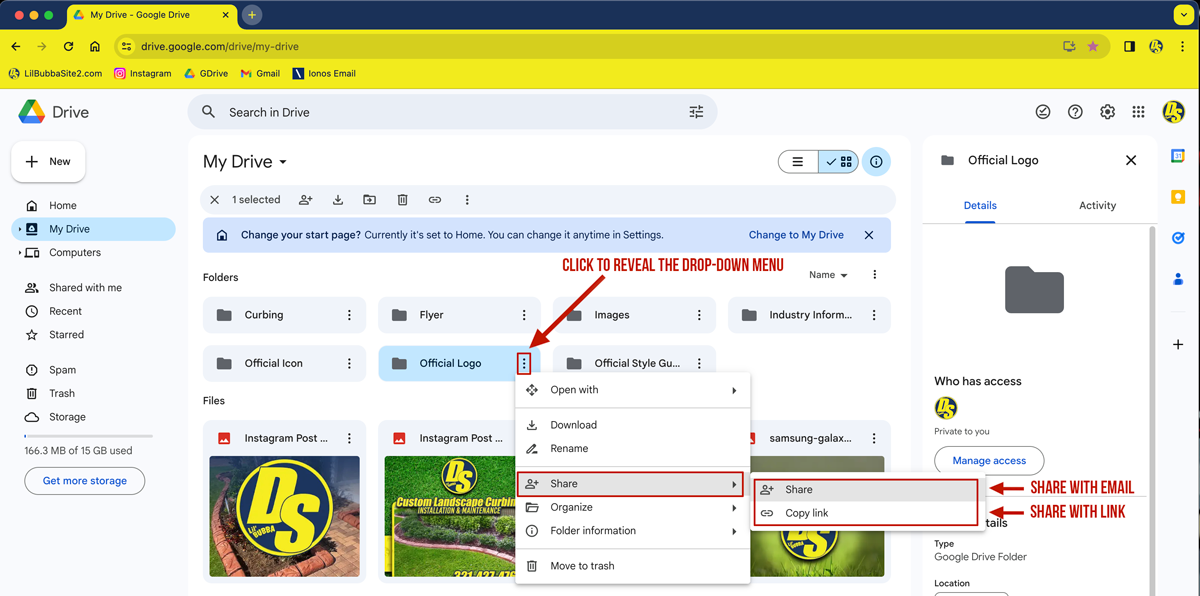
(Image 9)
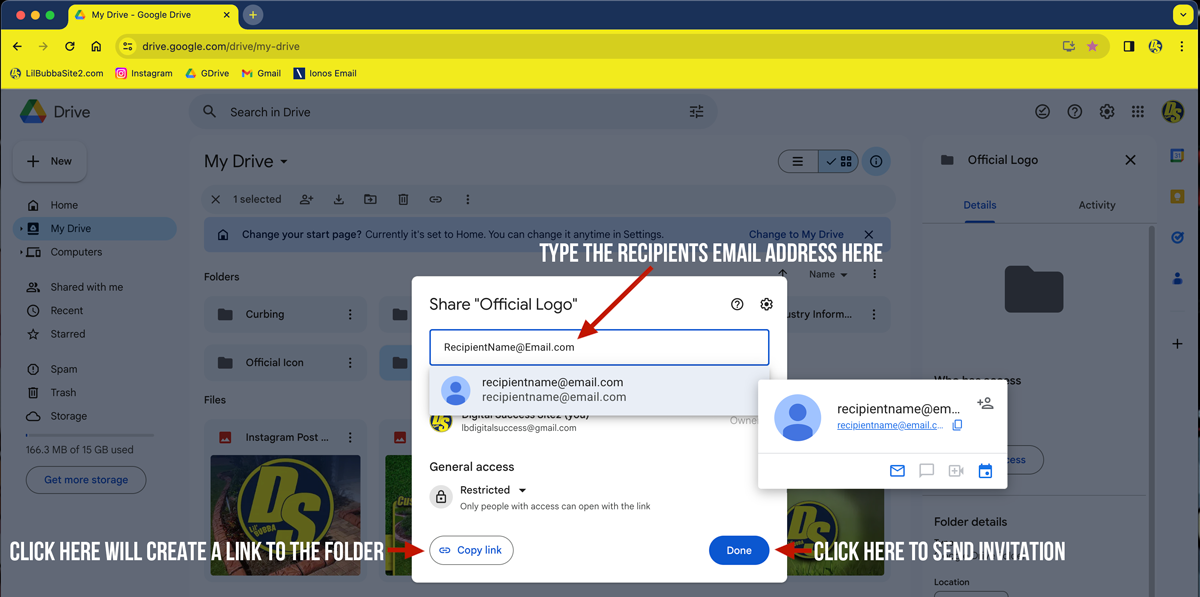
After clicking the Share tab you will see the following pop-up appear. You can enter the email address or addresses you choose to share this folder with here. If adding multiple addresses, always separate each name with a comma. As you enter each email address an additional pop-up will appear giving you the option to add the recipient(s) to your Google Account contact list.
You will notice there is still the option to Copy link is available to you. It does exactly what it says. By clicking the button you automatically have copied the link and may now paste it into an email if you choose (Image 10).
(Image 10)
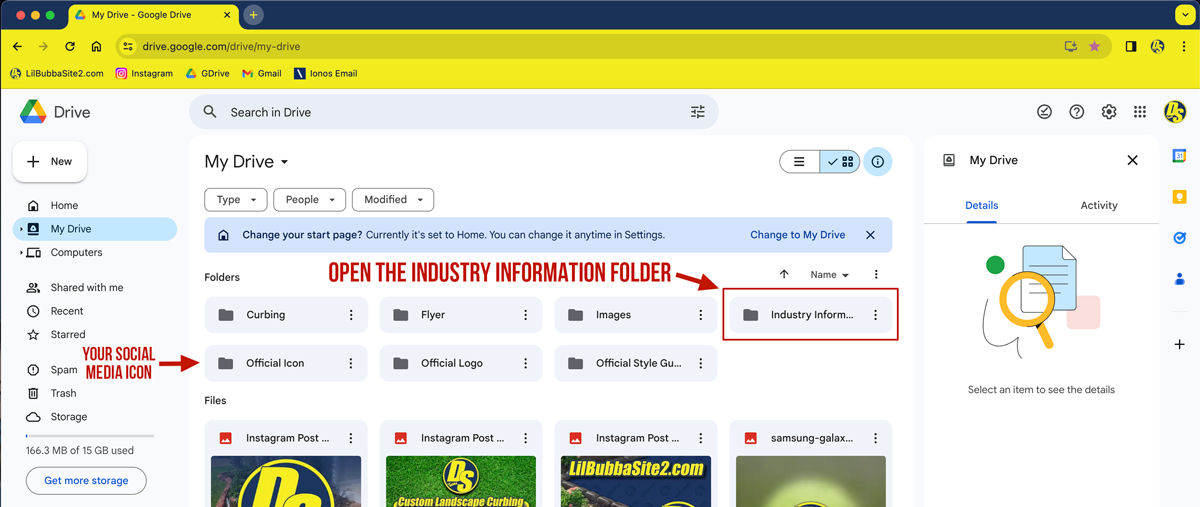
By clicking anywhere on the screen you can cancel the share option and return to the main folder. Once you are there, take note that the folder titled Official Icon ontains your Social Media Icon, previously rendered out to the industry standard 512px x 512px (PIXELS). If you ever create a new social media account for your business you only need to retrieve the PNG file located inside this folder (Image 11).
Now let’s take a look inside the Industry Information folder. This folder contains a few manuals and artcles, all of which are printable PDF files, that pertain to curbing and the equipment in your Lil’ Bubba® Curb Systems Package (Image 12).
(Image 11)
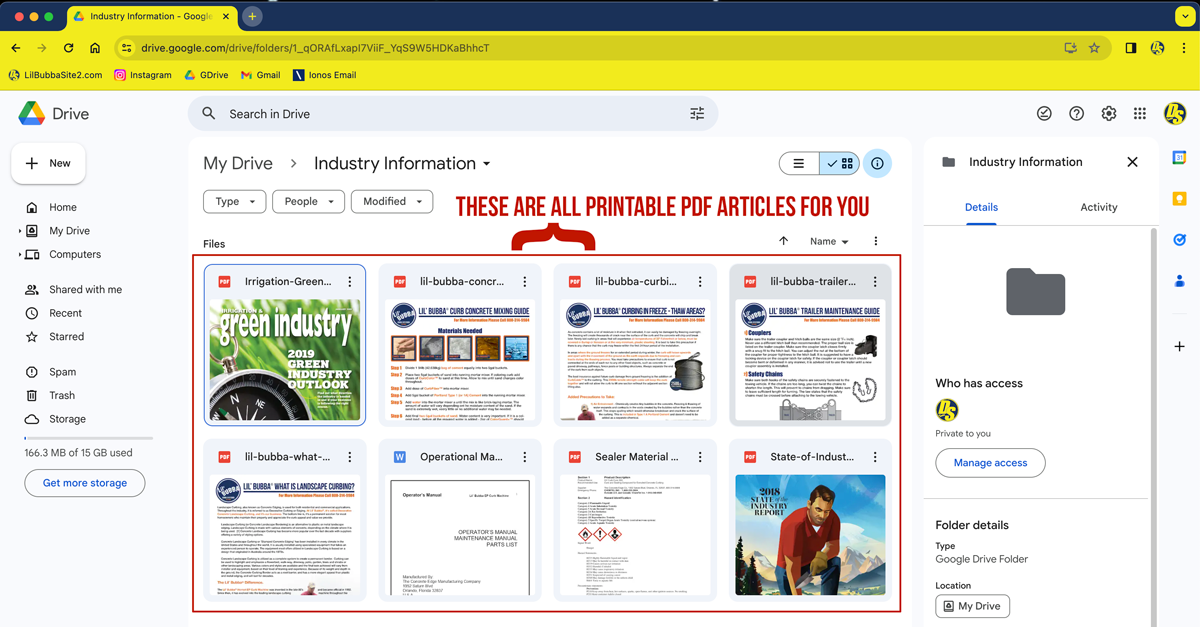
(Image 12)
Now that you know your way around the GDrive pretty well, lets return to a topic we mentioned briefly earlier. When deleting items from your GDrive, you will click the three dots in the top right corner of either the file or folder revealing a drop-down menu where at the bottom you will select Move to trash at which point the item will disappear from the folder (Image 13).
However, its not completely gone yet. If you delete something by accident and want to retrieve it you can access it for up to 30 days in the Trash Bin located in the menu on the left of the screen. By clicking the Trash tab you will be taken inside the Trash Bin folder.

(Image 13)
Once you are in the Trash Bin you can send a deleted item back to it’s original folder location by using the three dots drop-down menu located in the top right of the file or folder. Items will by default, delete permanently after 30 days of arriving in the Trash Bin.
To empty all the contents of the Trash Bin you can simply click the Empty Trash tab in the right corner of the window. You can also delete each item individually if you choose (Image 14) It is good practice to keep your Trash Bin empty as you have a maximum of 15 Gigabytes Free with your current Google Account. That should be plenty in the early stages of your business.
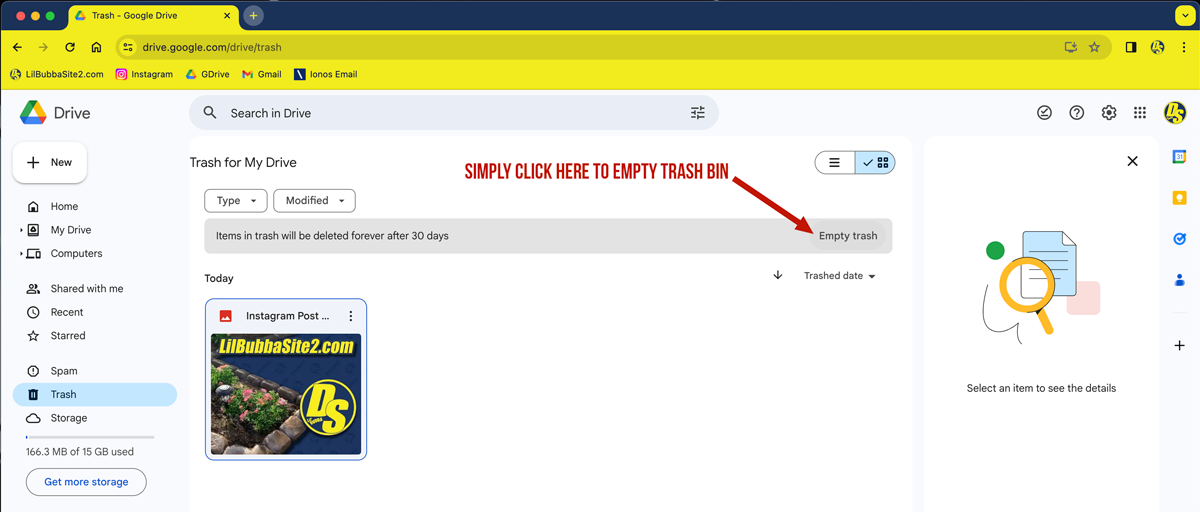
(Image 14)
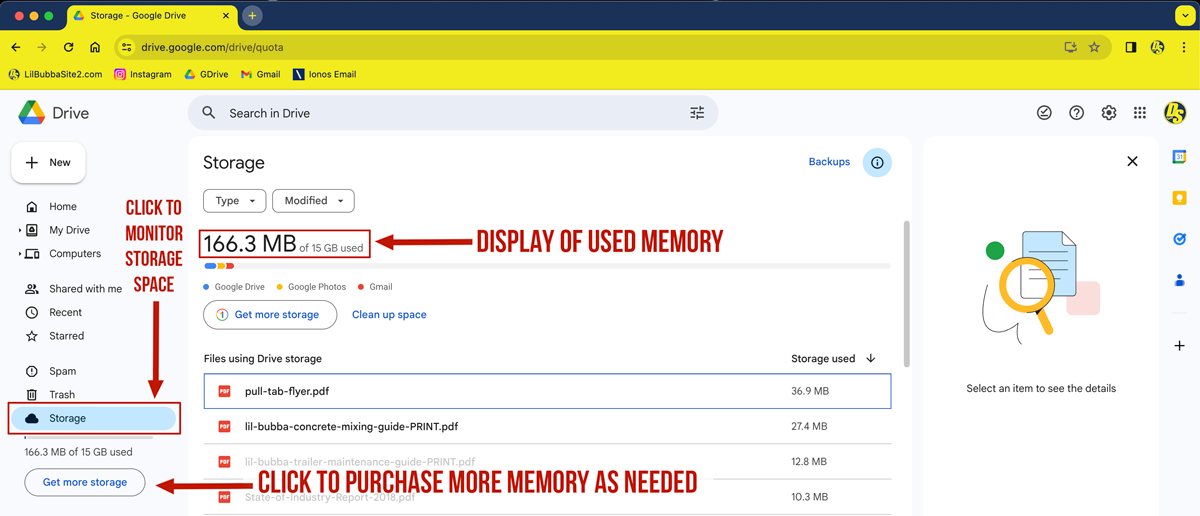
You can at anytime, check your used space in your Google Account by clicking the Storage tab located at the base of the left hand menu. Clicking this will instantly display the exact amount of memory you are currently using as well as a list with the specific sizes of each file in your account.
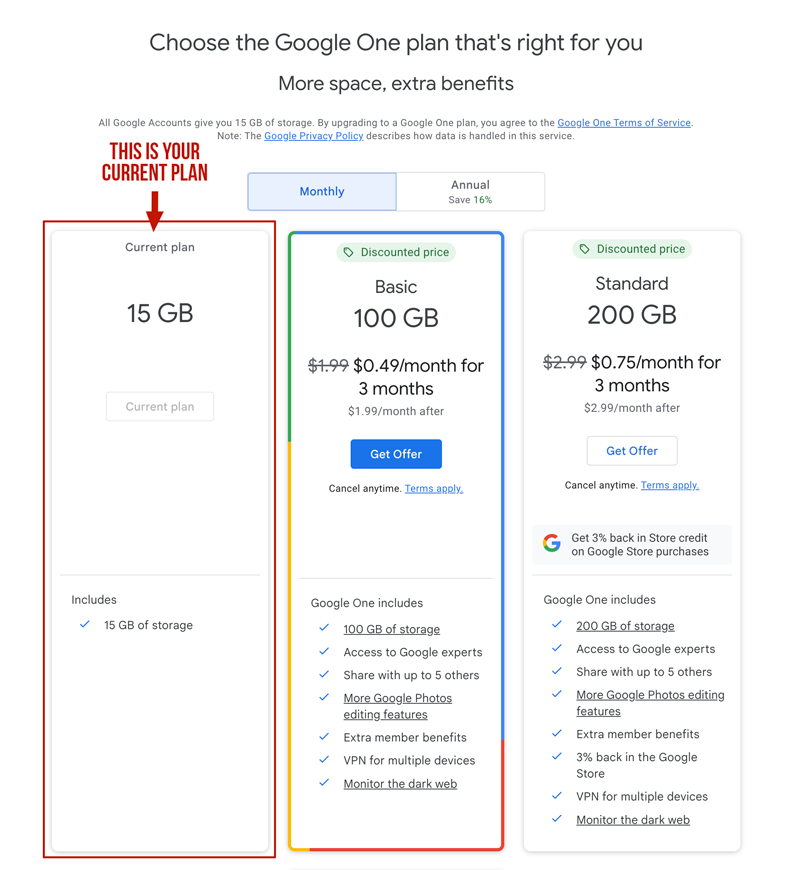
If at anytime you need more space, you can do so by clicking the Get more storage button in the bottom left corner of the screen to adjust your account for either a yearly or monthly amount. (Image 15).
(Image 15)
At the time this tutorial was created, the expansions we priced as listed below. This is a third-party provider and in no way is affiliated with the Lil’ Bubba Print Shop. We merely utilize their tools in our day to day work here. You are currently on the free plan listed on the left column below.
As your business grows you may need to expand your storage space or take advantage of some of the other options available you see listed below. If that day comes, your current accounts information would transfer seamlessly so you don’t need to worry about losing a thing.
You should be pretty comfortable with your GDrive and its use now and I would like to thank you for following through this tutorial, be sure to check back ofter to see what other tutorials we add in the future..