CREATING YOUR INSTAGRAM ACCOUNT
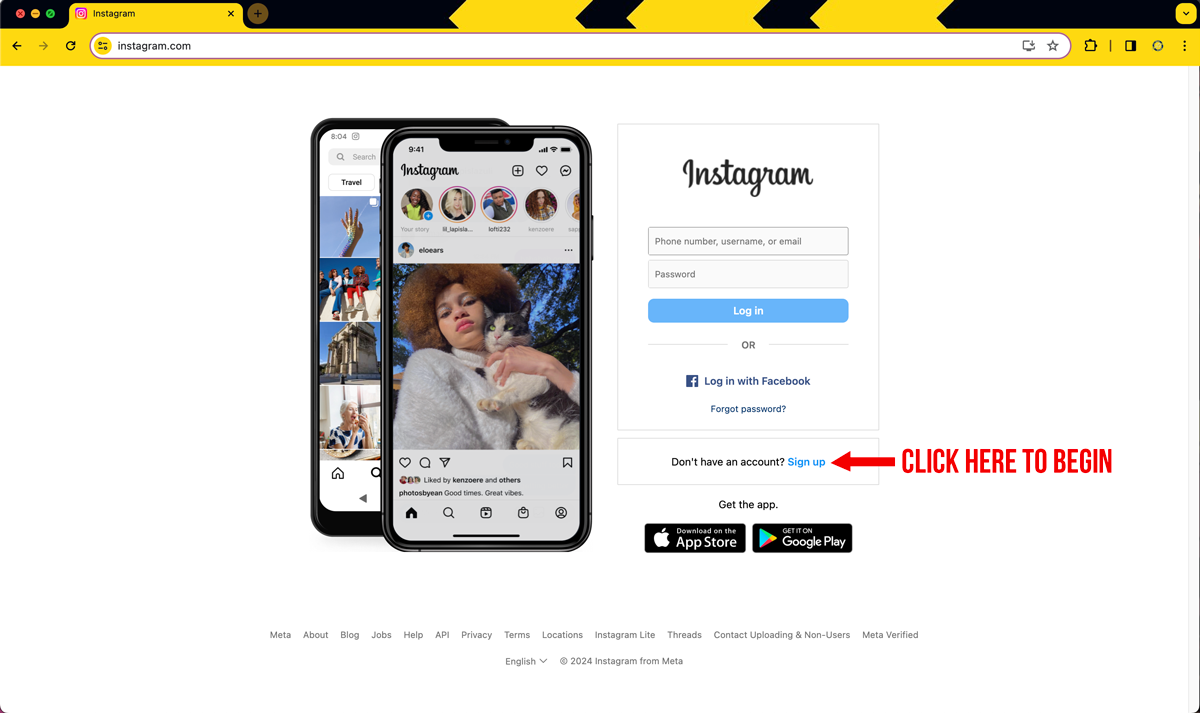
(Image 1)
- Mobile Number or Email: Use the Gmail Account created for you here. All messages going forward will be delivered to your Gmail.
- Full Name: Enter your First and Last Name as the page owner. Business names can be flagged as fake accounts in some cases.
- Username: Here you can be creative, but I suggest making it your business name or something close to it.
- Password: Create a unique password that is easy fo you to remember.
While typing in your Username, you may see prompts load below with Suggested Usernames but you do not have to use these unless you like one of them. After submitting all the requested inforamtion, click the blue Sign up button on the bottom (Image 2).
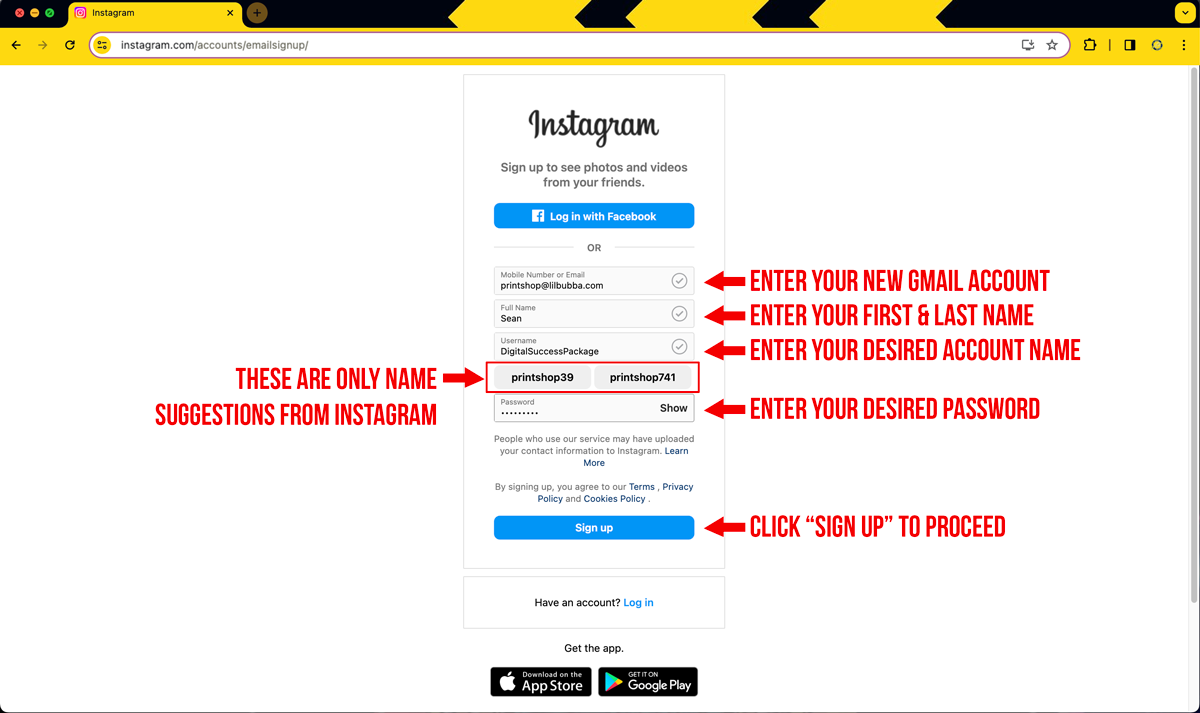
(Image 2)
After clicking the Sign up button, the screen will refresh displaying the following screen (Image 3). Here you will enter a birthdate. Your actual birthday is suggested, but not 100% necessary but you must make sure the date you enter equals 18 or older or your account will not be created. After your birthdate is entered click the Next button to proceed.
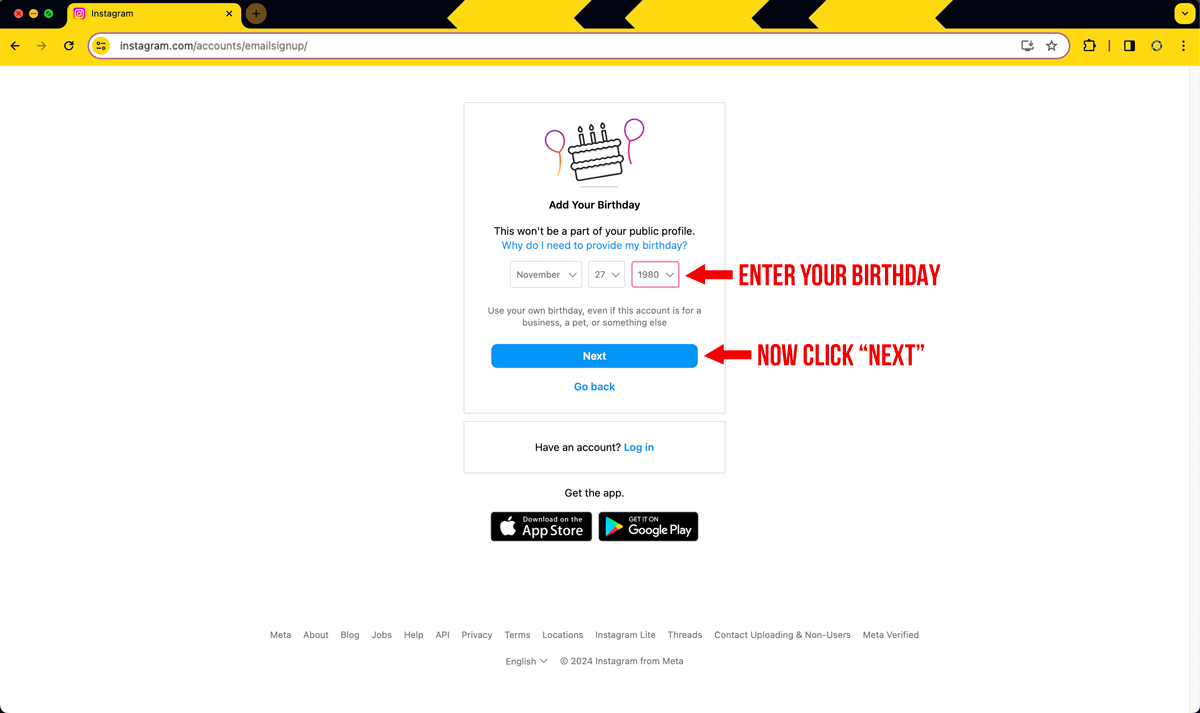
(Image 3)
After clicking the Next button (Image 3), you have created your account, now you will be taken inside your account for the first time. First, you will see a pop-up appear that will give you the option of turning the notifications on. I suggest this as any interactions with your account could be potential clients so you will want to know when they send messages or like your posts.
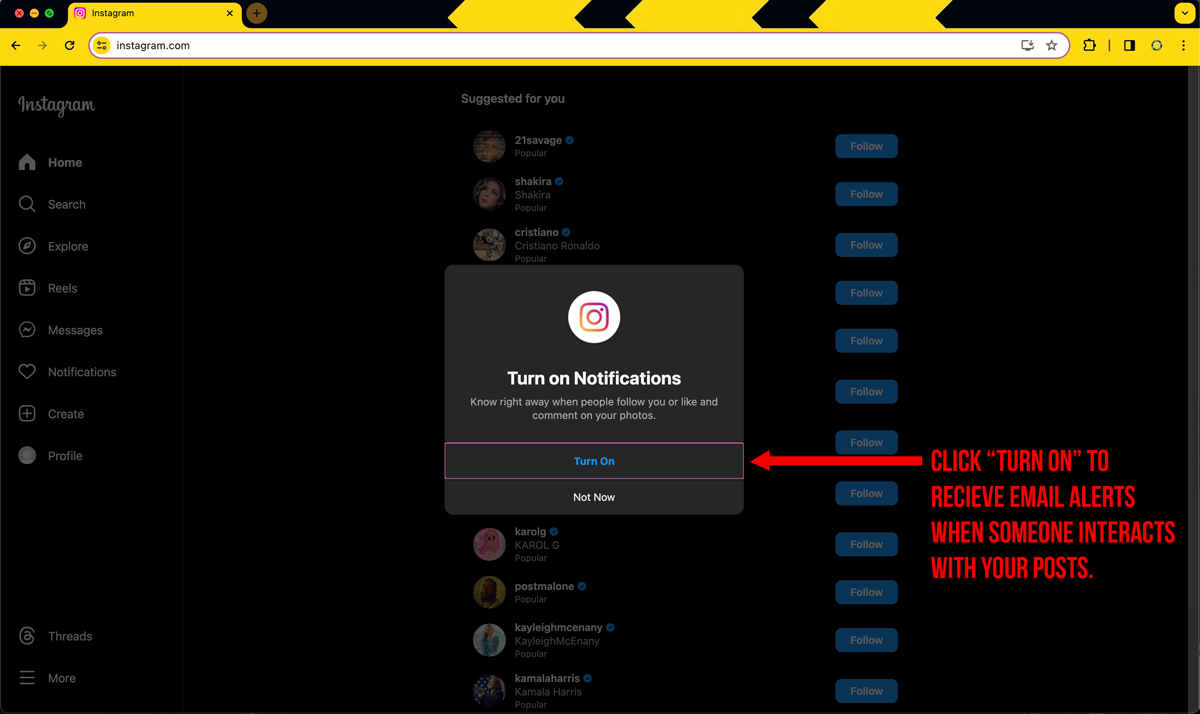
(Image 4)
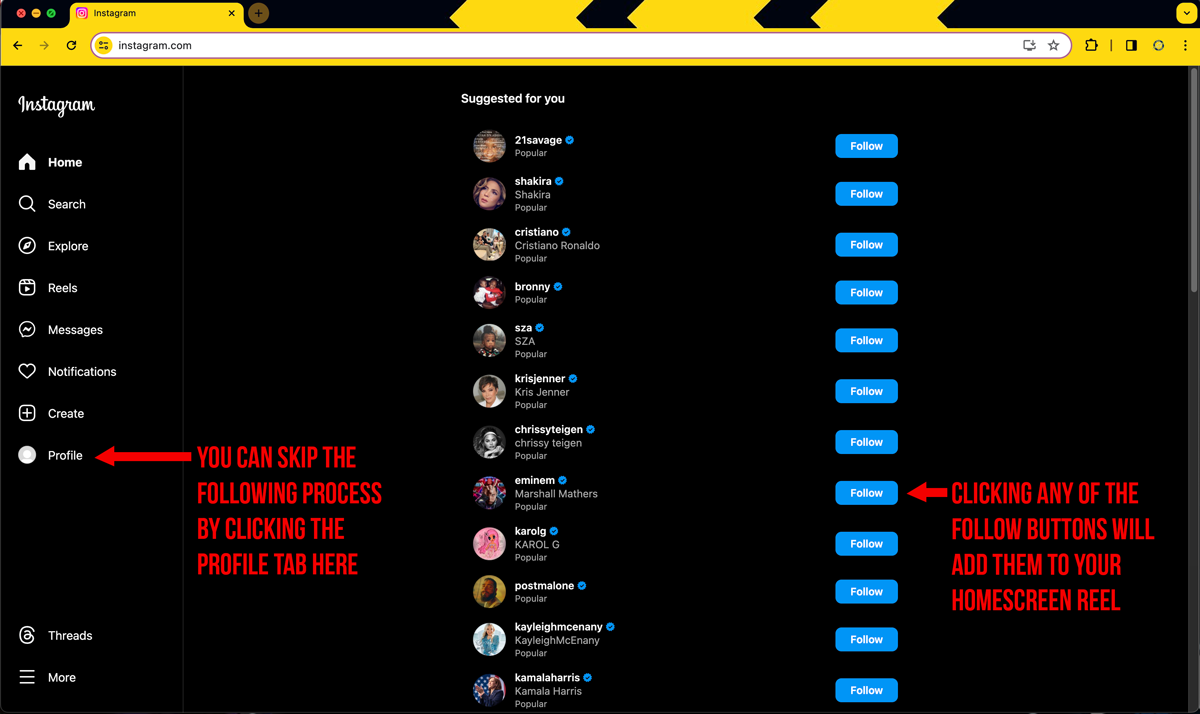
Once you click Turn On or Not Now the screen below will be revealed (Image 4). Here you will see a list of Suggest Accounts to Follow generally filled with celebrities and influencers, you can select any of these options you choose or you can click the Profile tab on the far left to skip this step. You can always add accounts to follow at anytime. We will go over finding accounts to follow later in this tutorial.
(Image 5)
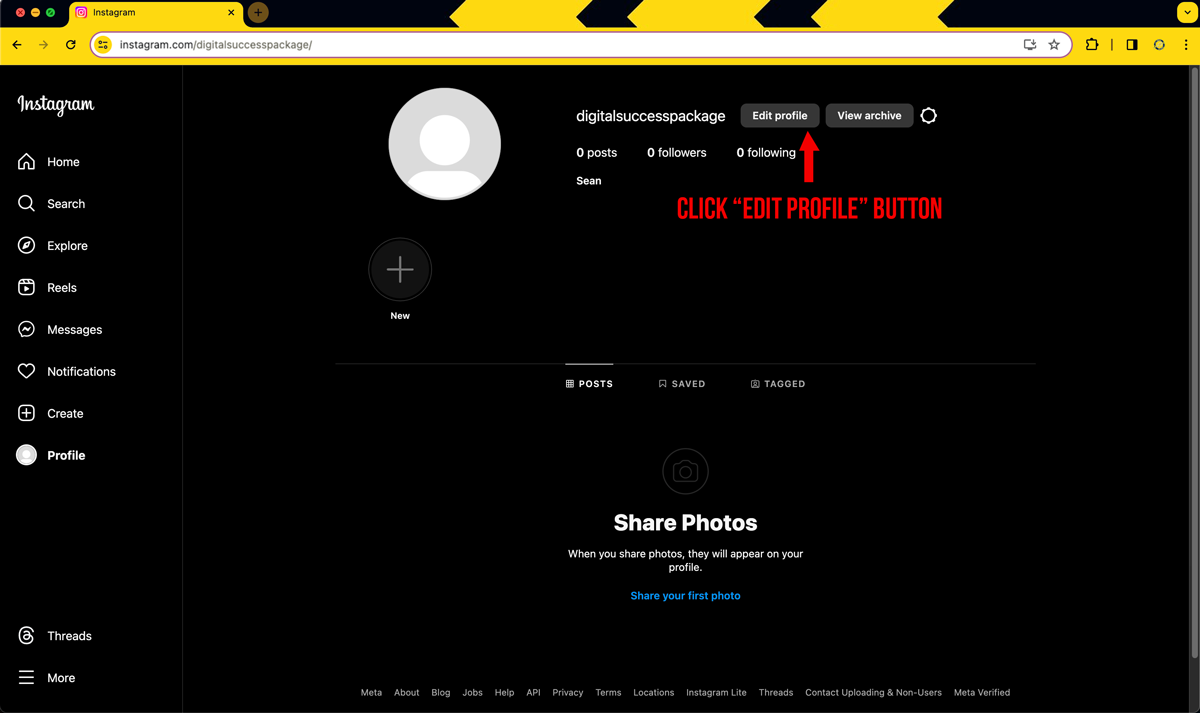
After clicking the Profile tab, your screen will load the default Profile Page (Image 6). To edit your pages information, click the Edit profile button to get to the editable page to fill out your profile’s information.
(Image 6)
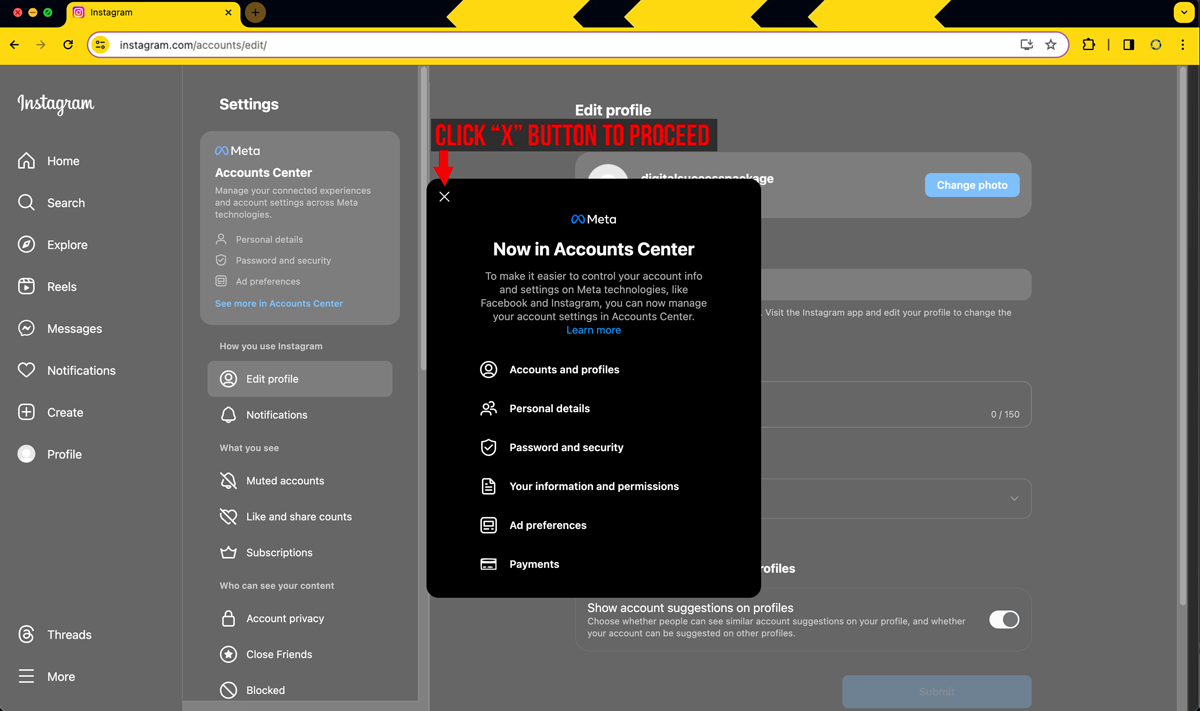
After clicking the Edit profile button a pop-up will appear giving you a short bit of information about your new account. After reading the information listed, click the X button in the top left corner of the box (Image 7). Once you do this, the screen below will appear giving you the capability of editing the profile’s information.
(Image 7)
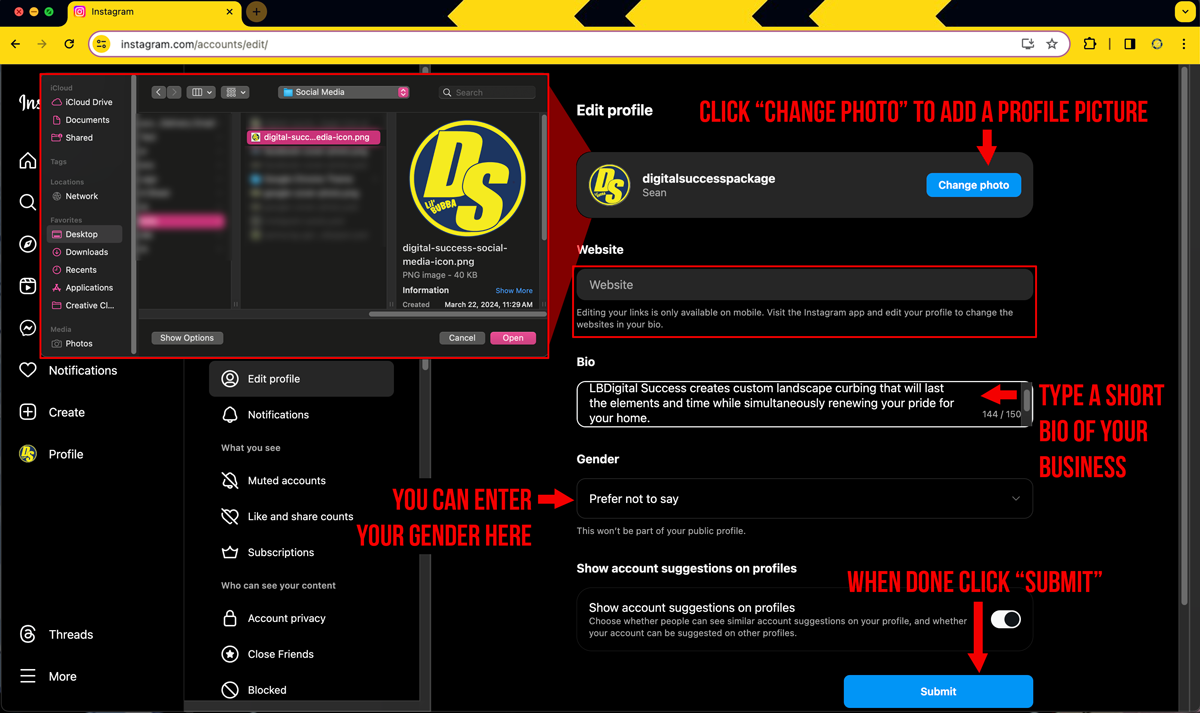
Here in the Profile Editor you will be able to load a profile image and create a short bio with a limit of 150 characters. I suggest keeping your images in an easy-to-access folder on your computer. First let’s add your Profile Picture to the account.
Start with clicking the Change photo button. Next a pop-up will appear allowing you to navigate through the folders on your computer. Locate your Social Media Icon on your computer. Once you have selected the image, click the Open or Submit button to load it into place. (Image 8).
Please Note*** The standard size of Social Media Icons is 512px x 512px (PIXELS). This size is the standard for all Social Media Apps.
After loading your Profile Picture, scroll down to the Bio section to type in your short bio for your business. Then scroll to the Gender tab. Here you can enter your gender if you would like to but it is not required. After all your information is entered you can click the Submit button to proceed.
Please Note*** You can enter your website link only on a mobile device so after your account is complete be sure to come back on your phone or tablet and enter your domain name for a direct link to your website to appear on your profile.
(Image 8)
Having clicked the Submit button previously, you have now edited the information in your profile. Next you will want to make your first post to your account. Be sure to have your Instagram Post(s) stored in an easy -to-find location on your computer. If your images are ready, click the Create tab located on the left side of your screen (Image 9).
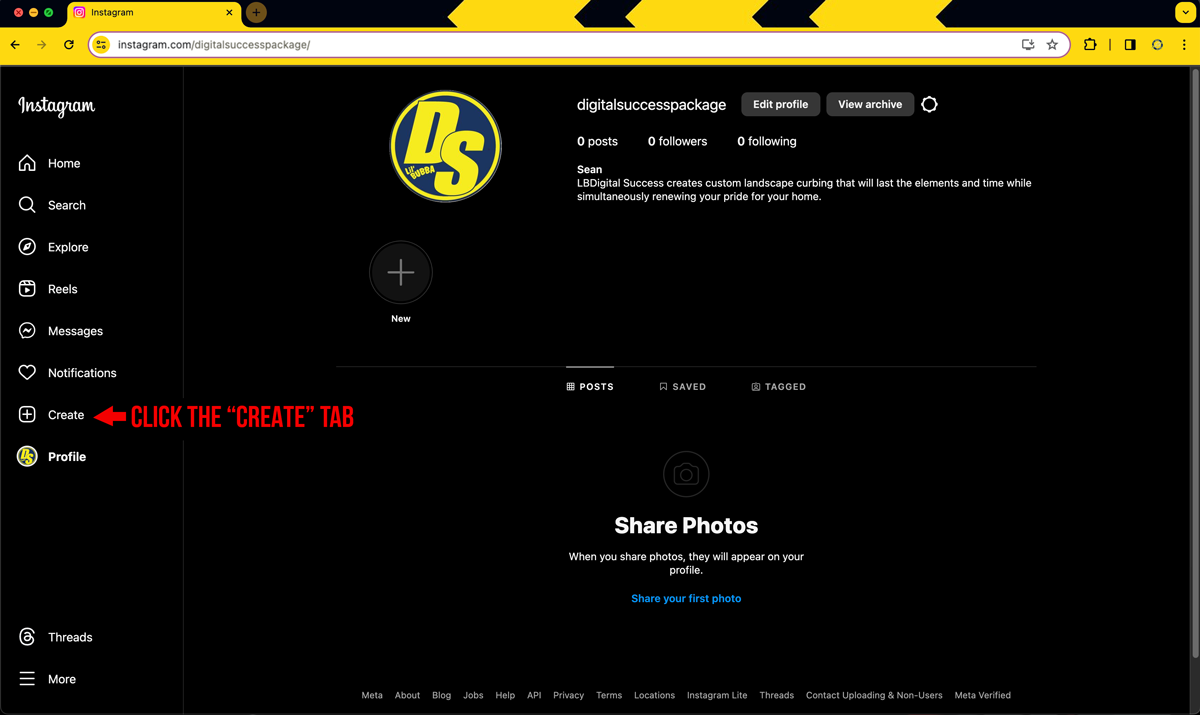
(Image 9)
Clicking the Create button will prompt the following pop-up window to appear (Image 10). By clicking the Select from computer you will prompt another pop-up screen allowing you to navigate your computer’s folders to locate your previously prepared Instagram Post (Image 11)
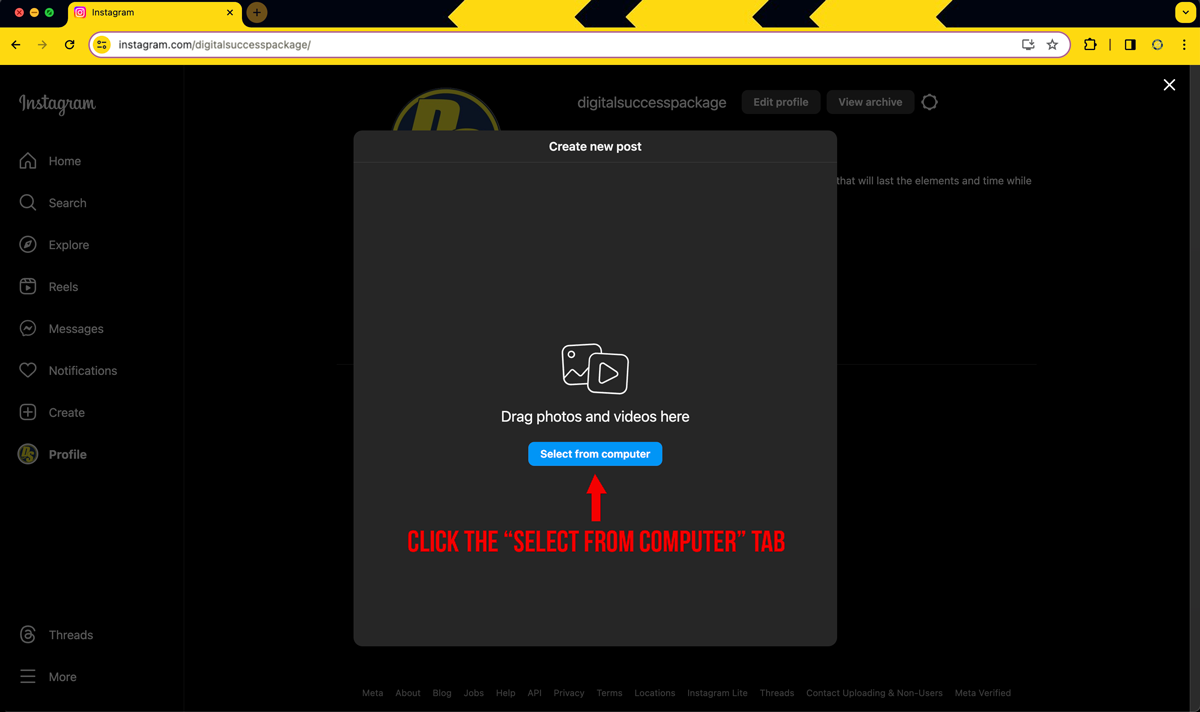
(Image 10)
Navigate to the location of your prepared Instagram Post located on your computer. Once there, select the image and click the Open or Submit button to load your image into your new Instagram Account (Image 11).
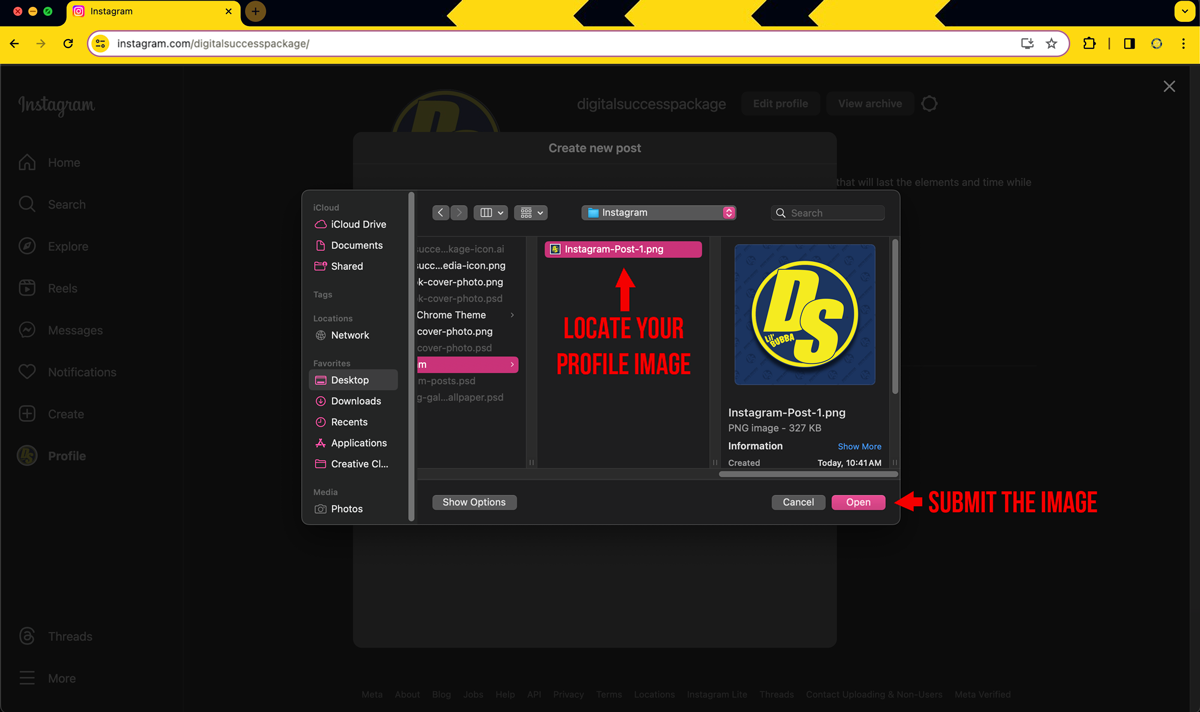
(Image 11)
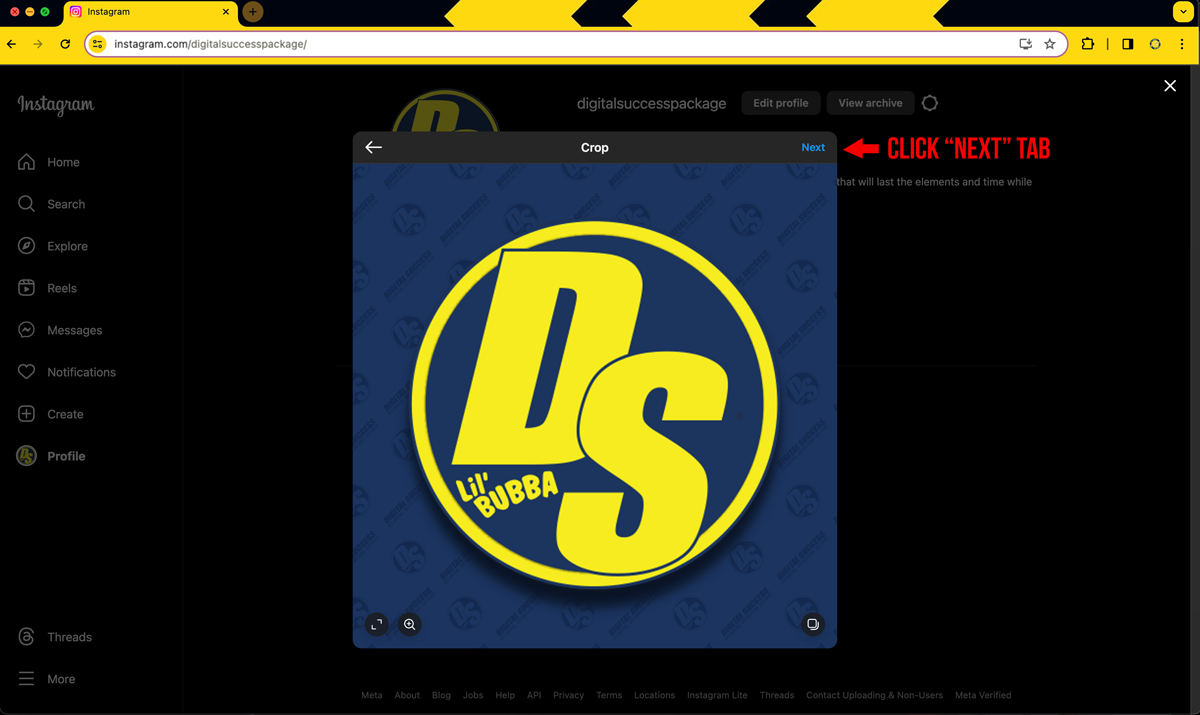
(Image 12)
Your selected image will appear in another pop-up window (Image 12). If your image is displaying properly go to the top right corner of the window and click the Next button to advance to the next screen of options (Image 13).
(Image 13)
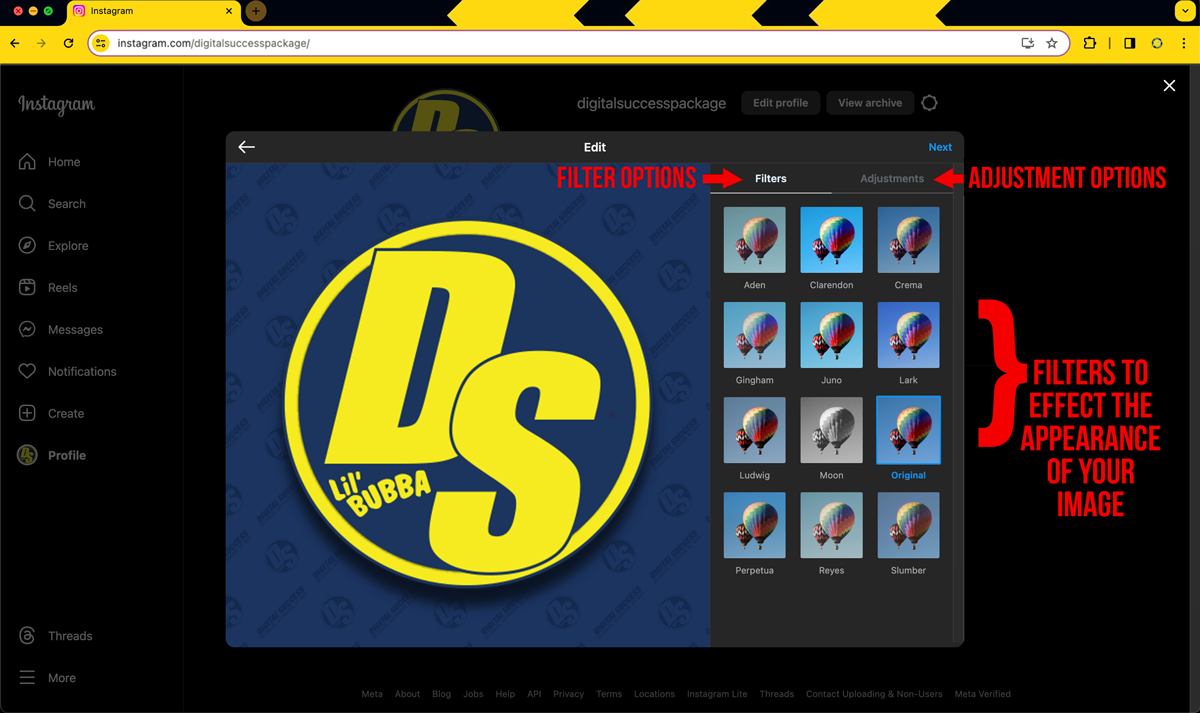
Now you will see the same pop-up window expand to show more options (Image 13). There are two main areas here that allow you to effect the appearance of your image.
- Filters: Has preloaded aesthetics that you can simply apply to your image to enhance it’s display. This is not suggested in most cases, especially images where you are showing your curbing work. By adding these filters you are “doctoring” the appearance of your image and for your actual curbing pictures you will want to show the closest to the real thing.
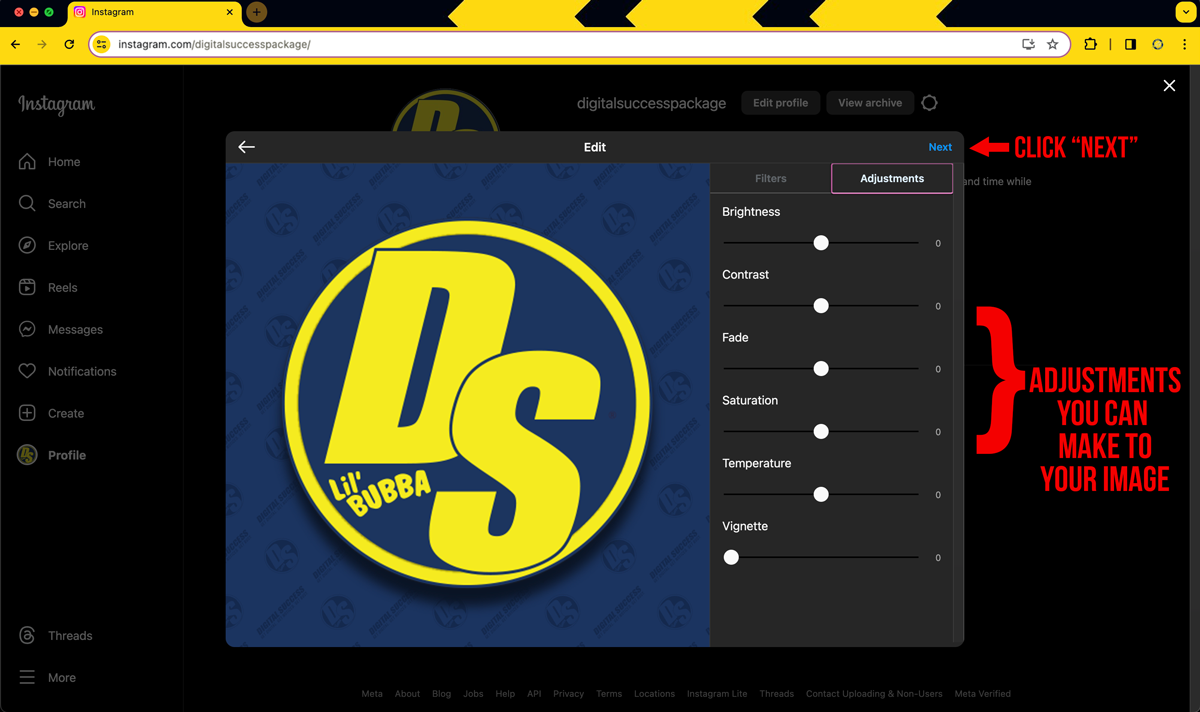
- Adjustments: Can be useful as they contain slider tools that will allow you to adjust the display of the image. You can adjust the brightness or the contrast and other options (Image 14). These tools are less invasive and when used properly can really make a dull image brighter and cleaner. Use these tools sparingly.
Once you have your image looking the way you like it click the Next tab located in the top right of the pop-up box to move to the next group of options.
(Image 14)
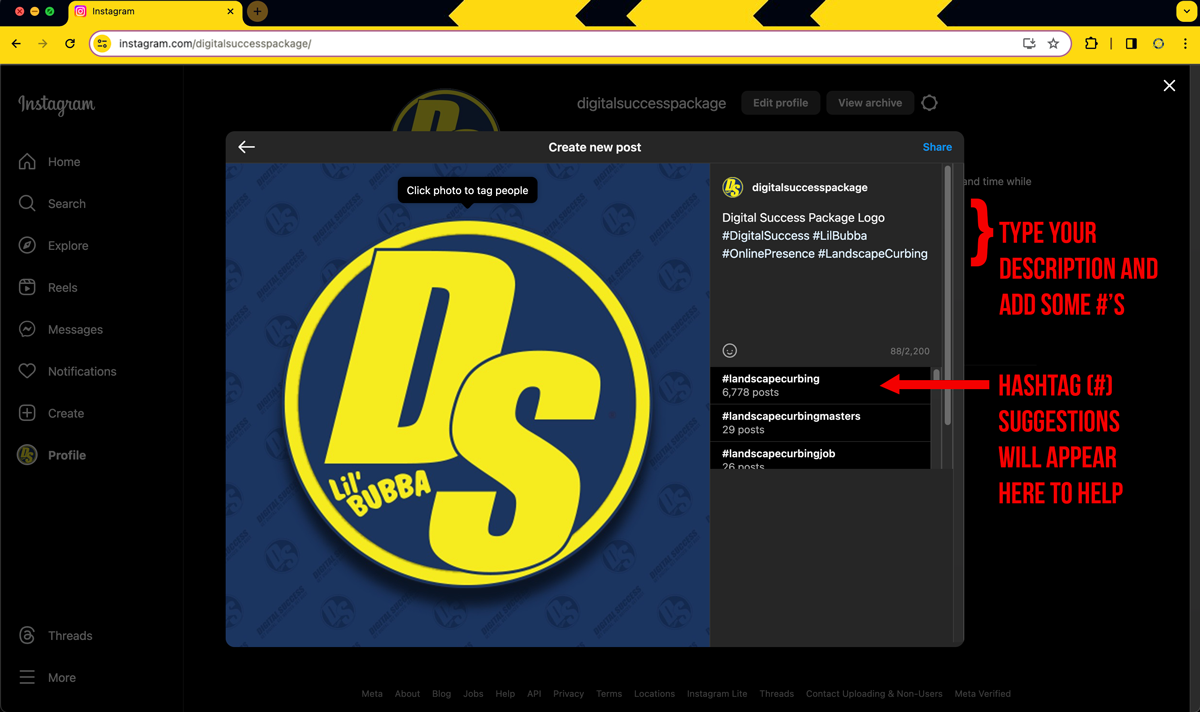
The next set of options are important to getting your images noticed in the pantheon of images offered through Instagram. First, you will type a caption or description of your image followed by a few Hashtags.
A hashtag is used for categorizing images on many social media sites. If you have a picture of “Landscape Curbing” specifically then you will want to add the #LandscapeCurbing tag so that it will show in searches for “Landscape Curbing”. This is only an example but you get the idea.
Also, as you are typing out hastags, you will see suggestions appear under the information box listing similar tags to the one you are typing and also the number of times that hashtag has been used (Image 15). The higher the number the better the hashtag.
After adding all your text and boosting your image with a few Hashtags you are ready to move to the next step.
(Image 15)
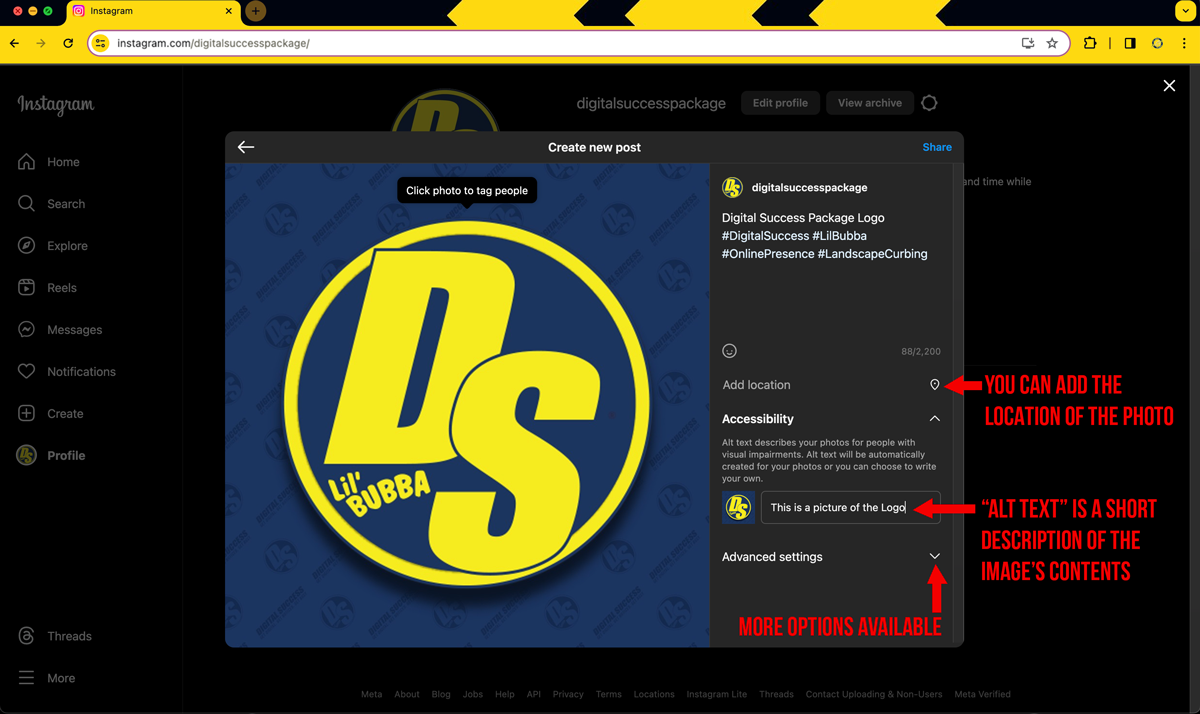
Under the description box you will see a few more options. First the Add location tab will allow you to enter the location the image was taken. I would advise against listing any of your client’s addresses but this option is available to you when suitable.
The Accessibility tab will allow you to enter Alt text for your image (Image 16). This is just a short description of your image’s content and this is useful for SEO purposes. The true use of Alt text is for screen readers that quite literally read the contents of a screen for visually impaired web users.
These tags are built into your website as well and is a part of the Web Accessibility laws put into practice years ago. Keep your descriptions light, no more than a sentence is necessary.
(Image 16)
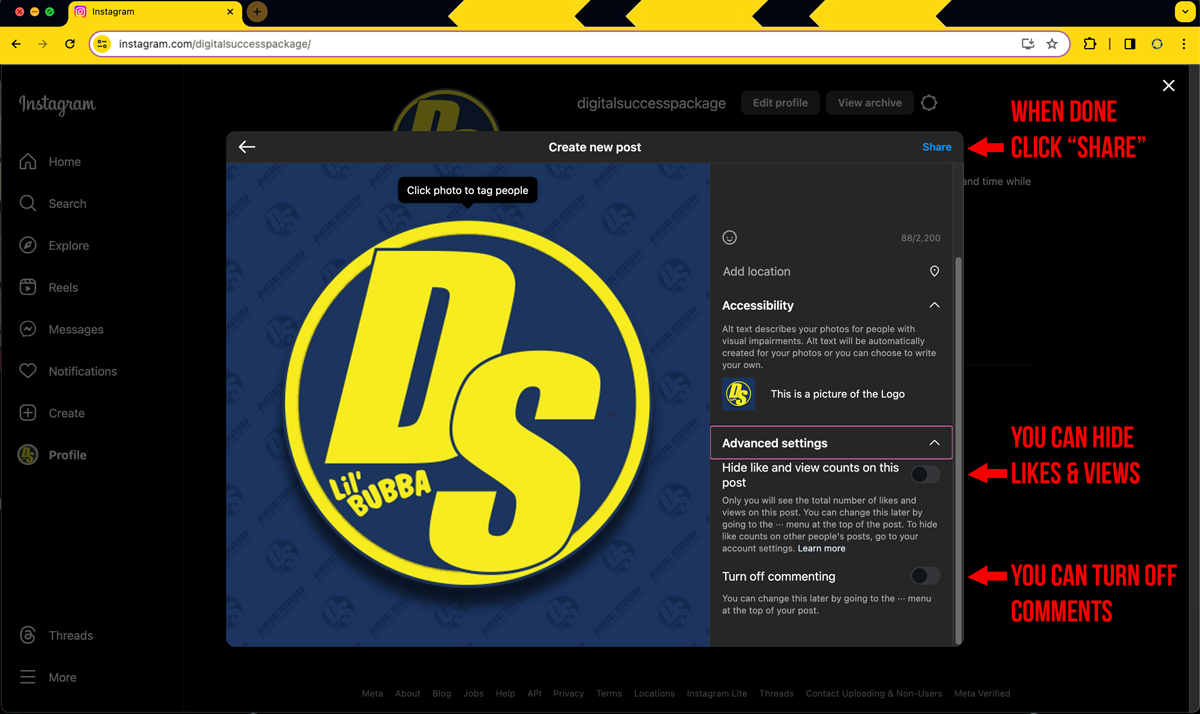
Below the Alt text box you will see another tab titled Advanced settings. Clicking this tab will reveal a drop-down list containing two items (Image 17).
- Hide like and view counts on this post: By clicking the switch here you are hiding any and all interactions that this post may gain, from the view of the public. I don’t suggest doing this but if you do keep in mind it is only for this single post. You have to click this for each post if you want to hide post interactions.
- Turn off commenting: By clicking this switch you are disabling the ability for anyone to comment on your post. Again, I do not suggest doing so unless you truly want to receive no comments for the specific post.
When posting images to Instagram the idea is to post attention grabbing images and to interact with your viewers. In most cases you want to keep “Likes” and “Comments” turned on so that you can potentially create a dialog.
Keep your posts clean and respectful, supply your audience with the best representation of your work. Take pictures at interesting angles and remove any “Trash” from the scene. Well crafted pictures should be as important to you as well crafted curbing. After all, you are posting your work and you want to represent it in the best light.
Photography Tip: Lighting is key, especially when taking outdoor photos. For many years, landscape photographers have known of the “Golden Hour”. This is the two times of day when daylight has a redder hue and softer appearance. This is Sunrise and Sunset. This is also commonly referred to as the “Magic Hour”.
There is a small window of time right before the “Magic Hour” called the “Blue Hour” where due to the either the sun not having risen or just previously having set that casts a a residual blue shade on indirect sunlight with no sharp shadows.
Both of these times offer interesting images of their own accord but due to less contrast during the “Golden Hour”, shadows are less dark, and highlights as less likely to be overexposed. This warmer colors enhances the natural colors of a landscape theme and create stunning imagery. Keep this in mind when taking your own pictures of your landscape curbing installations.
Now that you have filled out all the necessary steps to create an Instagram Post, go up to the Share tab located in the top right corner of the pop-up window and click it to make your post go live (Image 17).
(Image 17)
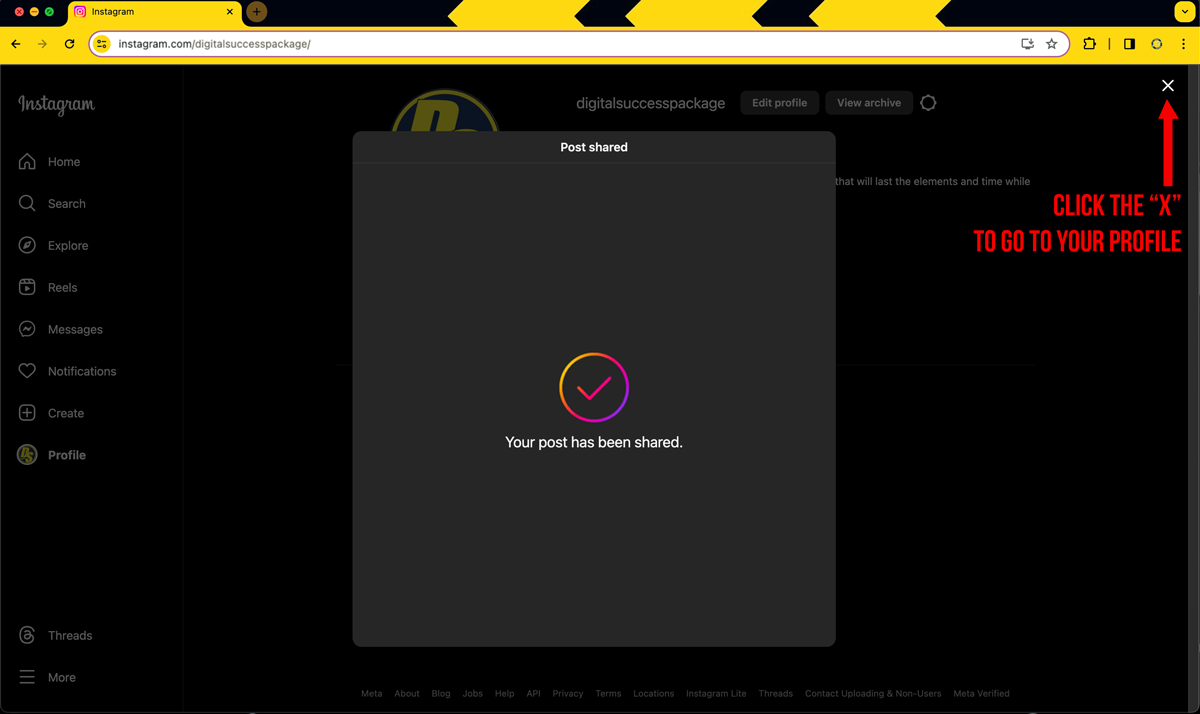
As the screen refreshes you will see the pop-up window turn grey with checkmark display in the center. This is to confirm your image has been posted to your account. Simply move your cursor to the “X” displayed in the top right of the browser window and click it to exit this window and return to your Instagram Dashboard (Image 18).
(Image 18)
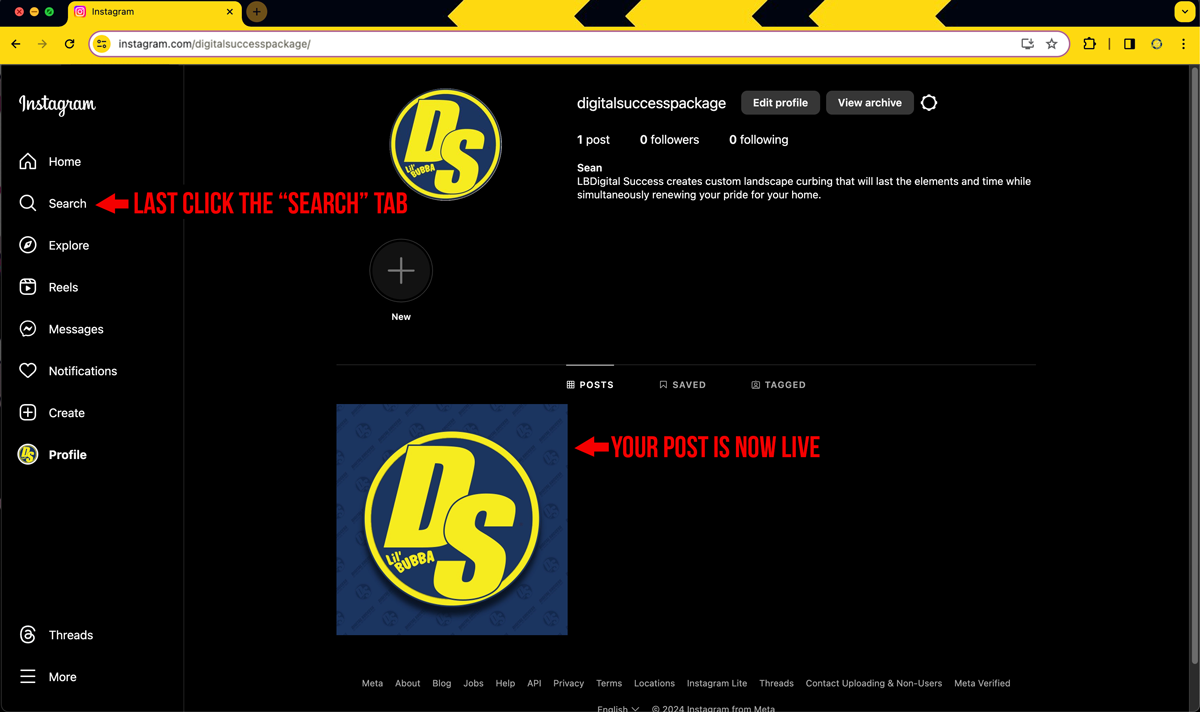
You will see your most recent post displayed in the preview window under your profile’s information. If by any chance you do not see your post displayed, simply refresh the browser as in some cases it may take an additional few moments to go live.
As we discussed briefly earlier, you can at anytime look for other accounts on Instagram to follow. To get started, go to the Search tab on the left of the browser window and click it (Image 19).
(Image 19)
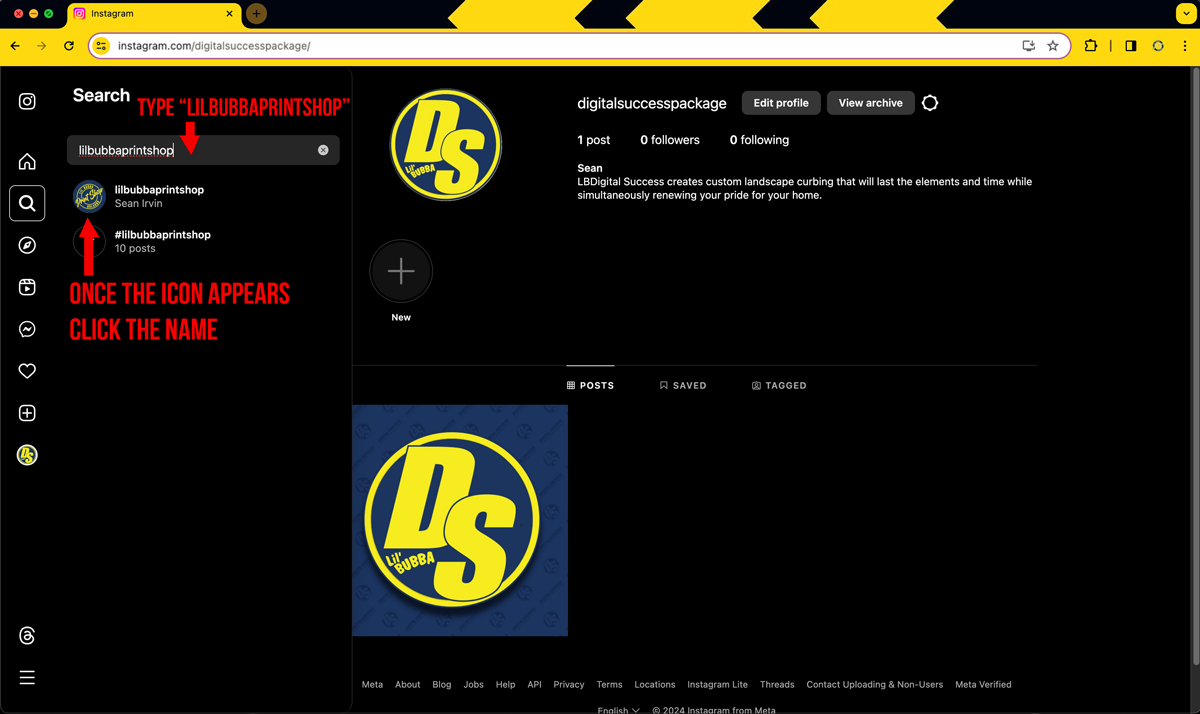
After clicking the Search tab, a pop-out window will appear from the left of the screen displaying a Text Search where you can type people’s names, their Instagram id, or business names. As you type, suggestions will appear and your search will narrow. Once you have found your target, click the icon just to the left of their posted name (Image 20).
For our tutorial today, type in, or copy and paste, LilBubbaPrintShop, with no spaces between the individual words. Once you see the Print Shop Logo appear, click the logo to be taken to the Lil’ Bubba Print Shop Instagram Page (Image 21).
(Image 20)
Once the page loads, go to the top of the screen and click the blue Follow button to add us to your friends list. Directly next to that you will see a Message button where you can send us a message and let us know you just finished this tutorial (Image 21).
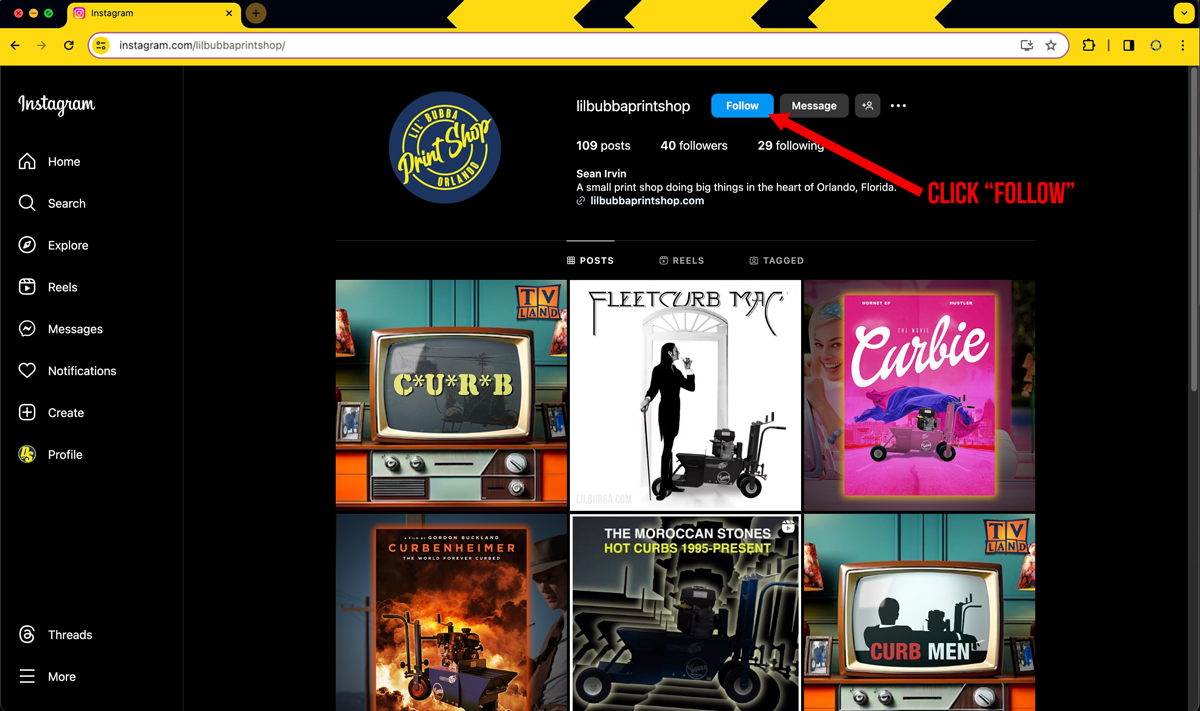
(Image 21)
Great job, you have now created an Instagram Account, made your first Instagram Post, and added your first Instagram Friend. I hope this tutorial helped and be sure to check back for more tutorials from the Lil’ Bubba Print Shop.