How to Access Google My Business
Accessing your Google My Business account through your brand new Google Chrome account is easy and provides you with access to many other tools as well. Through your Google My Business account, you can read reviews, answer online messages, upload images of your work and so much more. During this tutorial we will find where to go to get to your new account and learn how to upload/change images, logo and even our Google Cover Photo. After you are logged into Chrome with your new account credentials, you should have a new page that looks similar to the screenshot below.
(Image 1).
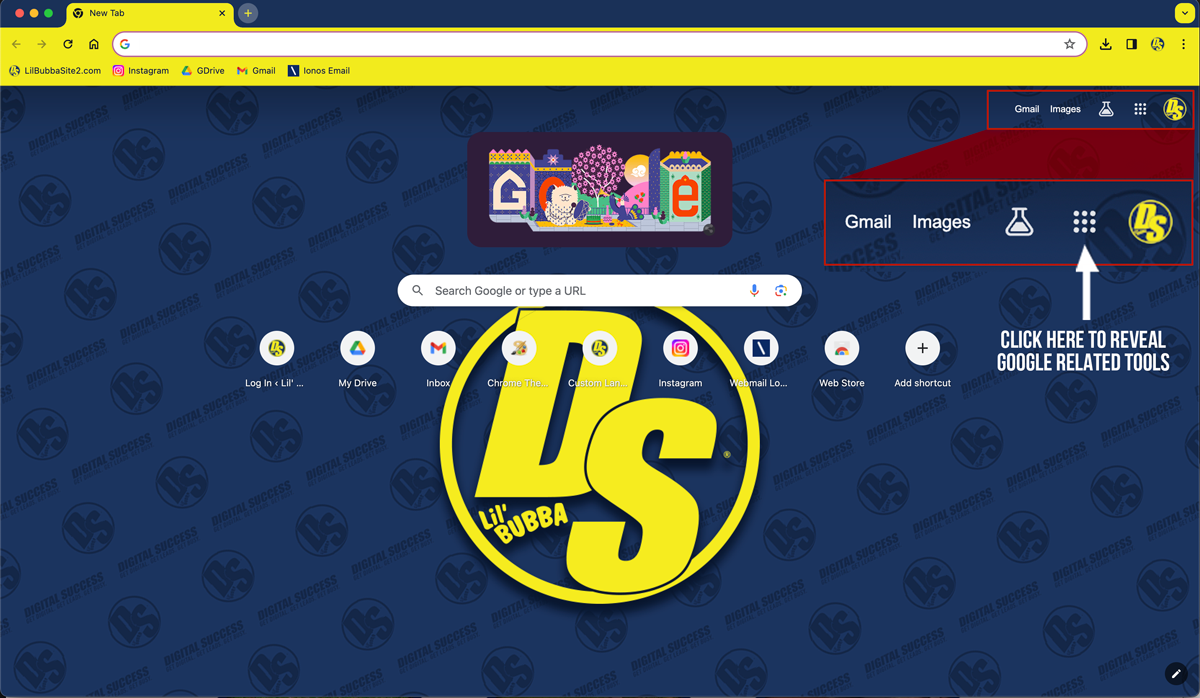
(Image 1)
Now that you know this is here, be sure to comeback and look through each of the offerings as there are many things from calendars to spreed sheet builders available to you 24 hours a day. However, for this tutorial we are focusing on the Google My Business button, with the icon of a shop awning in blue. Yours might be further down in the menu so once you locate it, please click the button. (Image 2).
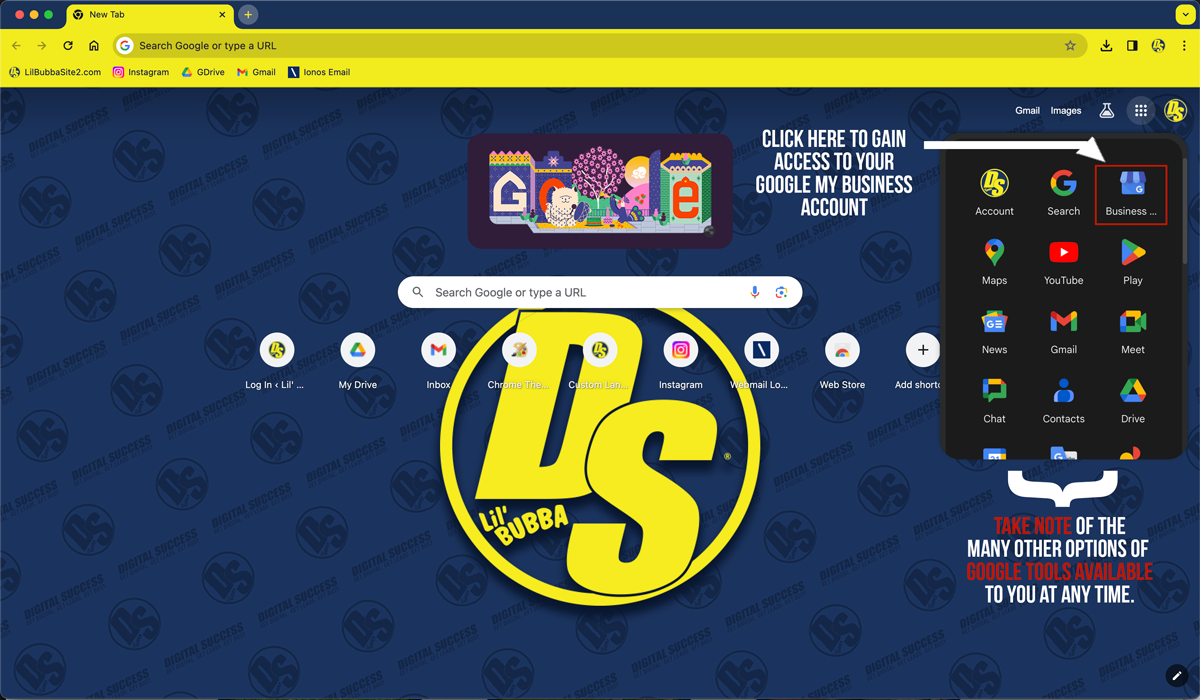
(Image 2)
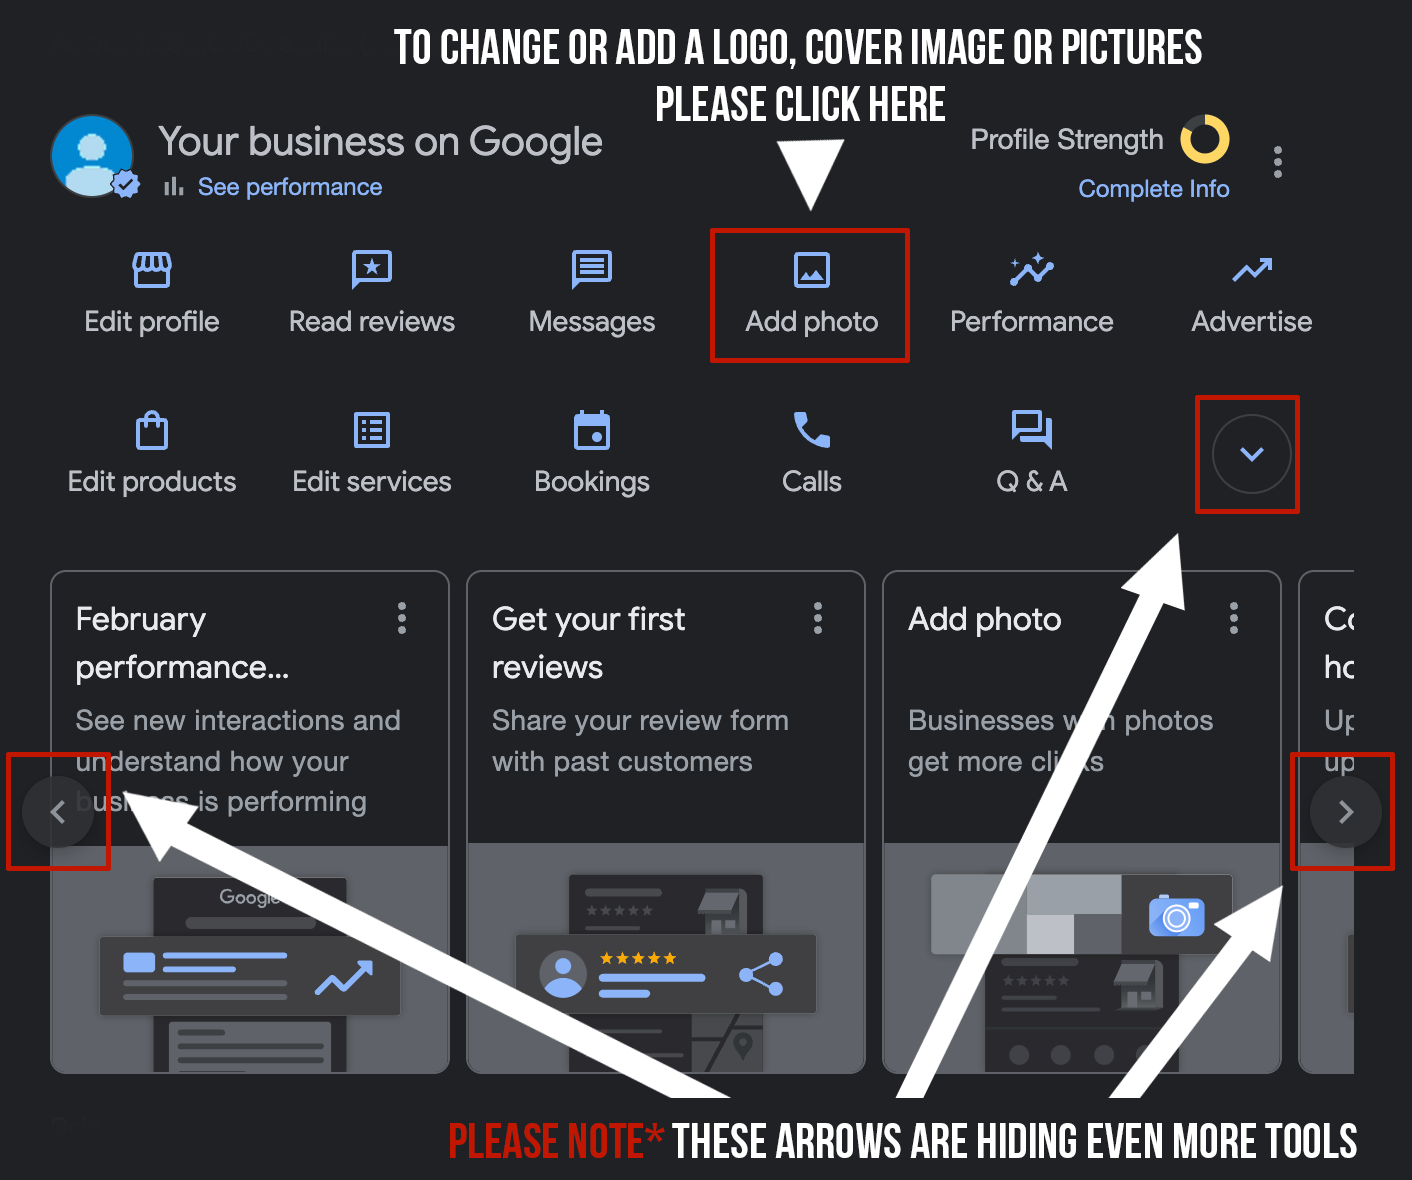
After clicking the icon your screen will load something similar as you see in the image below (Image 3). There are two main window here.
Window on the left is the many different tools that come along with the Google My Business app. Take a look and familiarize yourself with the options as each one is tailored to help you grow your business.
Window on the right is similar to how your business listing will appear when someone finds your business in a search. Here your website will have a link through a button as well as a call button for guests to call you directly. You can also adjust your business hours for any reason you may find.

(Image 3)
After you have looked around at the offered tools, lets focus on the Add Photos button to continue with your tutorial. Click the Add Photos button to begin. First we will upload new images of your work to the account for potential clients to review
(Image 4).
(Image 4)
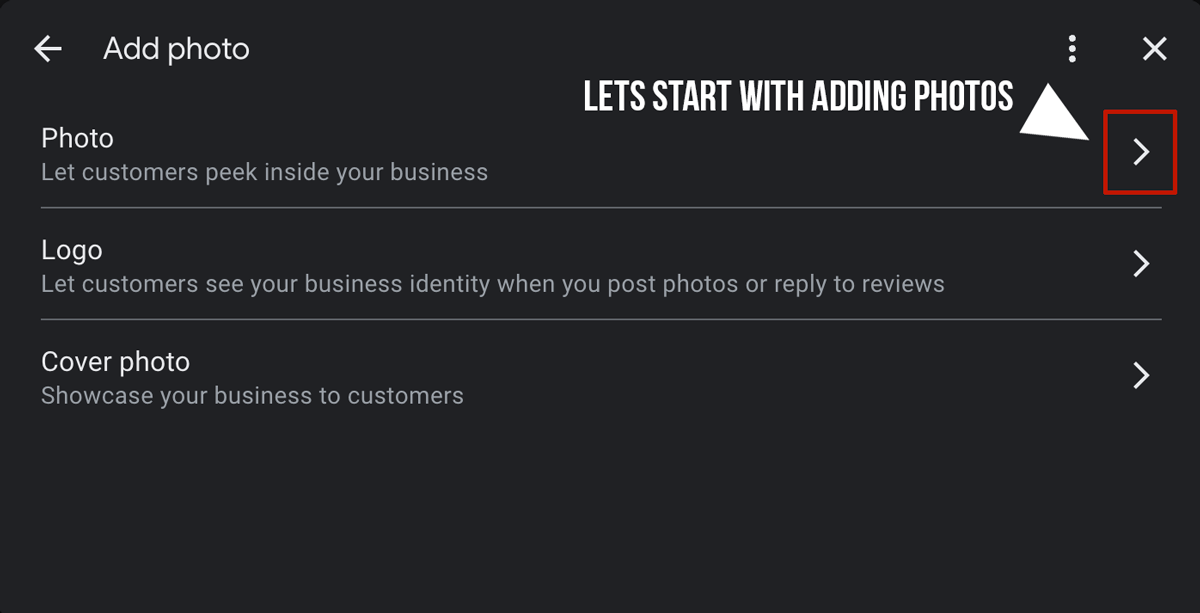
After clicking the Add Photos button, you will see the following window appear on your screen. This window is the same for changing your Logo and Cover Photo as well but to start, we are going to click the arrow to the far right of the Photo option. (Image 5).
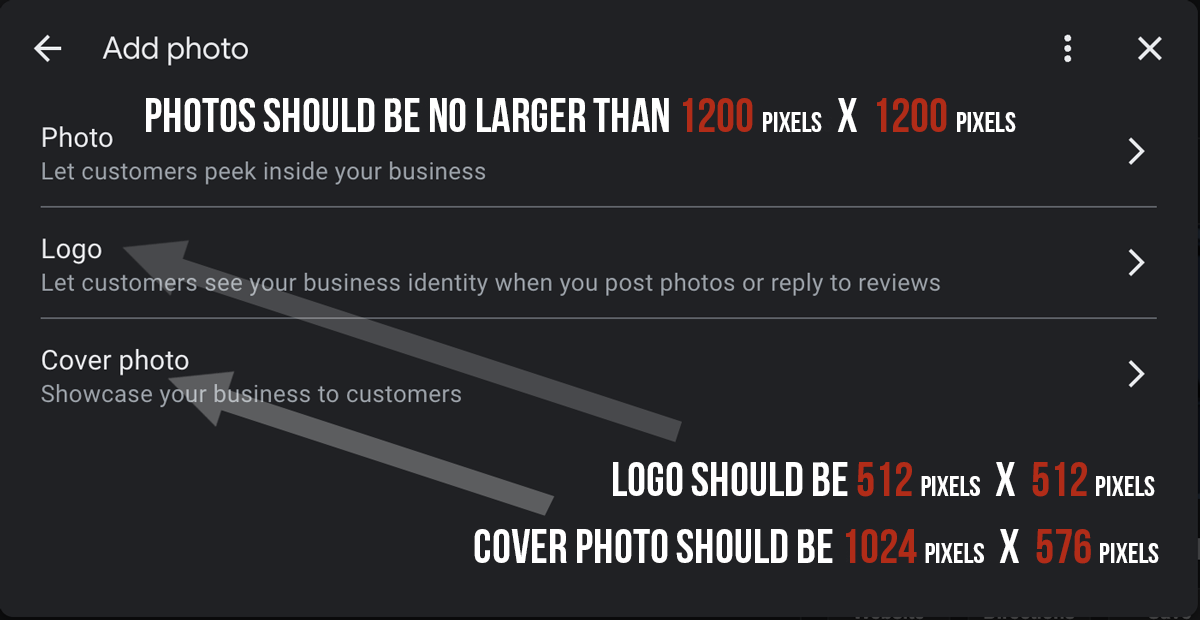
(Image 5)
(Image 6)
After clicking the arrow button on the far right, you will then have another window pop up that will allow you to upload your images.
I strongly suggest having a organized folder on your computer that contains your images of your work (i.e. Curbing Pictures, Walkway Pictures, etc.). This is a good practice to get into as it will make the next few steps even easier for you (Image 7).

(Image 7)
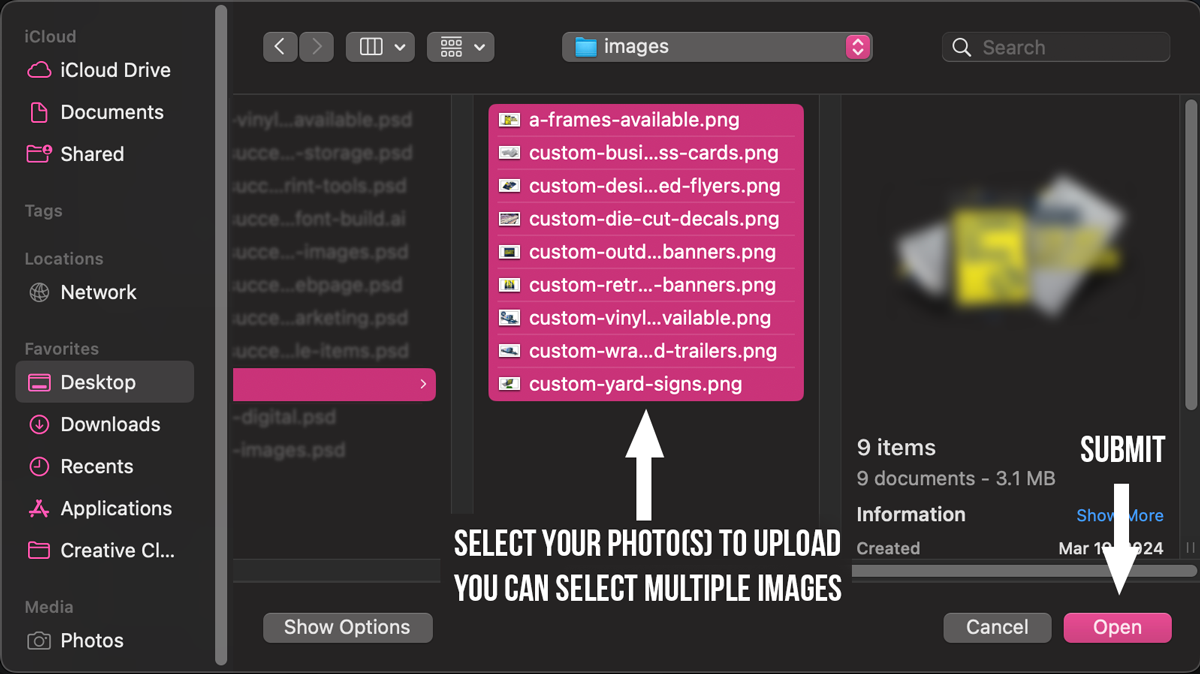
Now click the Select photos or videos button, as seen above (Image 7). Once you have done this a window will appear allowing you to navigate the contents of your computer. If your images are neatly in the folder you prepared, then simply navigate to their location and open the folder (Image 8).
You can upload multiple images here at a time, just know that the more images you choose, the longer the upload time will take. After you have selected your images click the open button or it’s equivalence on Windows.
Please Note*** if you are working on a Windows computer your window may appear different than the example as the example image was taken from a MAC computer.
(Image 8)
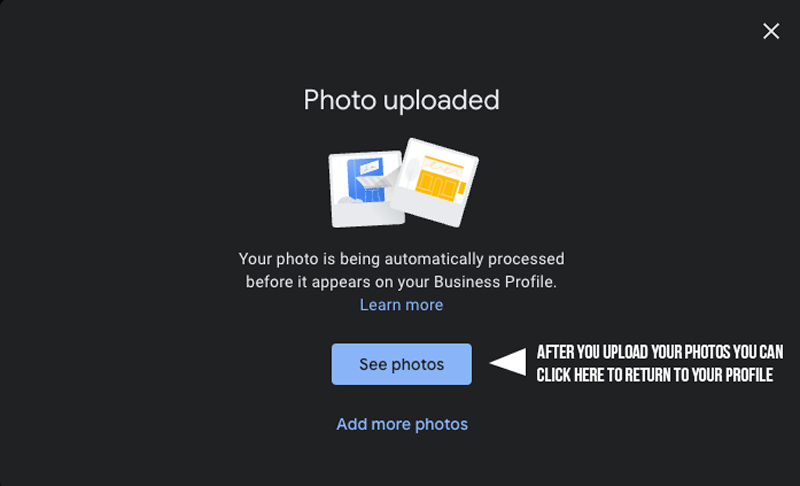
After submitting your new photos to the account, another window will appear similar to the image below (Image 9). You can now click the See photos button to (in theory) be taken to a screen that will display the images you have uploaded.
However, if you are met with a black screen, do not panic as this is a common issue. Simply navigate back to the home screen of the Google My Business menu we accessed on (Image 3) above in this tutorial. Rest assured your images have uploaded to your account and are live now.
(Image 9)
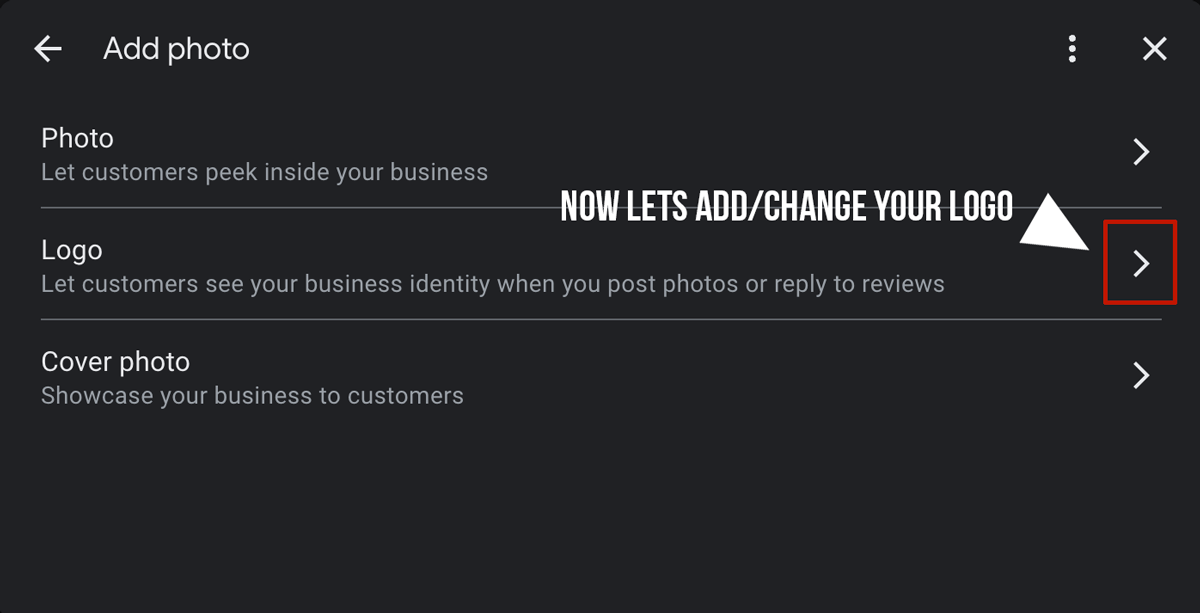
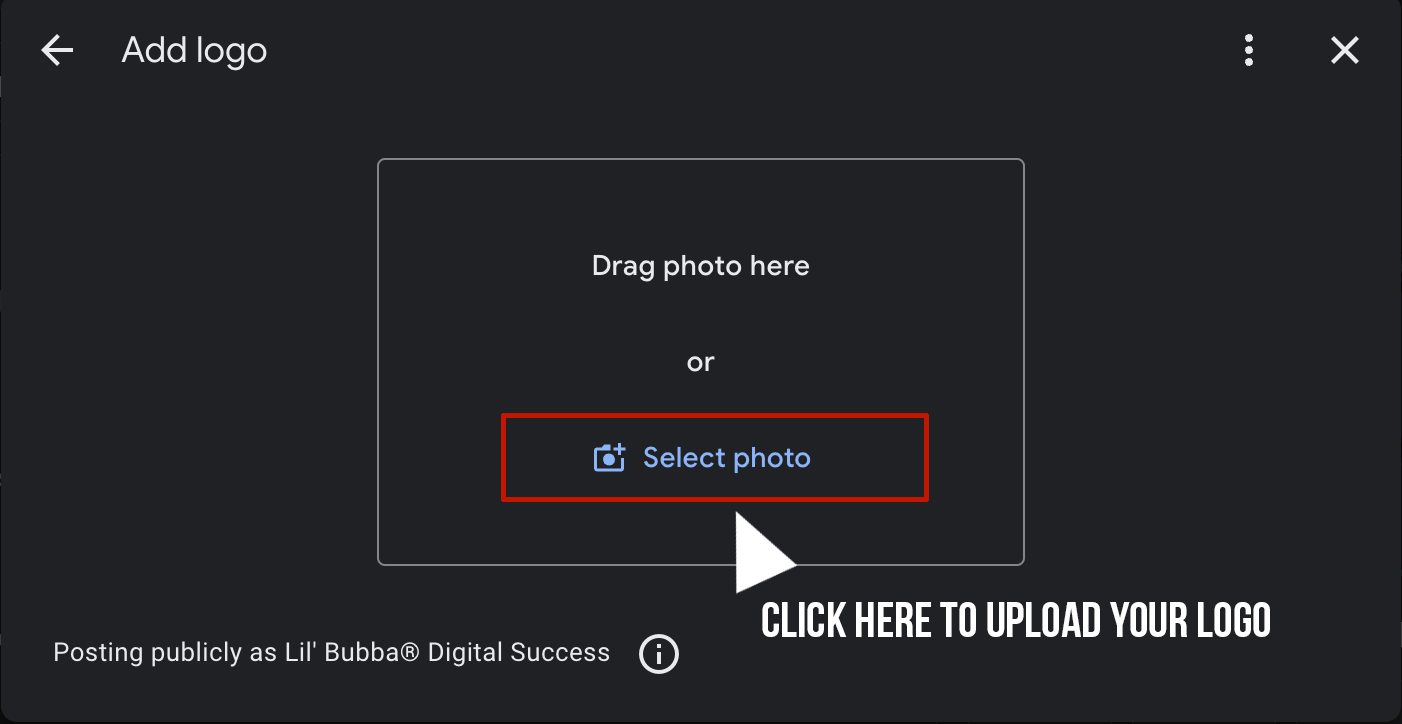
Now that you are back to the Google My Business homepage again, we are going to repeat the previous step of clicking the Add photos button again to be taken back to the following screen (Image 10), but this time we will be clicking the arrow to the right of the Logo option.
For all online logos/social media icons the recommended size is 512px x 512px (pixels). This is a universal truth so if you have your logo set to this size you are good to go anywhere (i.e. Instagram, Facebook, TikTok, etc.). Anything larger than this may cause some cropping of the image.
(Image 10)
Similar as before when we added images, you will again be met with the following window. Press the Select photo button again to add/change your logo in your account (Image 11).
(Image 11)
After clicking the Select photo button, a window will appear allowing you to navigate your computer. If you have your logo safely placed in a folder on your computer, simply navigate to it’s location and select the logo you want to use and click open or the Windows equivalent (Image 12).
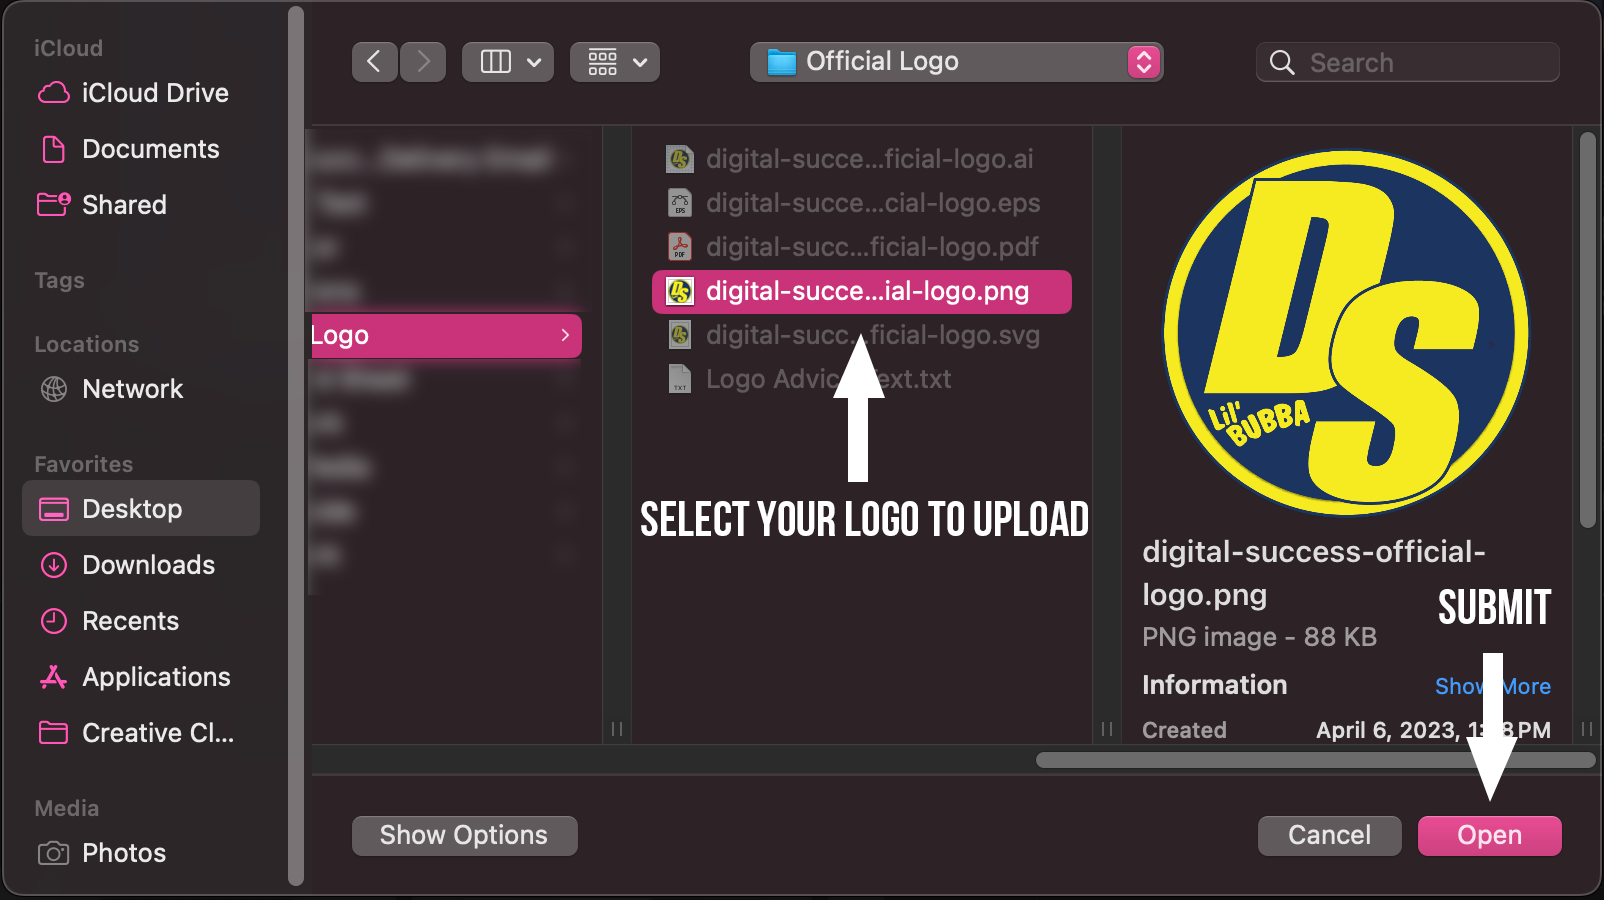
(Image 12)
Once you click submit of the logo another window will appear. If you have properly sized your image to 512px x 512px then you should have no reason to crop the image. Once the image displays in the manor that you choose, then click the Save button, to launch your Logo on your account (Image 13).
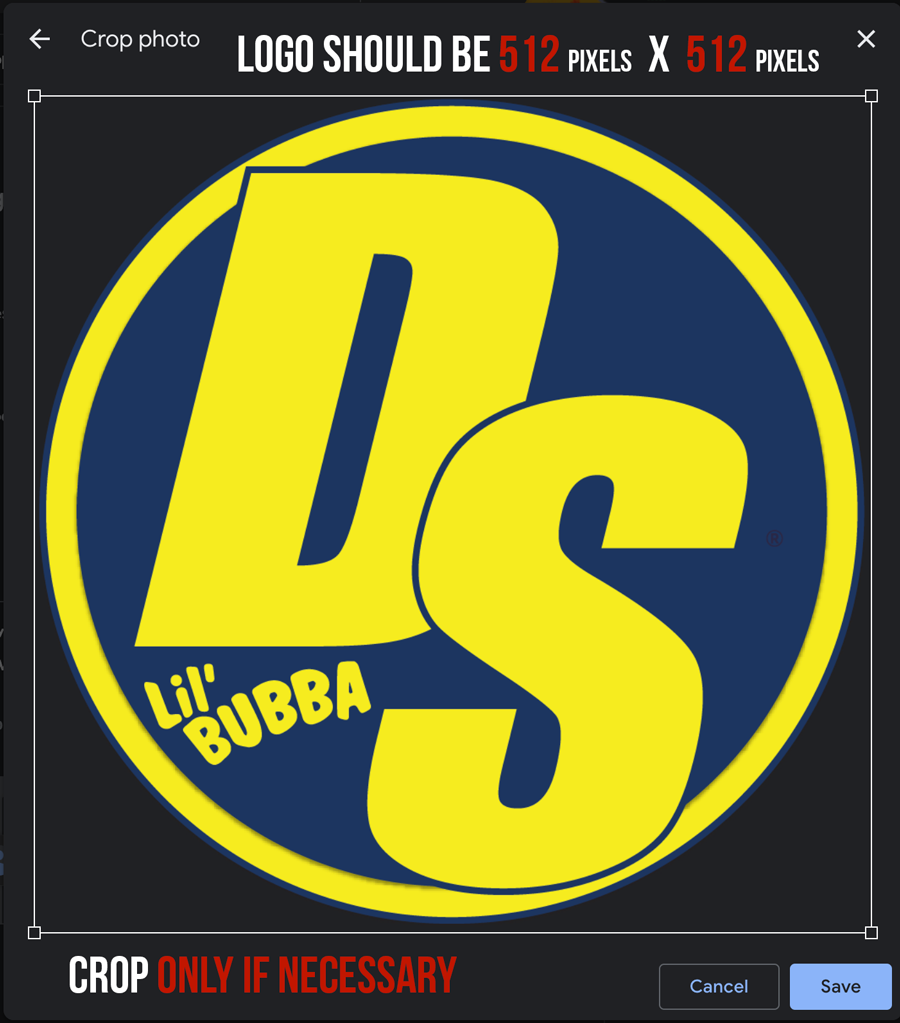
(Image 13)
After submitting your new logo to the account, another window will appear similar to the image below (Image 14). You can now click the See logo button to (in theory) be taken to a screen that will display the logo you have uploaded.
However, if you are met with a black screen, do not panic as this is a common issue. Simply navigate back to the home screen of the Google My Business menu we accessed on (Image 3) above in this tutorial. Rest assured your images have uploaded to your account and are live now.
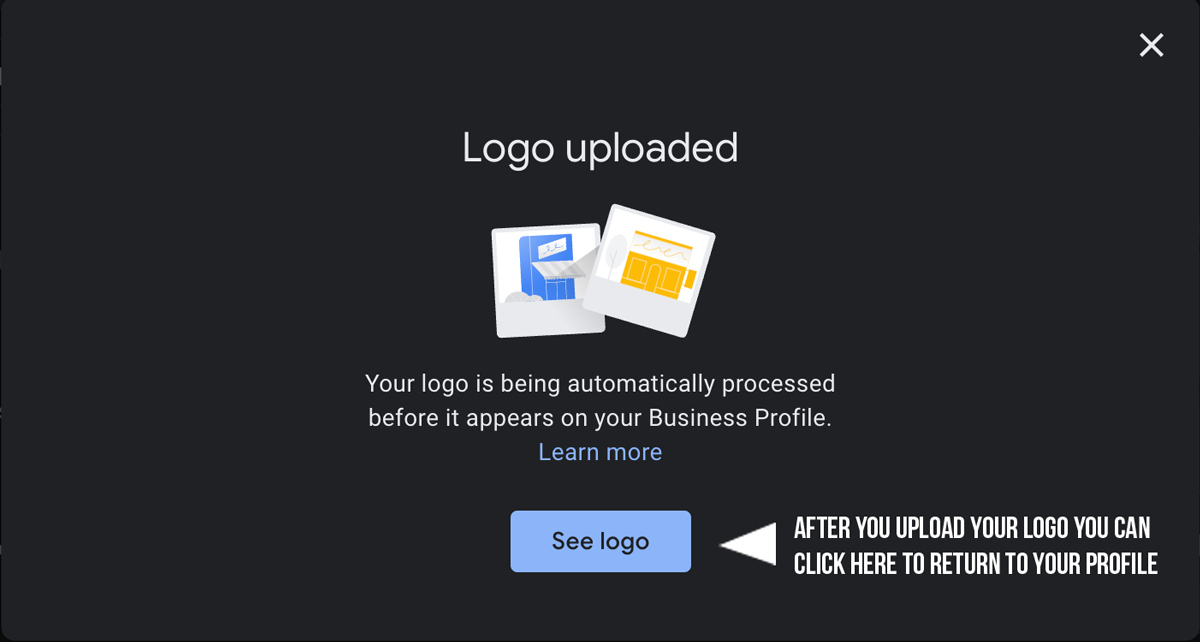
(Image 14)
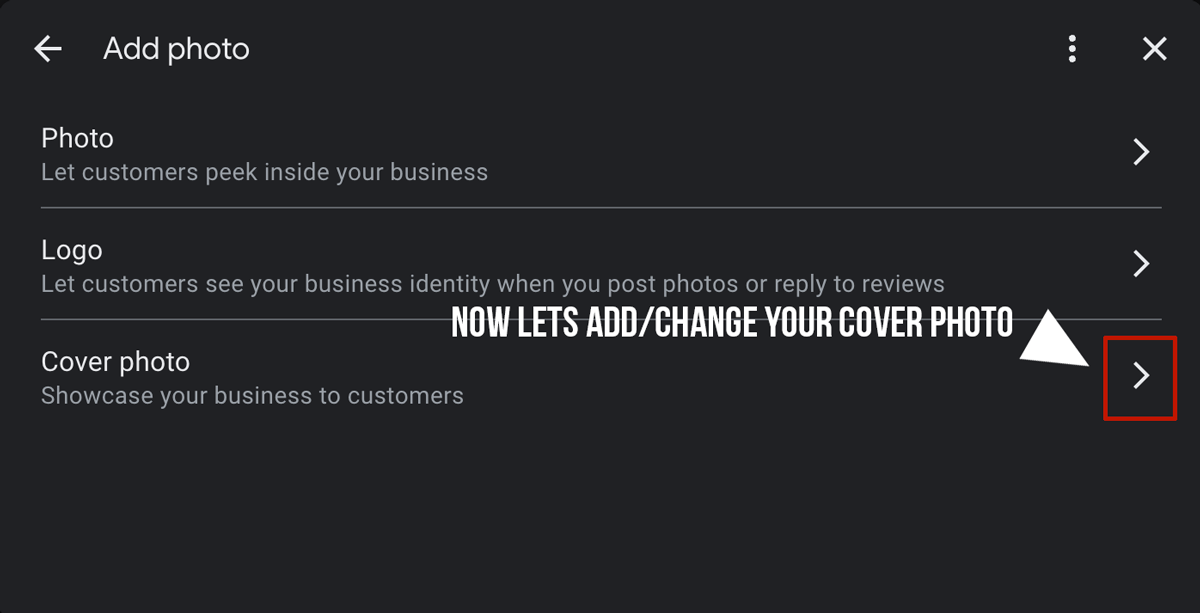
Now again navigate back to the Google My Business homepage again, we are going to repeat the previous step of clicking the Add photo button again to be taken back to the following screen (Image 15), but this time we will be clicking the arrow to the right of the Cover photo option.
For the Google Cover Photo the recommended size is 1200px x 576px (pixels). This sizing is specific to the Google My Business Cover Photo so for other platforms this image may not be suitable. Always check your dimensions before uploading images to social media platforms.
(Image 15)
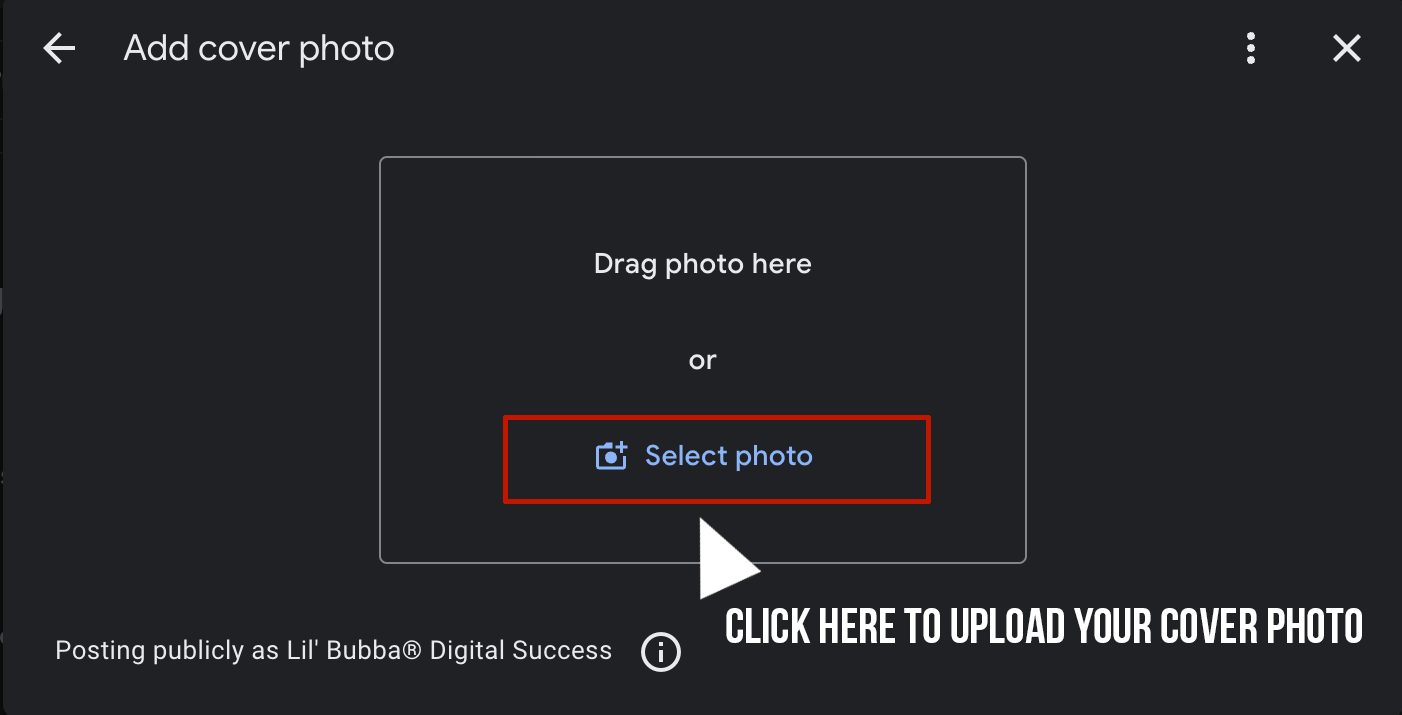
Similar as before when we added images and a logo, you will be met with the following window. Press the Select photo button again to add/change your logo in your account (Image 16).
(Image 16)
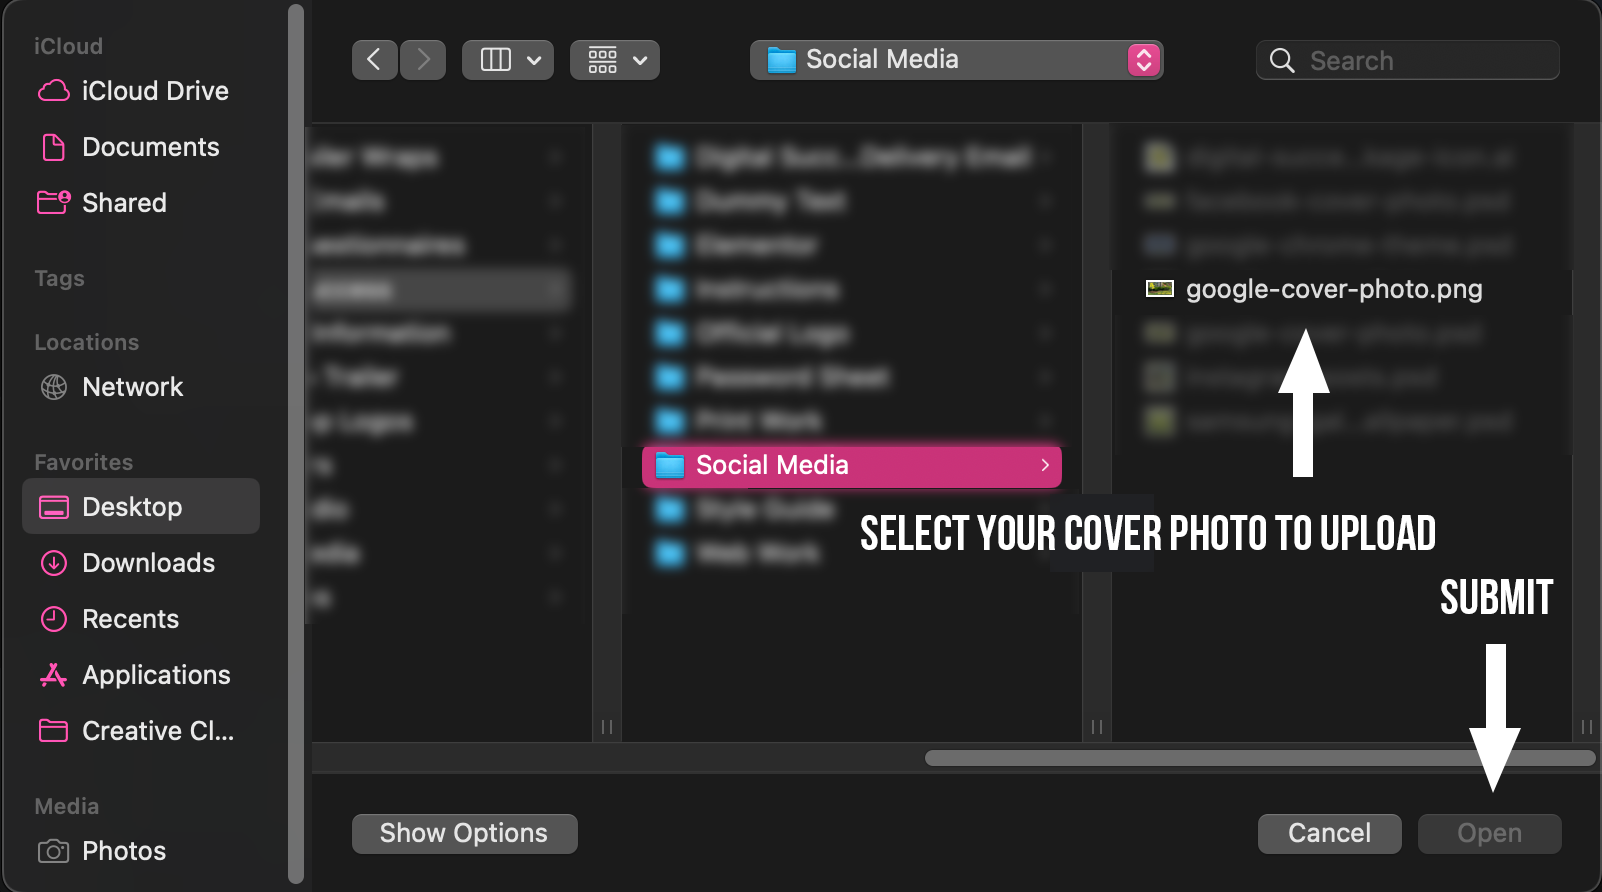
After clicking the Select photo button, a window will appear allowing you to navigate your computer. If you have your Cover photo safely placed in a folder on your computer, simply navigate to it’s location and select the Cover photo you want to use and click open or the Windows equivalent (Image 17).
(Image 17)
Once you click submit of the Cover photo another window will appear. If you have properly sized your image to 1024px x 576px then your image will load properly into place on your account. Click the Save button, to launch your Logo on your account (Image 17).
(Image 18)
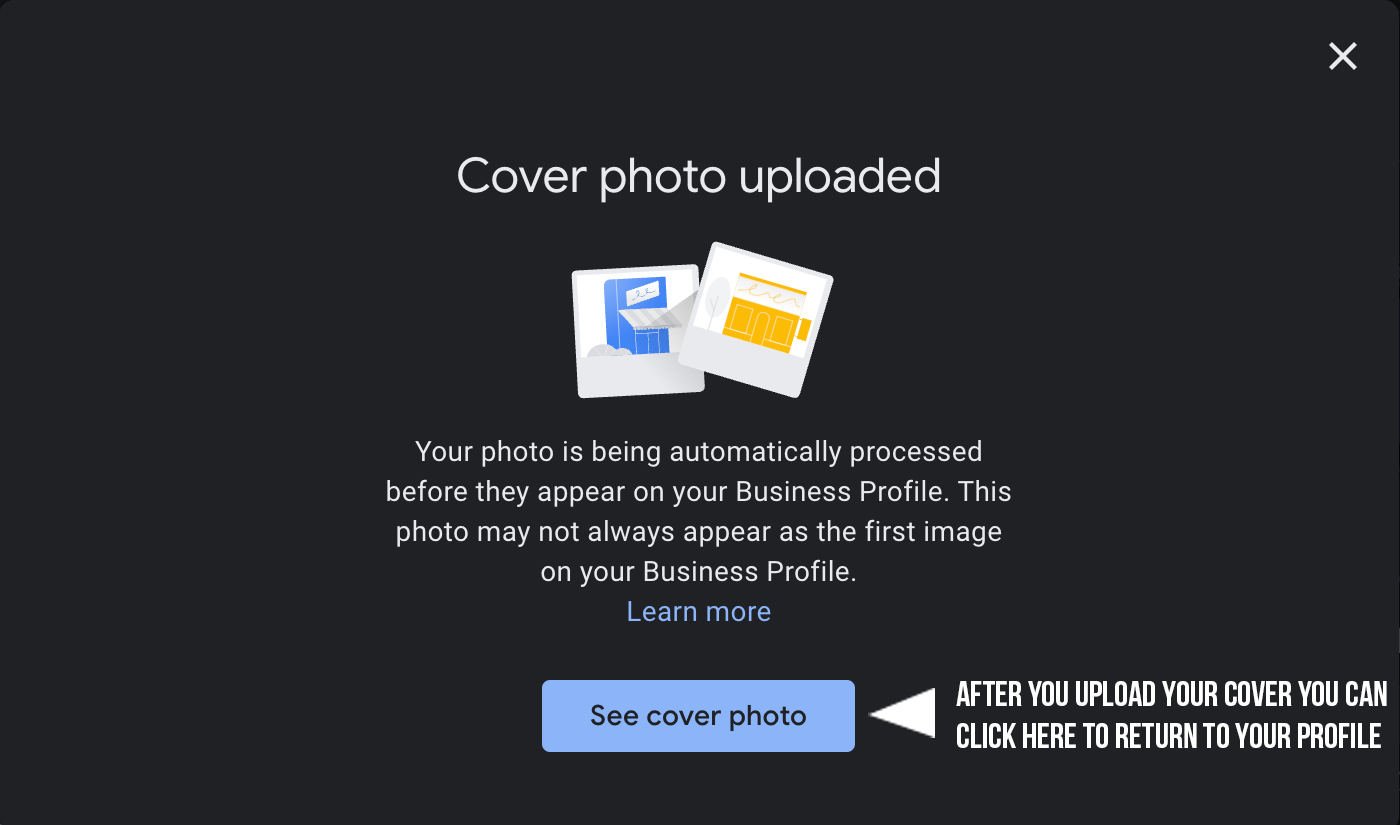
After submitting your new Cover photo to the account, another window will appear similar to the image below (Image 18). You can now click the See cover photo button to (in theory) be taken to a screen that will display the logo you have uploaded.
However, if you are met with a black screen, do not panic as this is a common issue. Simply navigate back to the home screen of the Google My Business menu we accessed on (Image 3) above in this tutorial. Rest assured your images have uploaded to your account and are live now.
You have now effectively been introduced to your Google My Business account and added some photos, perhaps even a Cover photo or Logo. You can change your Cover photo any time you like but I would suggest not changing your Logo to often as your brand is distinctive and recognition goes a long way.
Be sure to check the Lil’ Bubba Print Shop website often for more tutorials helping you to get the most out of your Digital Success Package.