How to Change Images in Your Gallery
(Image 1)
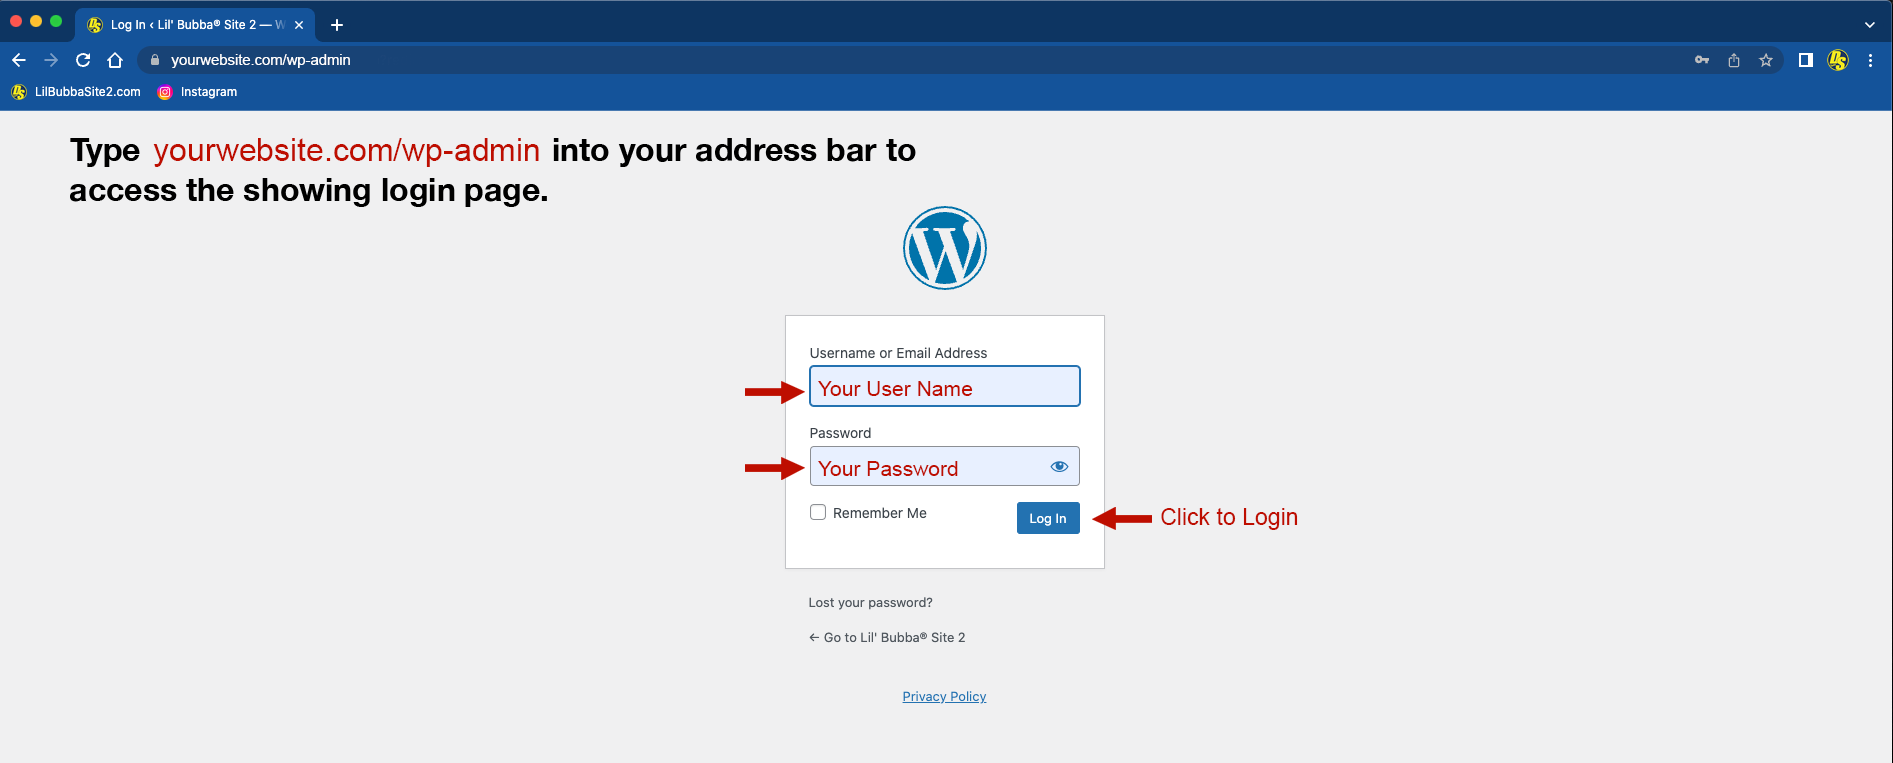
When you have arrive at this screen, enter the USERNAME and PASSWORD provided to you by the Lil’ Bubba Print Shop. Hit enter and wait for the next screen, Your Website Dashboard, to load completely.
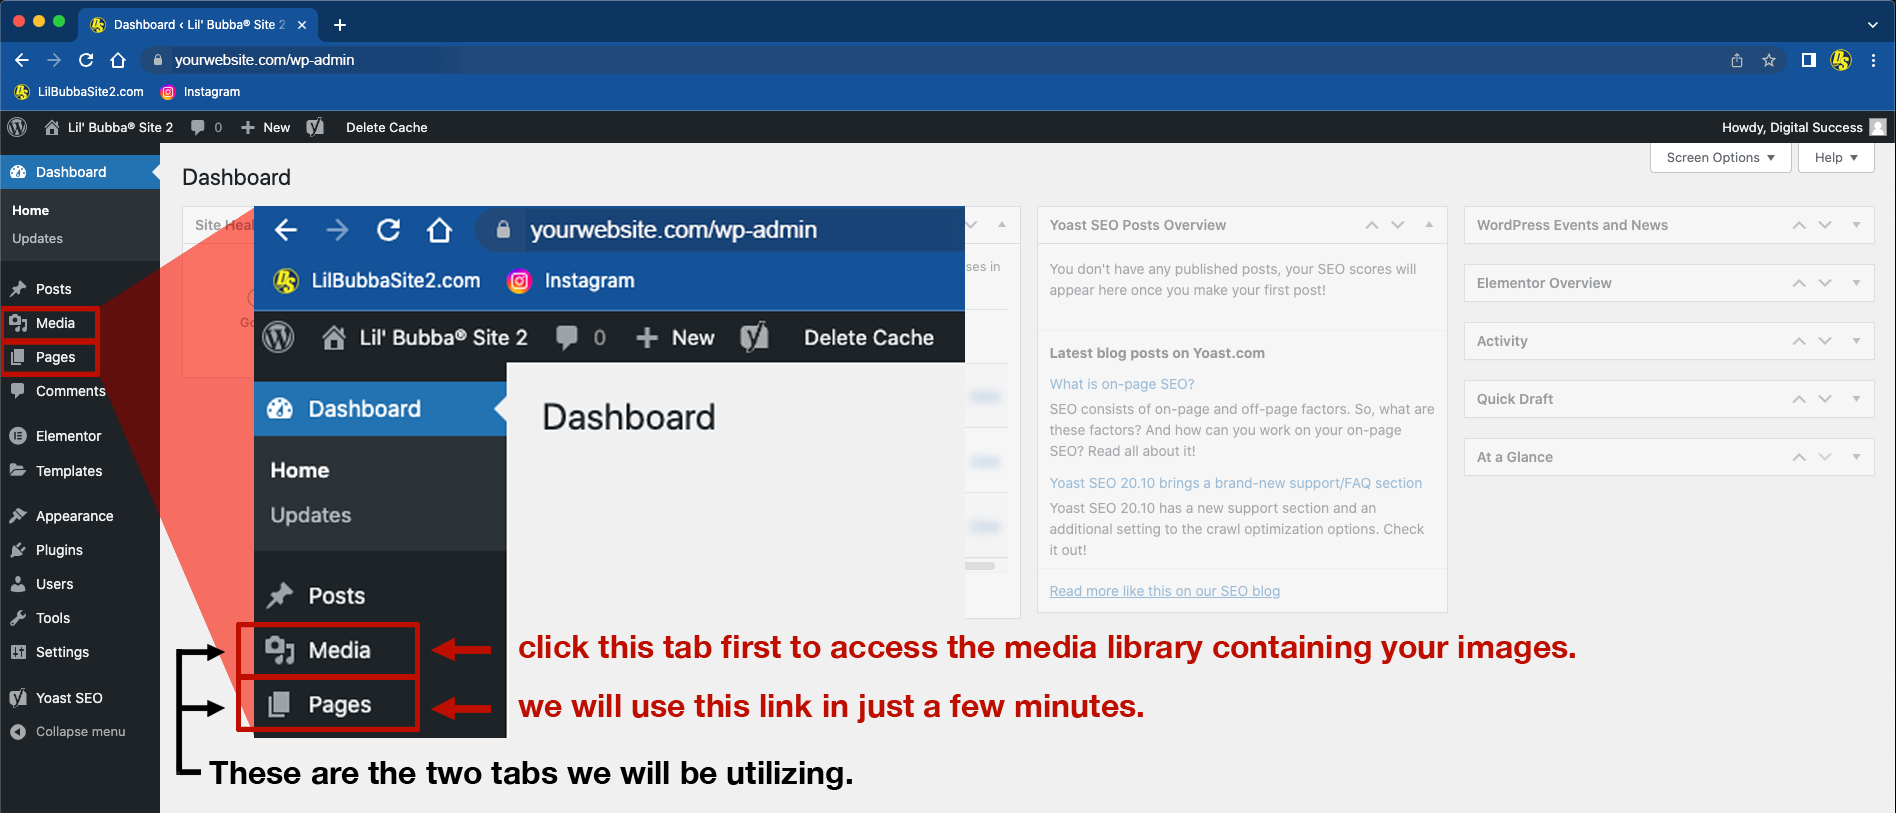
First, we will click the Media Tab to open the folder containing all the images that comprise your website. (Image 2).
(Image 2)
The Media Page will be the home of all images, videos, and/or PDFs that your website may contain. Here you can upload or delete your contents, but keep in mind; once it is deleted it is gone forever unless you have a backup.
You can upload one image or multiple images at a time. I suggest keeping all your images in a designated folder on your computer. This will make them easy to access when you are ready to transfer them to your site.
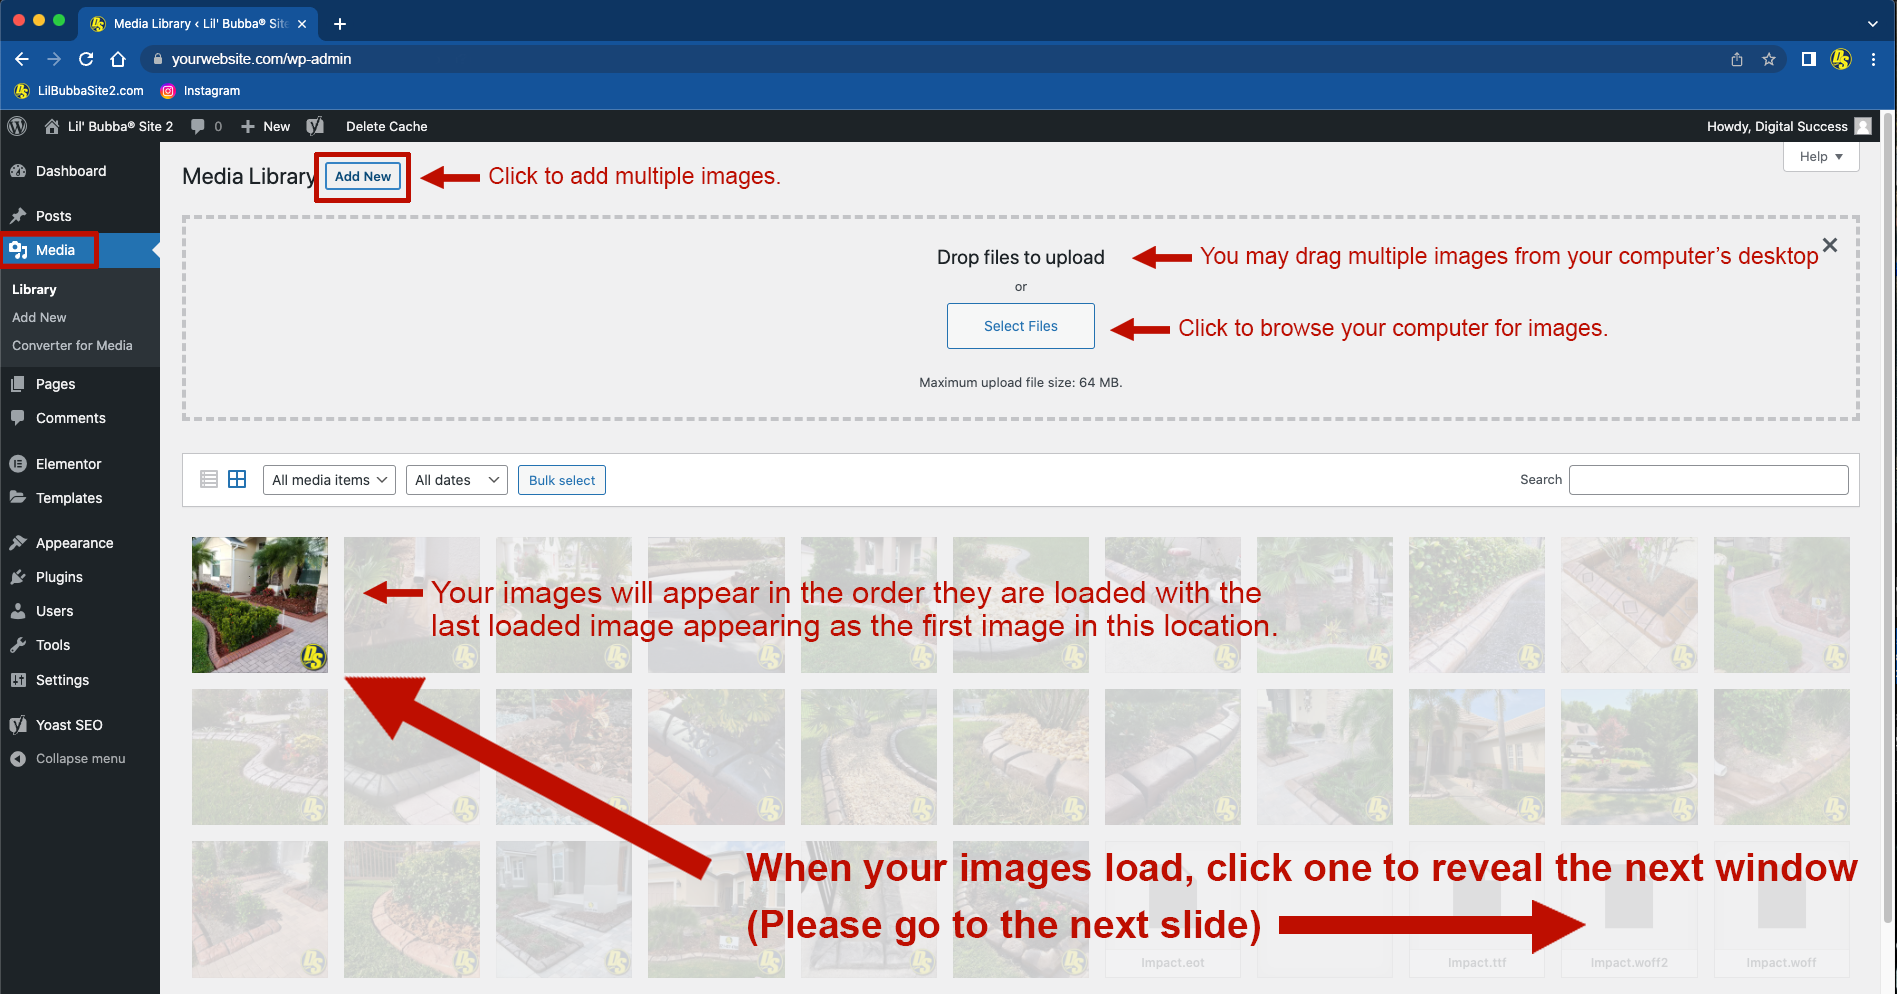
When your images are ready for upload, click the Add New button located in the top right of the Media Library screen. Once clicked, a box will appear with Drop file to upload and a button that reads Select Files. You may either drag, from your desktop, the images you have selected into this area or click the Select Files button to navigate to the location of your images on your computer. (Image 3).
(Image 3)
As your images load, they will appear from the top left of the screen and push to the right as each image loads.
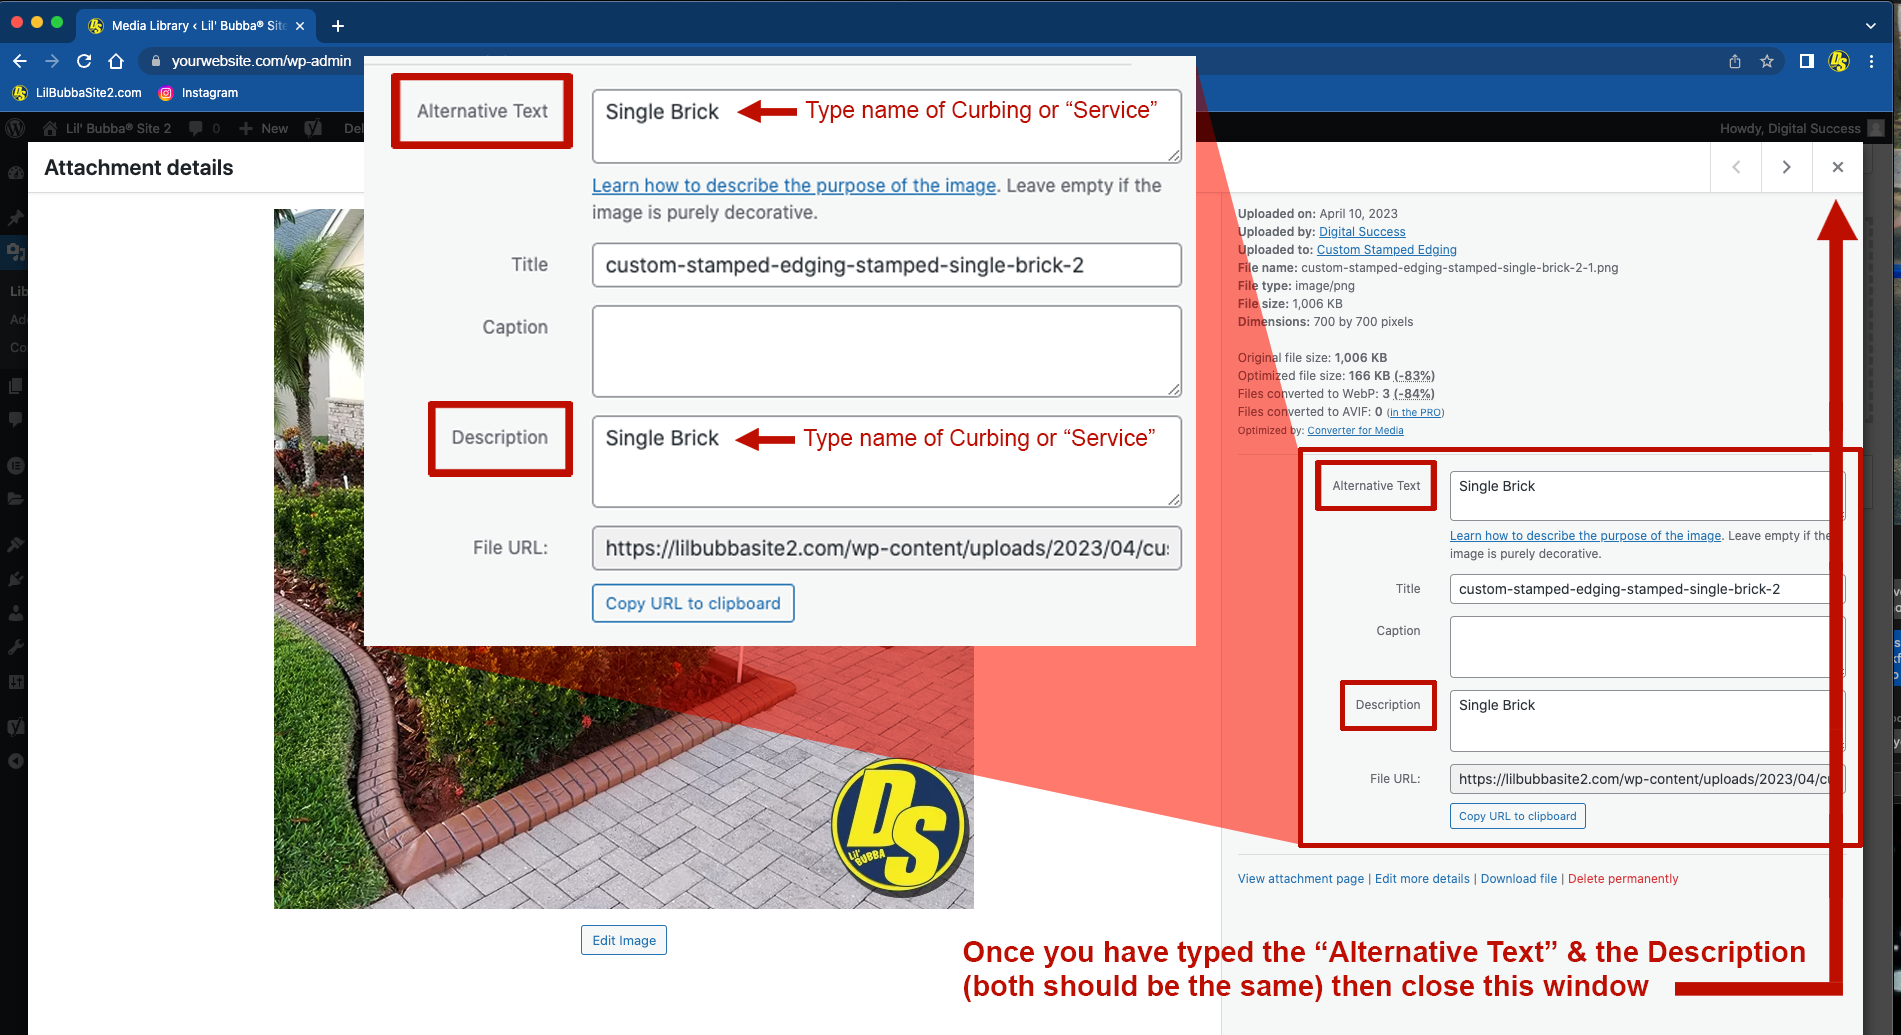
When all images have loaded you will then need to add text into both the Alternative Text area and the Description area as seen in Image 4. This is important for both accessibility of users and for SEO purposes of your website’s health.
You may be as detailed as you like here, but generally the name of the type of curbing in the image is sufficient for our purposes. You can use the arrows in the top right to navigate through the images in the gallery and once you have completed naming all your new images, you can then click the “X” button in the top right to close this window. (Image 4).
(Image 4)
Now that you have pre-loaded your new images into your Media Folder, you are ready to add them to your Gallery. There are two Galleries in your website pages, Moroccan Natural Stone and Custom Stamped Edging, so be sure to access the proper page on the next step.
To access the individual galleries, please click the Dashboard button, wait for the page to load, and then select the Pages button, both are located on the left-hand column of the Dashboard Menu. (Image 5).
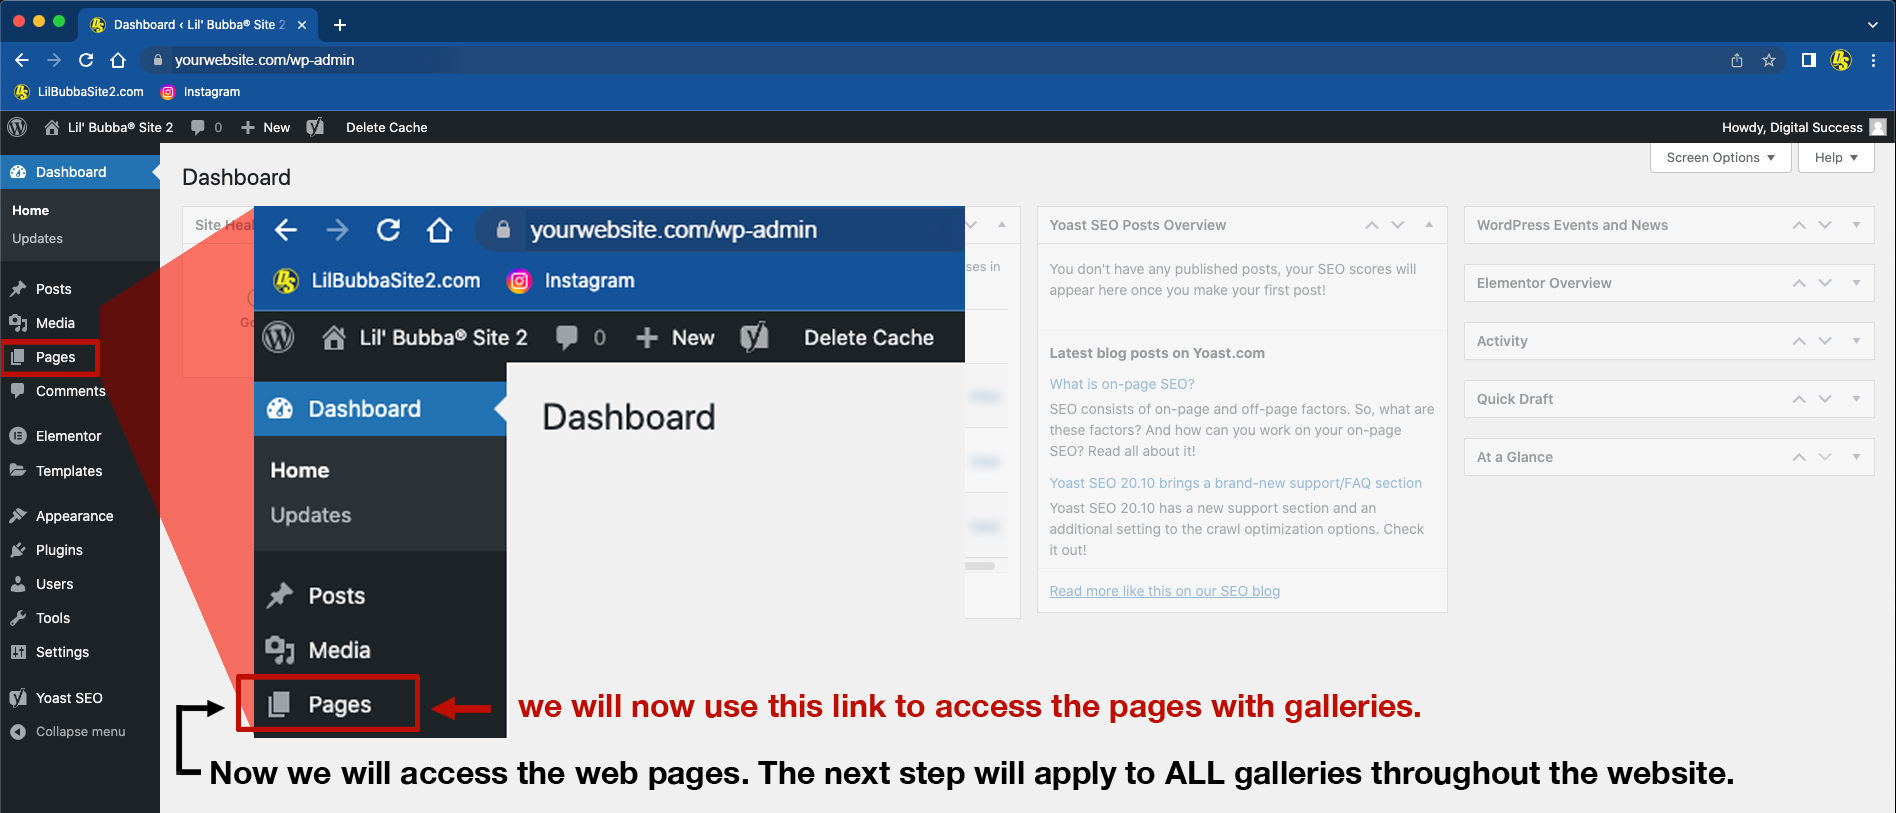
(Image 5)
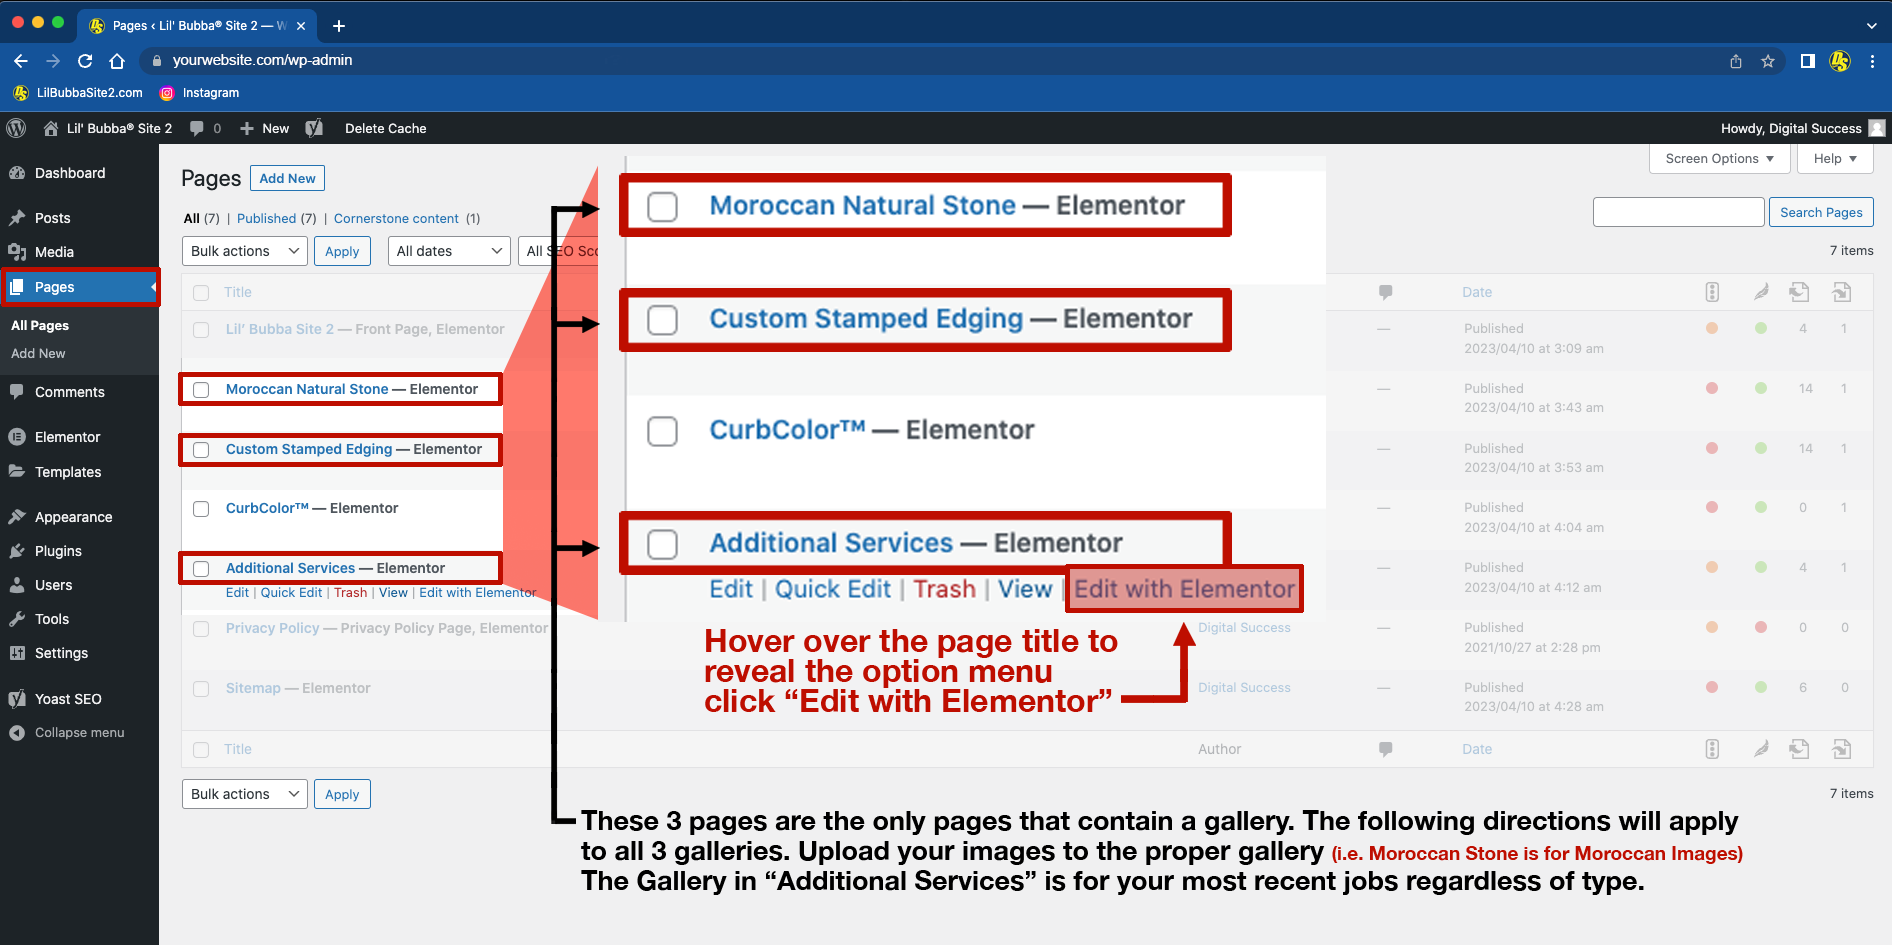
When the Pages window appears, you will see a listing of all the pages the make up your website. For our purposes here we are going to focus on the two pages that contain your galleries, Moroccan Natural Stone and Custom Stamped Edging pages, but keep in mind that there is a small, 4 image gallery located on your Additional Services page as well. The methods we use to change images in the galleries will be the same for the Additional Services page as well.
It is important that you know that while the website platform is built on WordPress, the actual site is built utilizing a plug-in titled Elementor Pro. This is important because when you are inside the page, you will be inside the Elementor Pro plug-in.
To access the individual page for editing, you will click the tab, located under the page name, that reads Edit with Elementor
(Image 6). Clicking this button will load an editable version of the page. No changes made to the page however, will be made until Additional Services has been pressed.
(Image 6)
Once the selected page has loaded you will notice the Header Section is greyed out. This is to prevent any edits to the header while in the individual page. Simply scroll down the page until you see the gallery section. (Image 7)
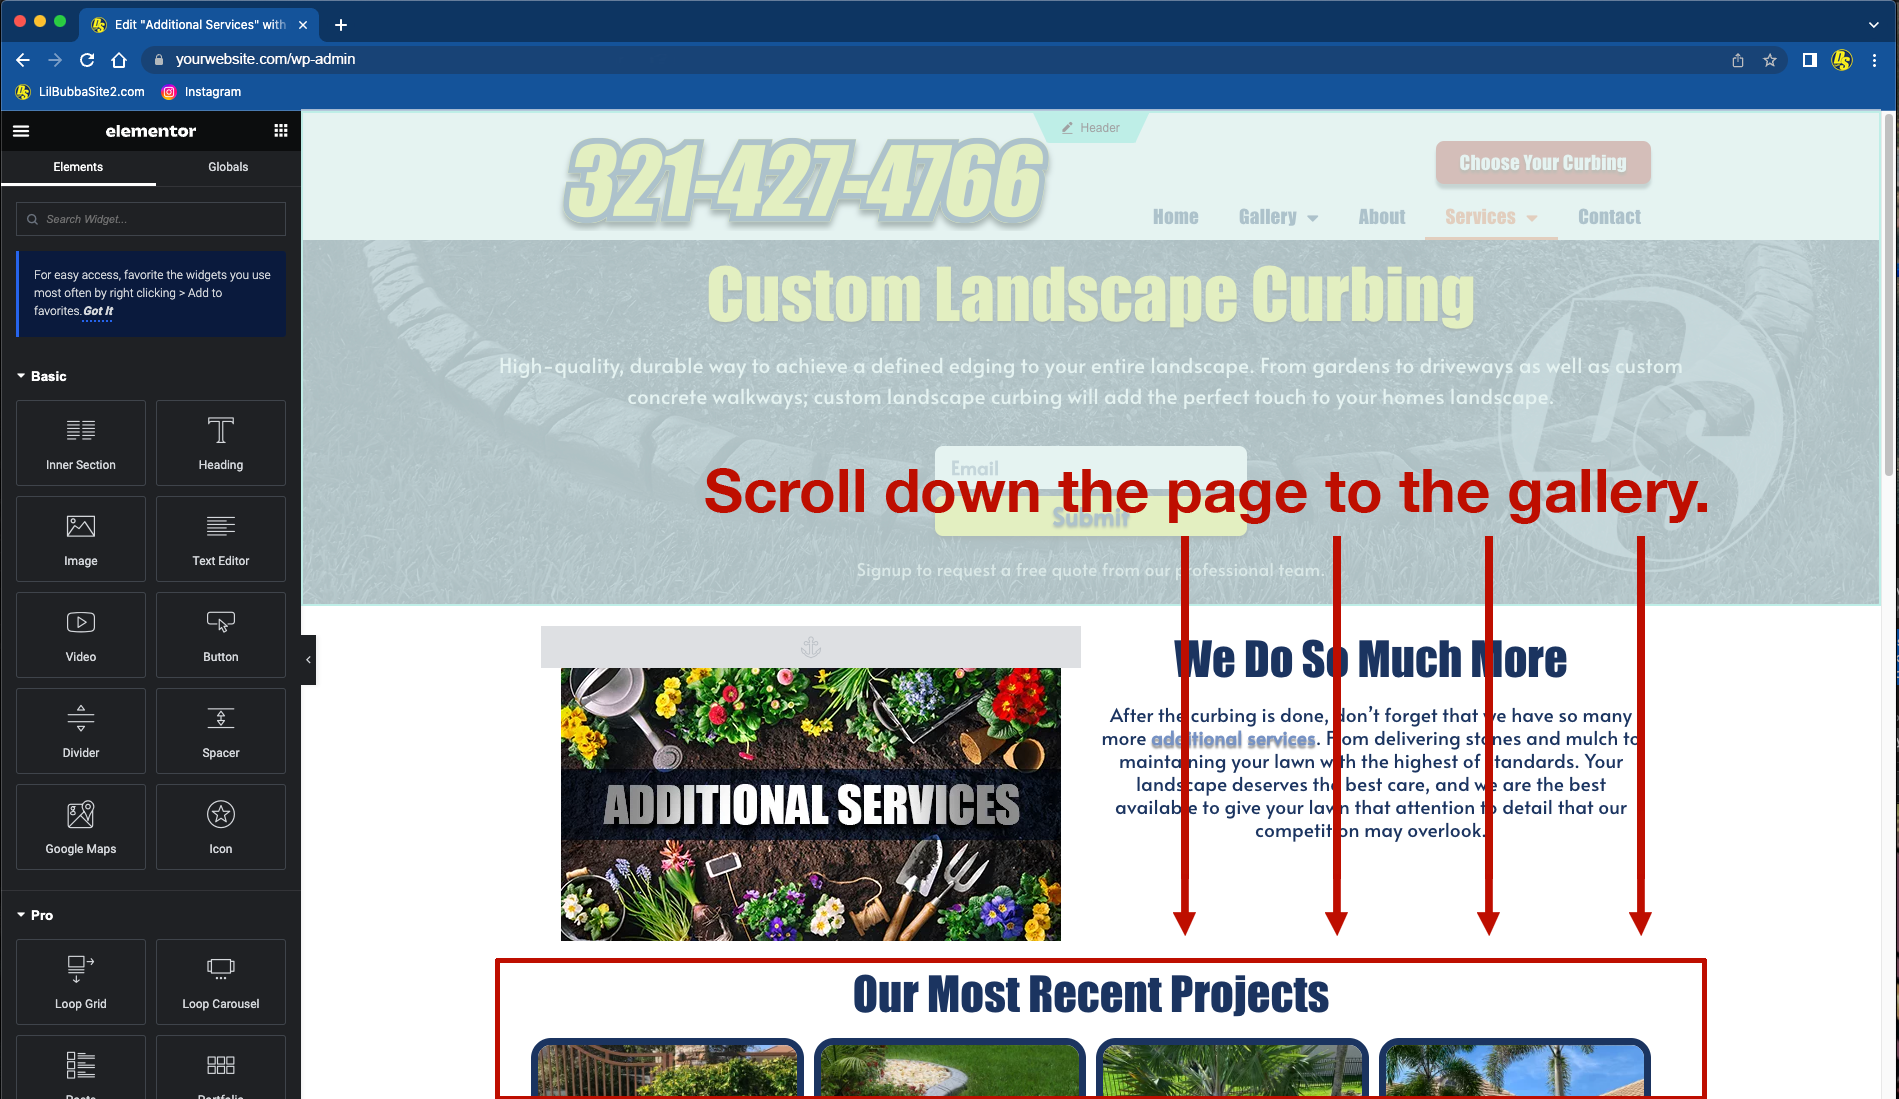
(Image 7)
Holding your cursor over the gallery section will make a thin box appear around the area signaling that it is editable. When this happens, navigate to the top right corner of the gallery section and click the Small “Pencil Icon” Box in the right corner. (Image 8).
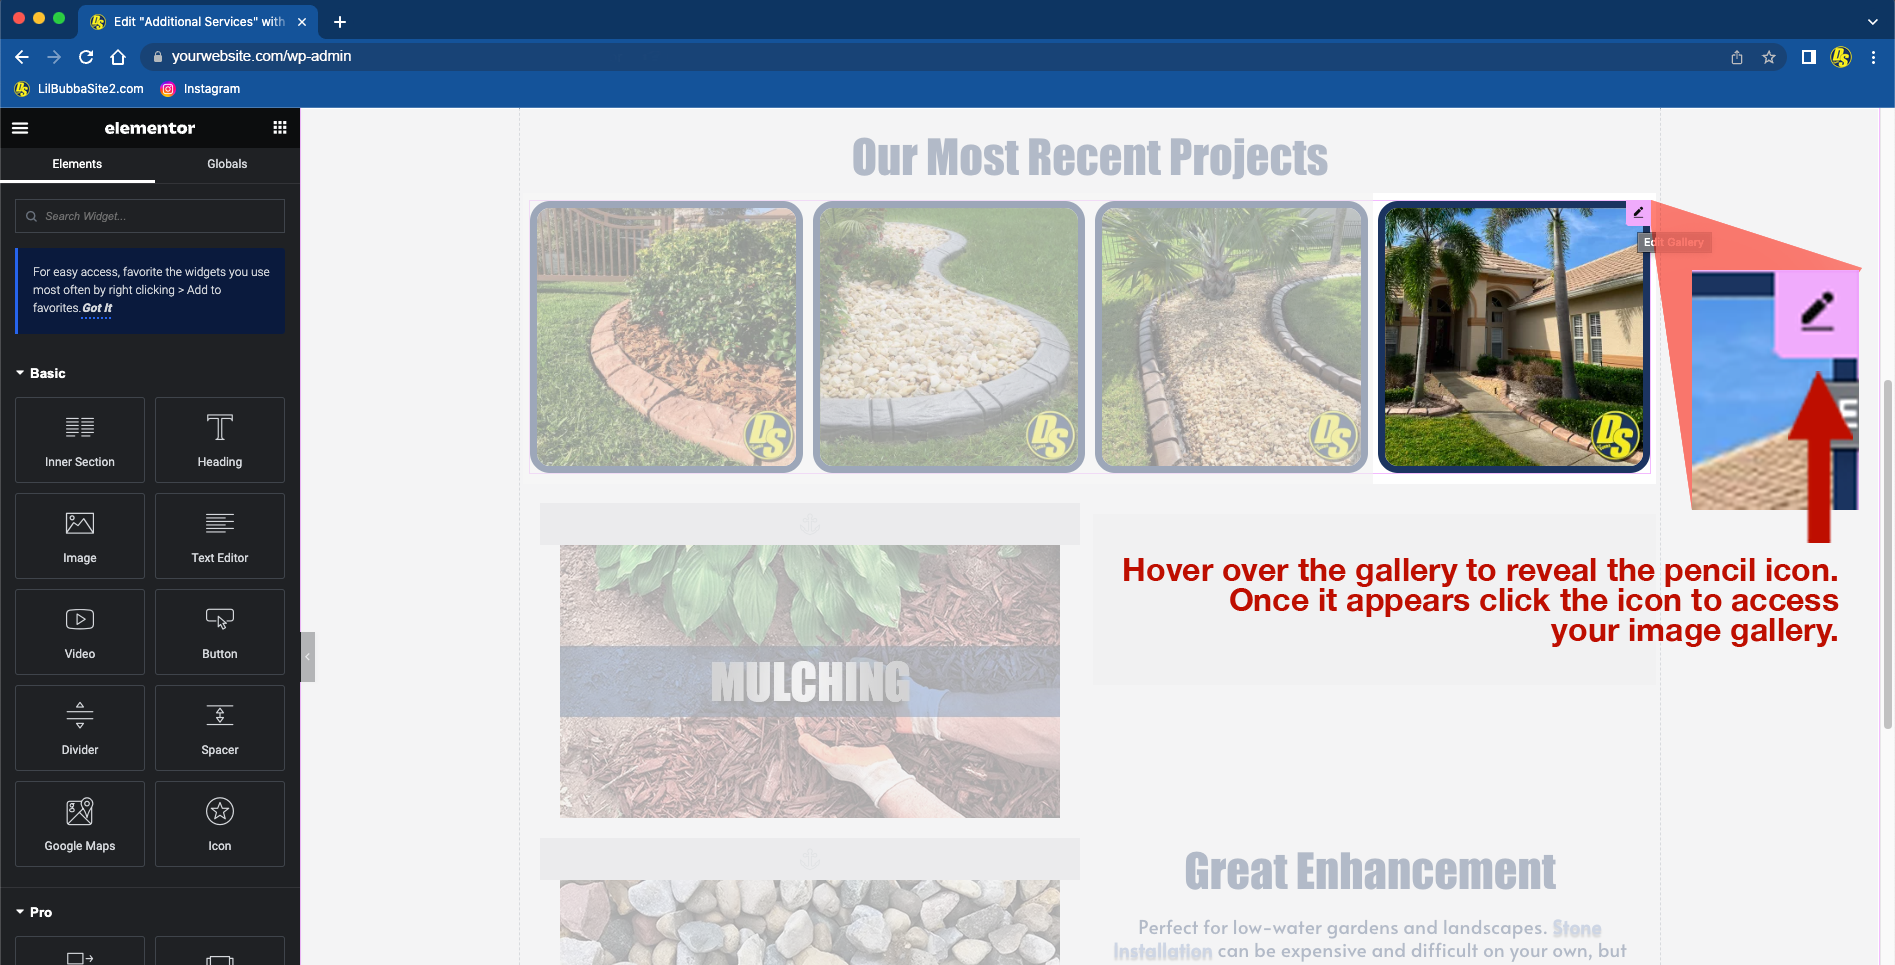
(Image 8)
Clicking this icon will cause the menu on the left side of the screen to change. This change is the Edit Gallery and indicates that you are ready to edit the photo gallery. To do so, click the newly displayed Small “Pencil Icon” Box over the thumbnail images displayed in the Edit Gallery. (Image 9).
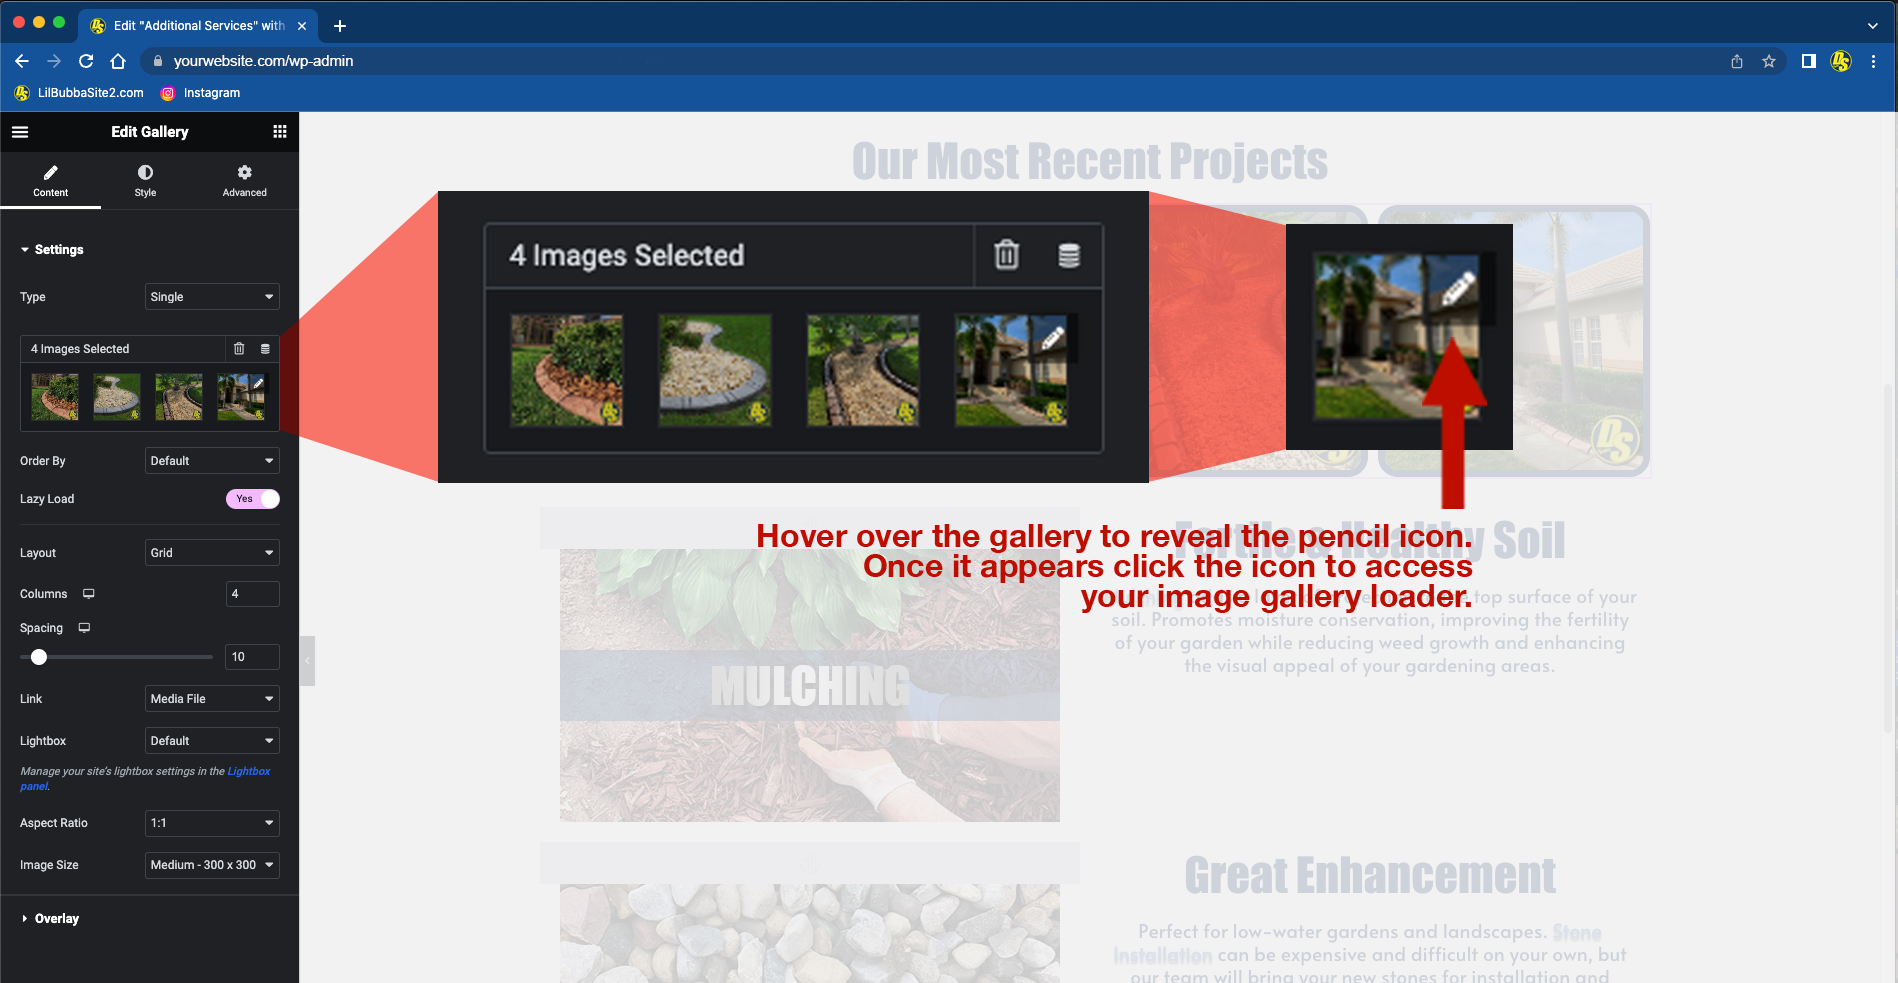
(Image 9)
Clicking this icon will cause the menu on the left side of the screen to change. This change is the Edit Menu and indicates that you are ready to edit the photo gallery. To do so, click the newly displayed Small “Pencil Icon” Box over the thumbnail images displayed in the Edit Gallery. (Image 9).
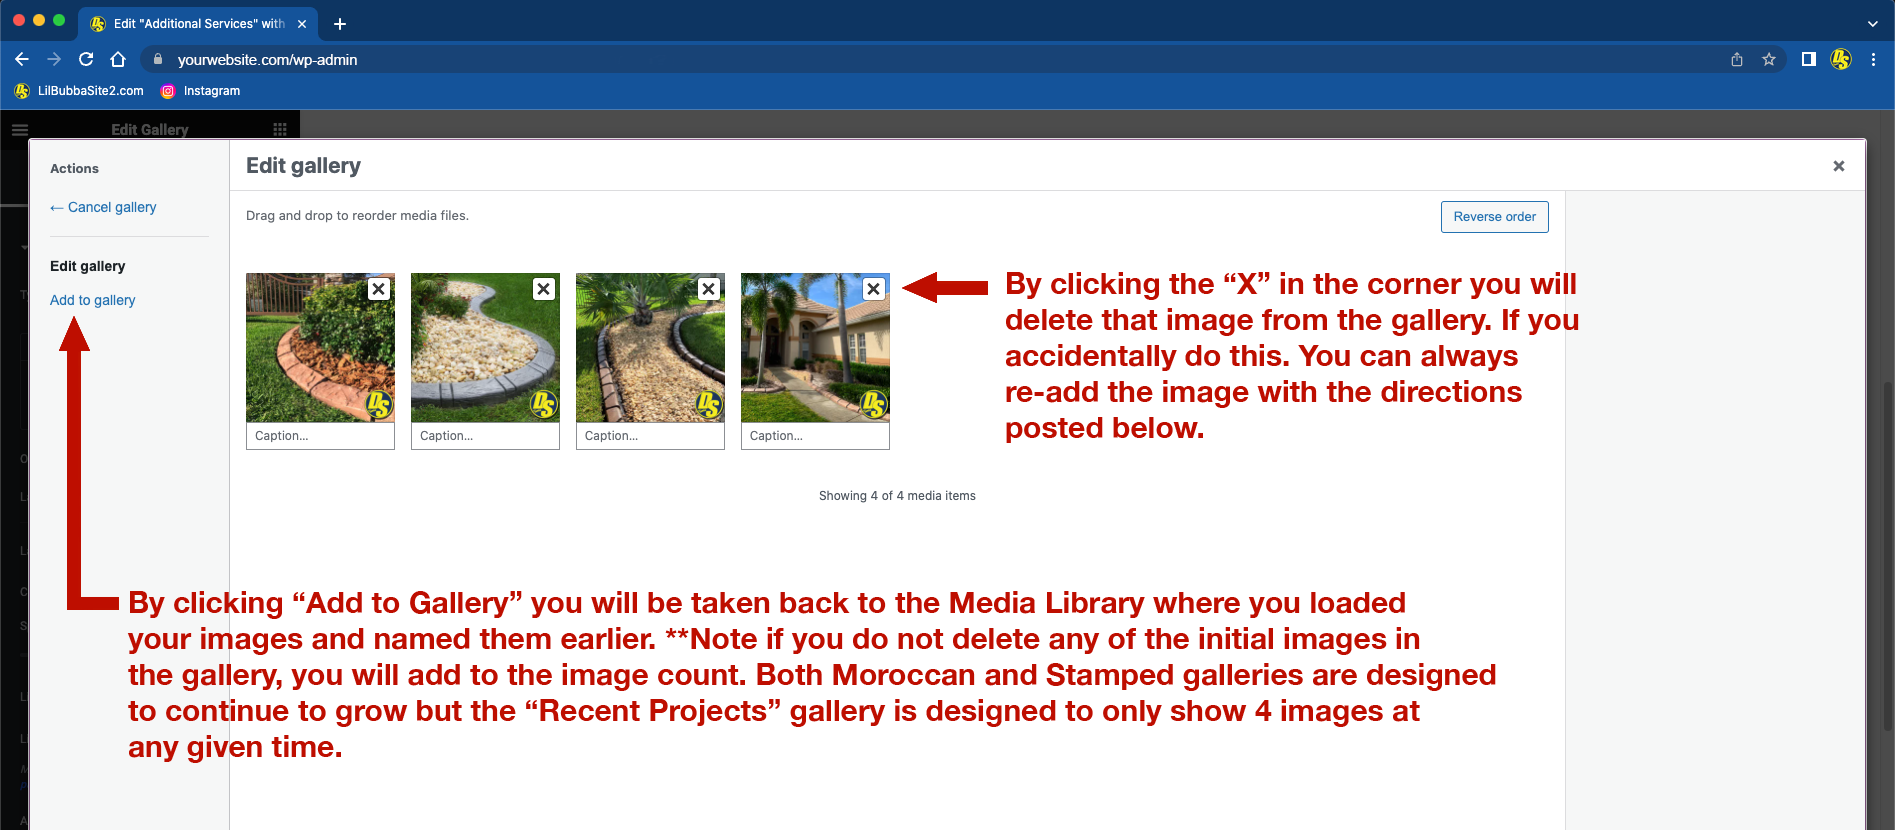
Once you have clicked the icon, another screen will load, showing the current contents of the Gallery. You can delete items and/or add them to the gallery from this location (Image 10).
(Image 10)
You can delete images by clicking the “X” in the top right corner of each image. Please note, the way that these Galleries are built you can continue to add images without deleting any if you choose. This will only expand the gallery so you don’t have to pick and choose only your favorite images.
This is true also on the “Additional Services” page gallery, however, that gallery is designed to display 4 images only. This is a design preference so if you decide you want that gallery to expand as well, you can do so.
(Image 11)
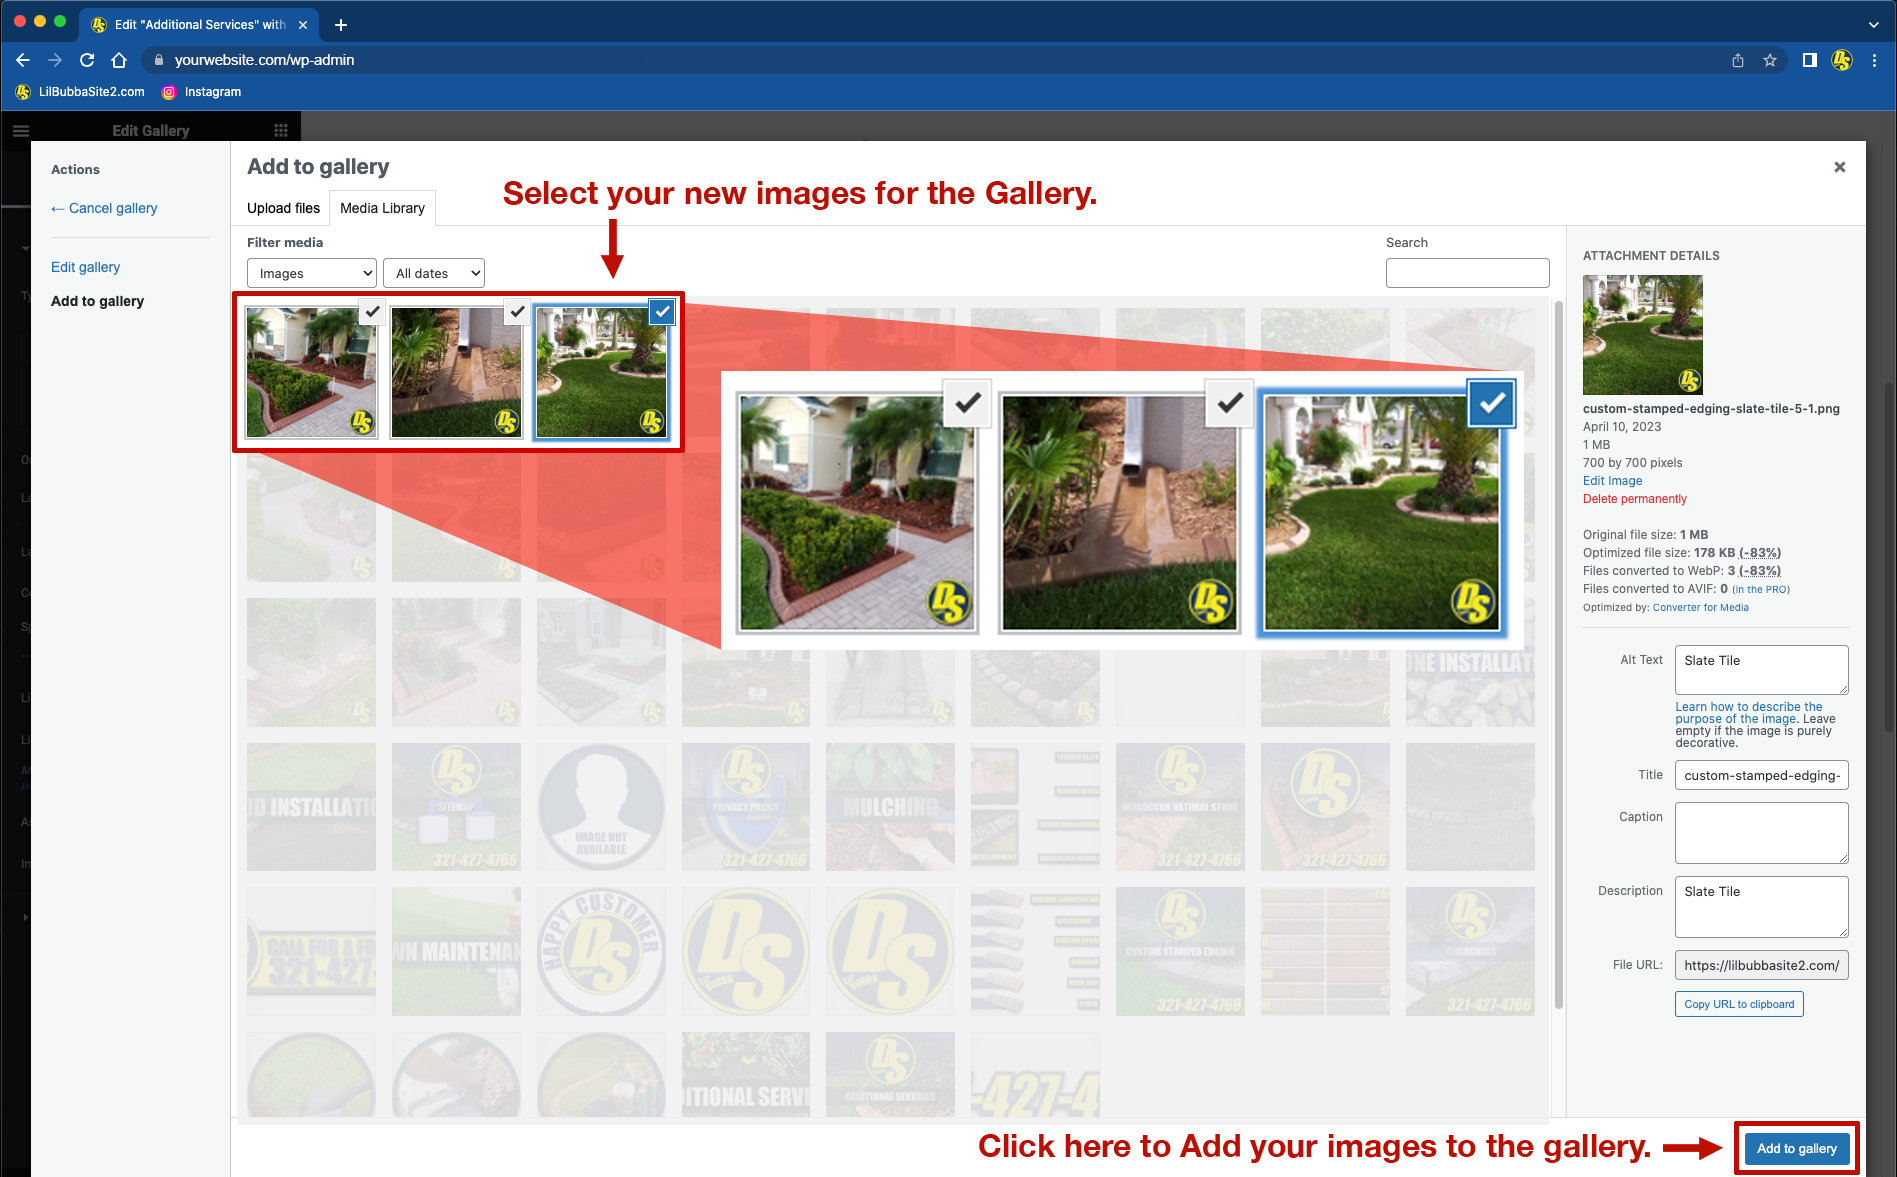
When adding images to the gallery, you will select the Add to Gallery button located on the left side of the screen. Clicking this button will take you back to the Media Gallery where you previously uploaded all your new images.
Simply clicking anywhere on the image that you want will add a “Check Mark” to the top right of that image, indicating that image has been selected to be placed in the Gallery. You can select multiple images and if you accidentally choose an image you do not want, clicking it again will deselect that image from the gallery folder.
When you have selected all the images you wish to add to your Gallery, you can then simply click the Add to Gallery button located at the bottom right hand of the screen (Image 11).
(Image 12)
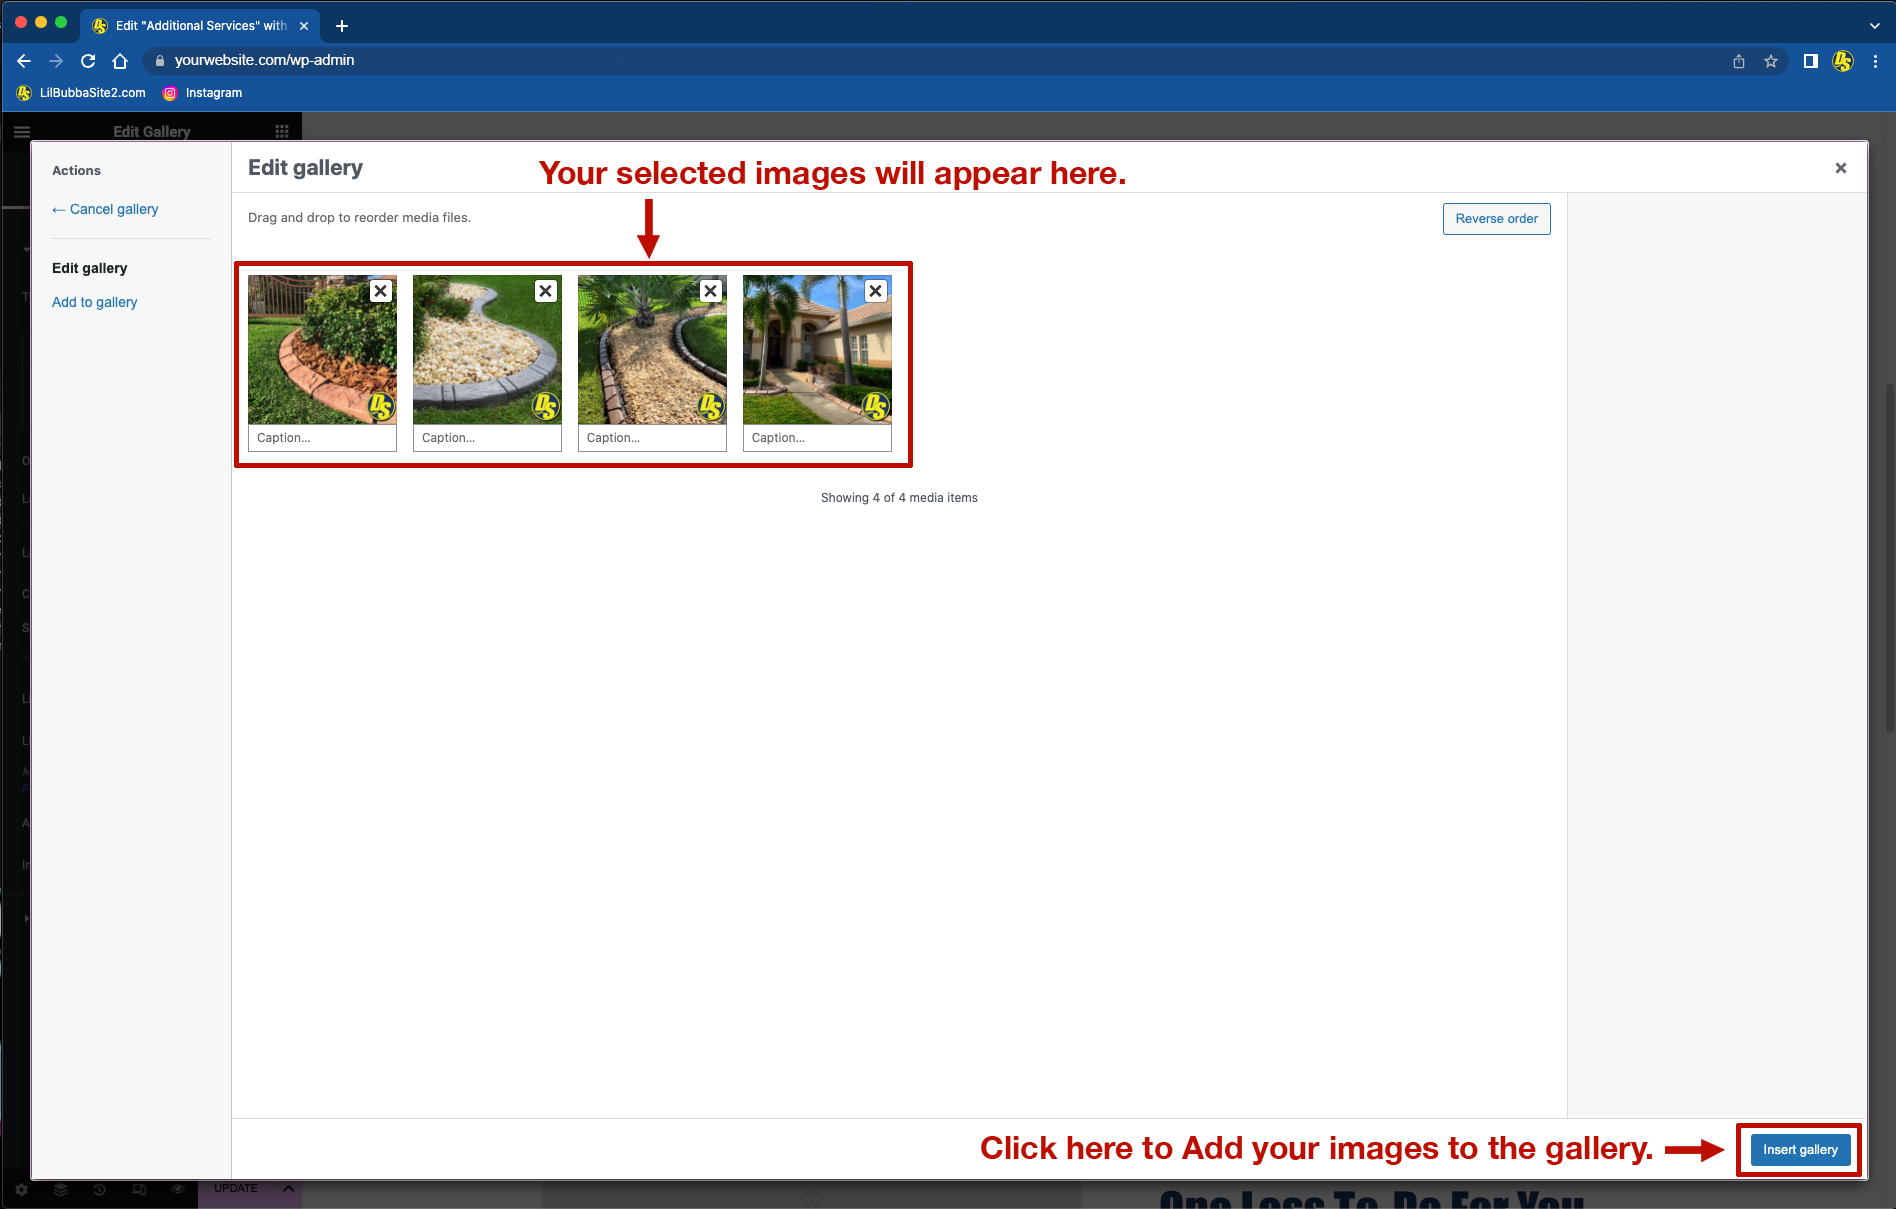
After clicking the Add to Gallery button, you will be transported to the previous Gallery screen that displays the images you have selected as well as any previous images that you did not delete. To officially add them into the website you will then click the Insert Gallery button also located at the bottom right hand of the screen (Image 12).
(Image 13)
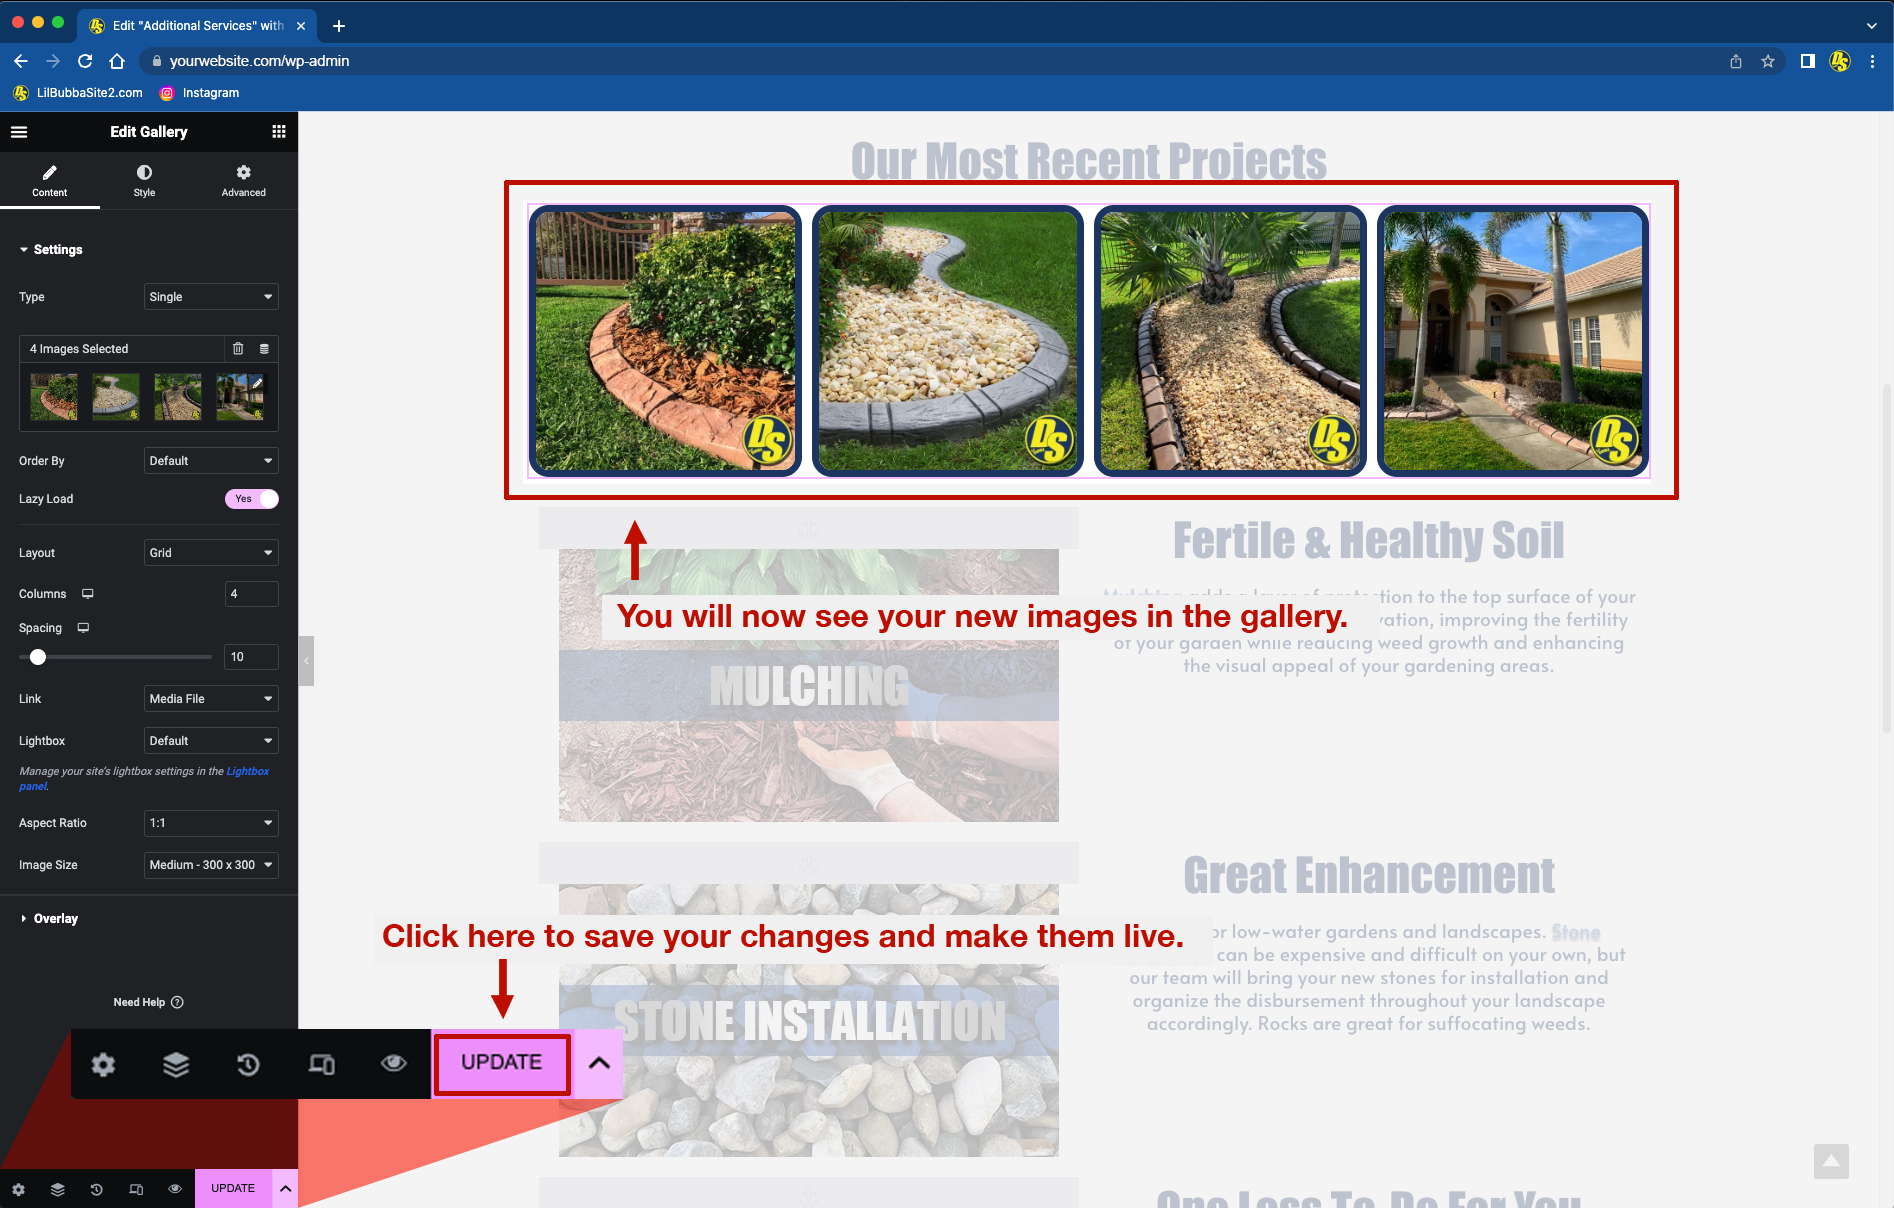
You have now edited your gallery and should have been taken back to the page where the Gallery lives, yet still in the editable mode. Please note that at this moment, your changes will not take effect on the “Live Website” until you click the Update button in the bottom right corner of the Edit Menu. (Image 13). Once you click Update button though, all of your edits will go live on your website.
(Image 14)
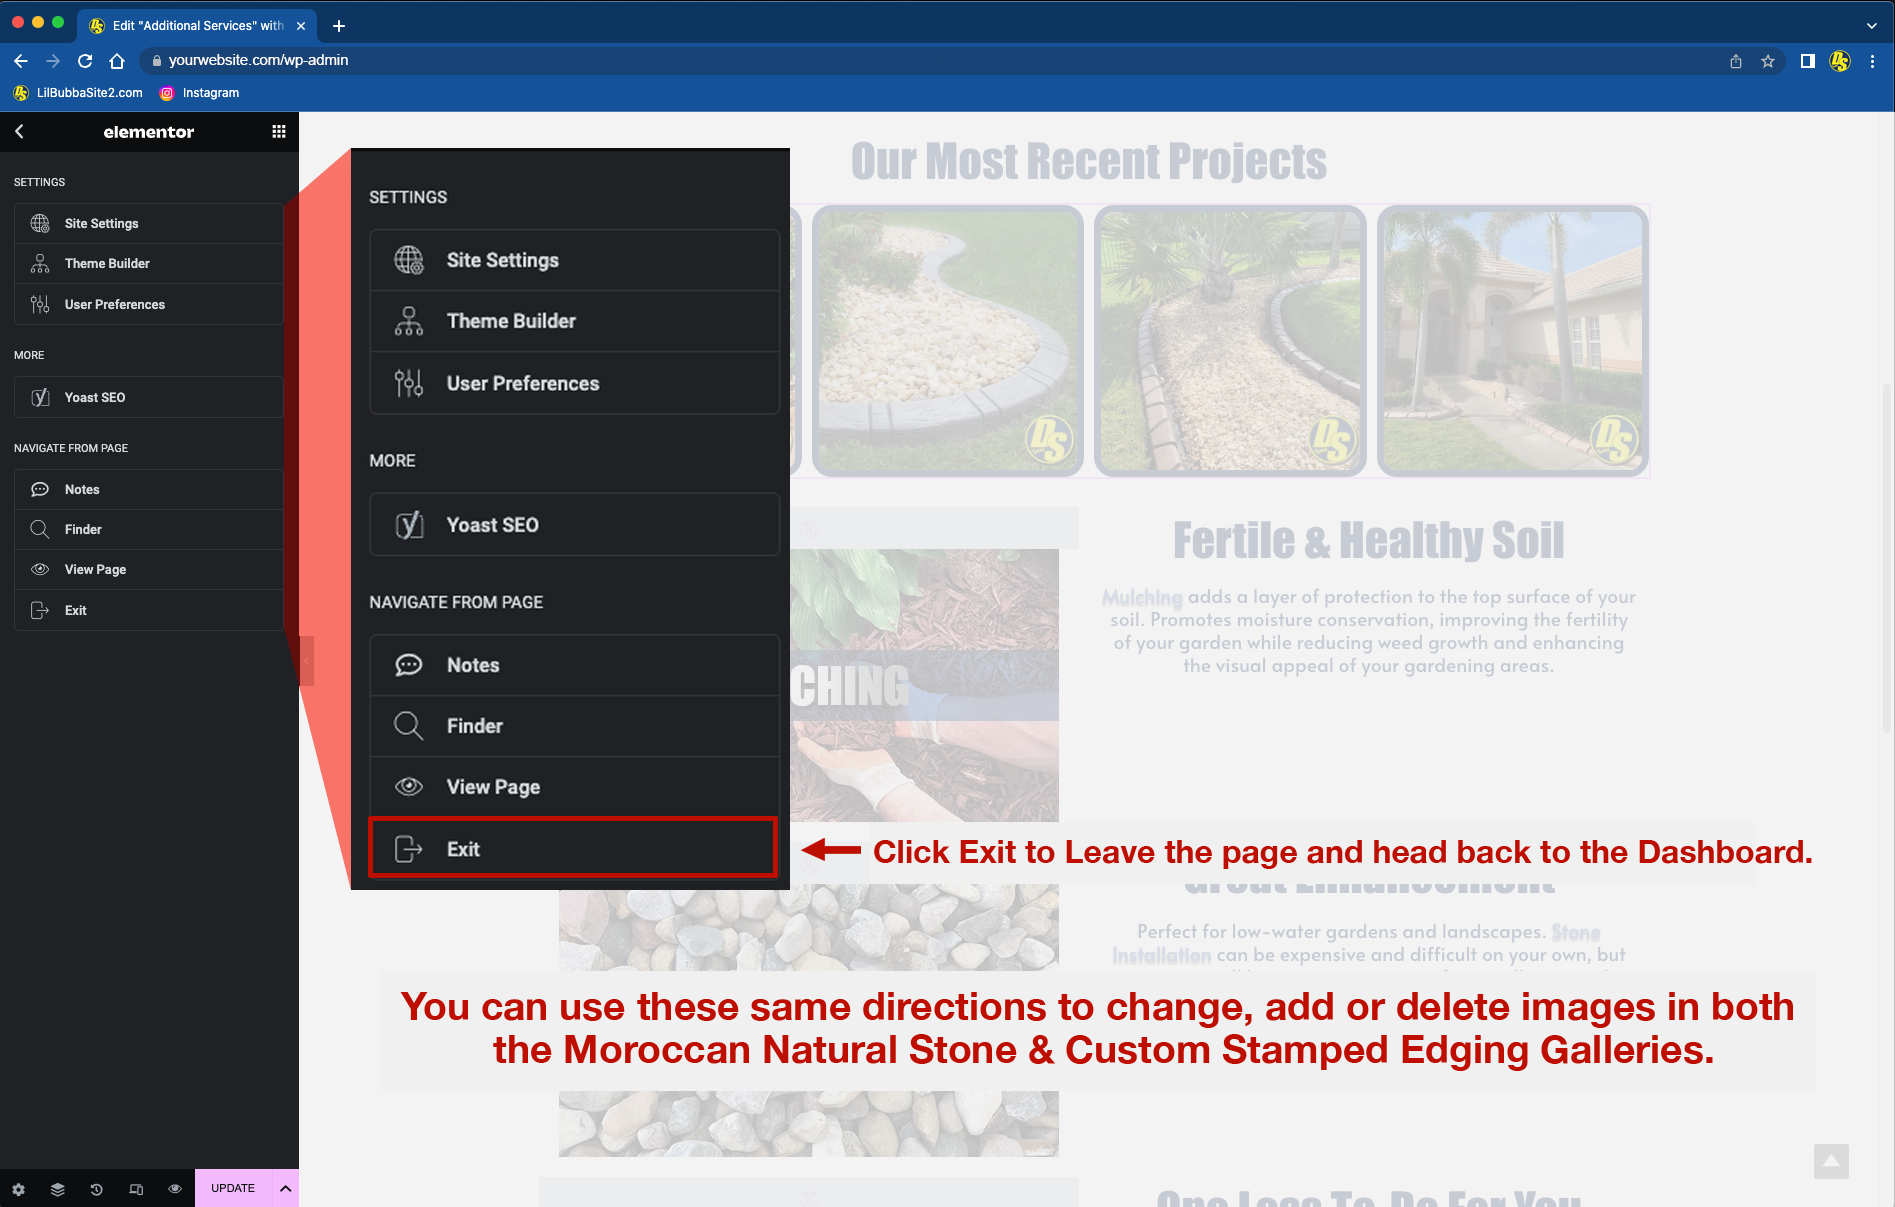
Now that you saved your work, you will want to exit the page by going to the top left corner of the Edit Menu where you will find 3 lines stacked on top of each other. This is called a Hamburger Menu and this indicates that there is a hidden menu with multiple options available. Clicking this icon will display the main Elementor menu.
At the bottom of this menu you will see the Exit button (Image 14). Clicking this will take you back to your website Dashboard. From there you can click the top left corner where you see your Website’s Name displayed. This will take you to your Live website where you can now view your edited gallery just as your audience will see it.
Thank you for your time and be sure to check back on our website for more tutorials helping you access the tools provided for you in the Digital Success Package built by the Lil’ Bubba Print Shop.