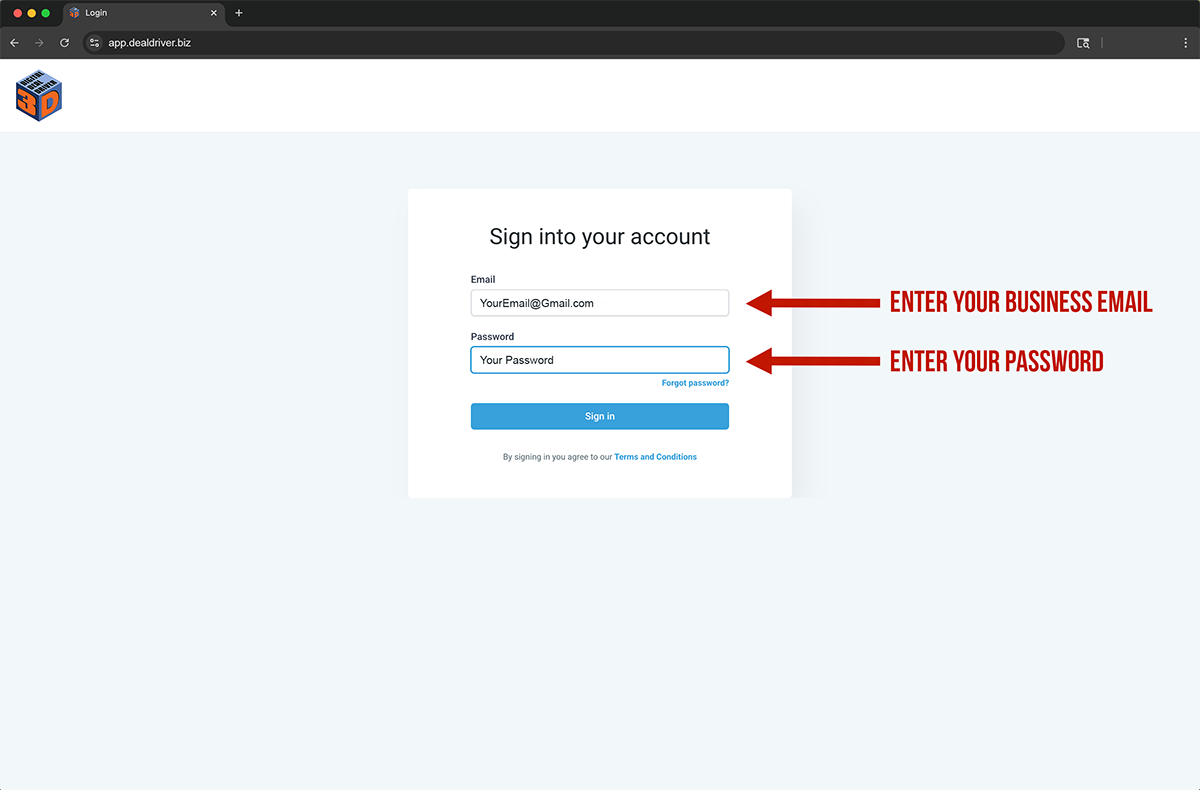
Go to App.DealDriver.biz and sign in using your Business Email and Password on the form. The Email & Password have been provided to you. You can change your password once the initial sign in is complete. (Image 1).
(Image 2)
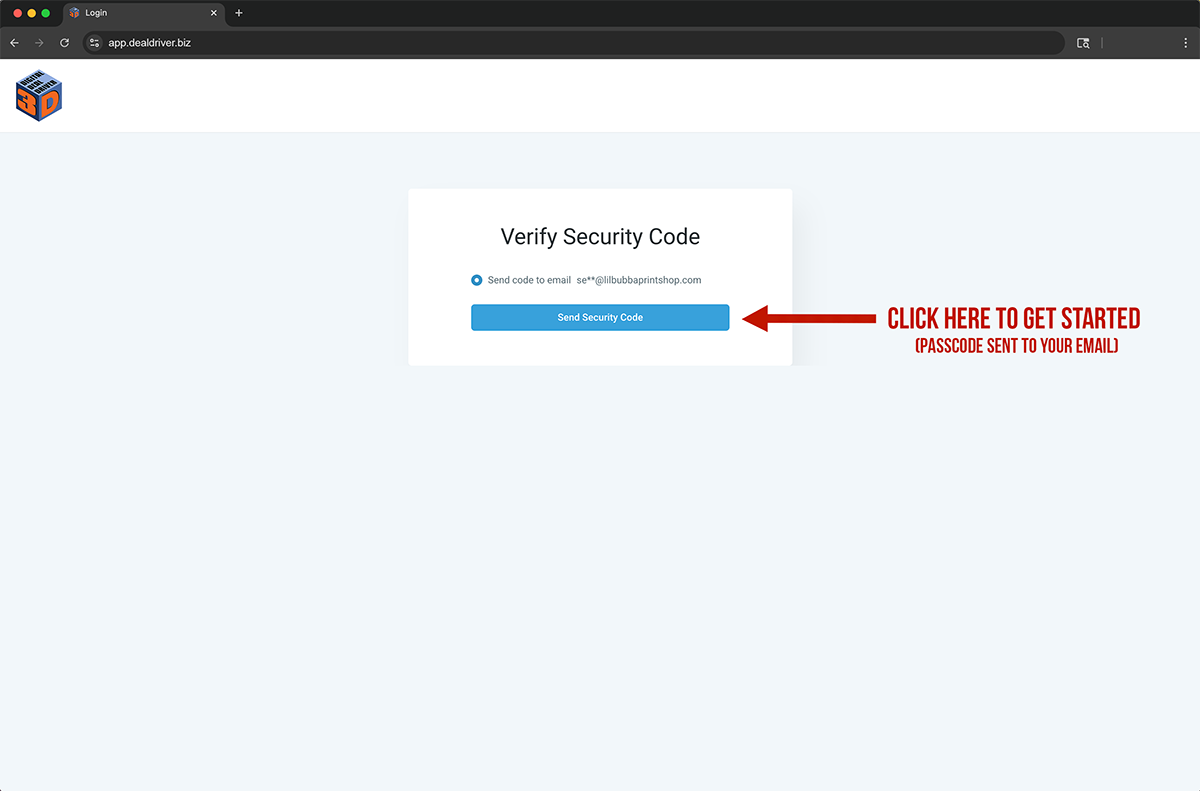
You will be taken to Verify Security Code. Click Send Security Code to have a one-time passcode emailed to you. Be sure to leave this page Open while you are checking the Inbox in your email account. Settings & Privacy menu for your Business page account. (Image 2).
(Image 3)
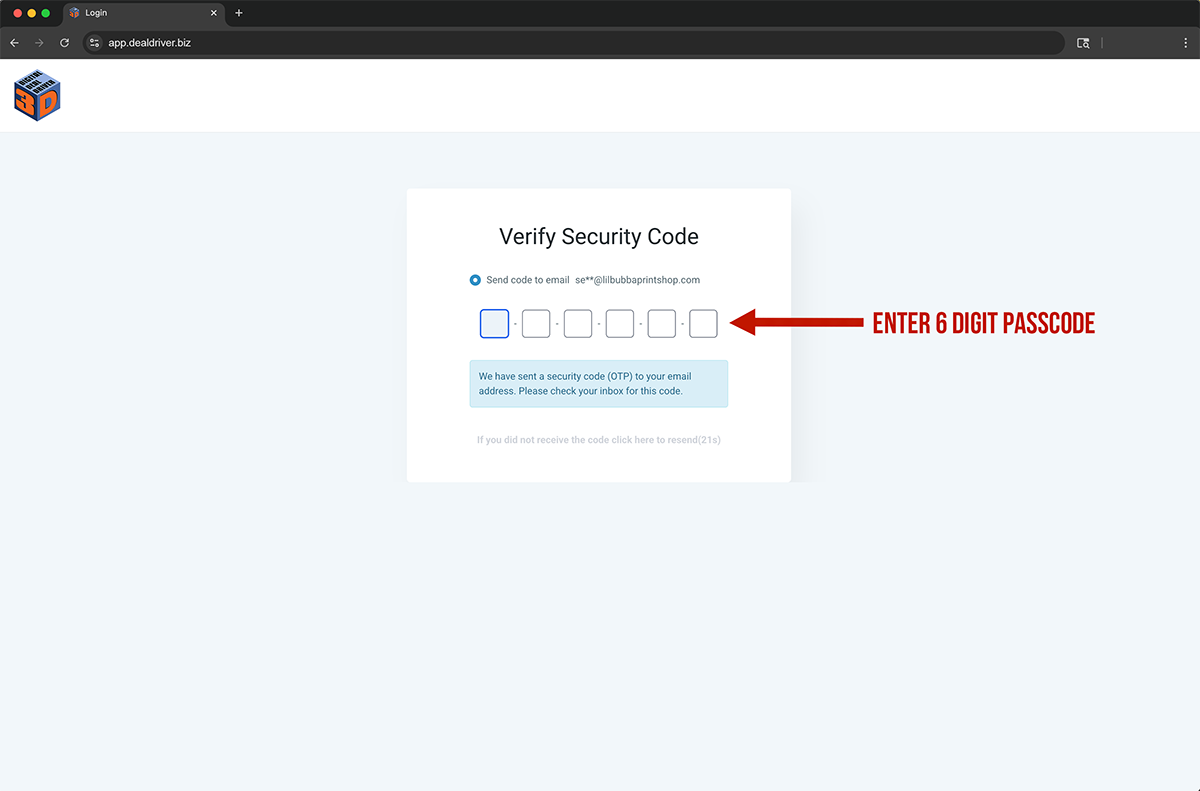
Type the Six-Digit Code that you received in your email inbox. Enter one digit per box, then hit the Continue Button. The code is only valid for 2 minutes, so if the code expires, simply click the Resend Link to have a new code supplied to you.
(Image 3).
(Image 4)
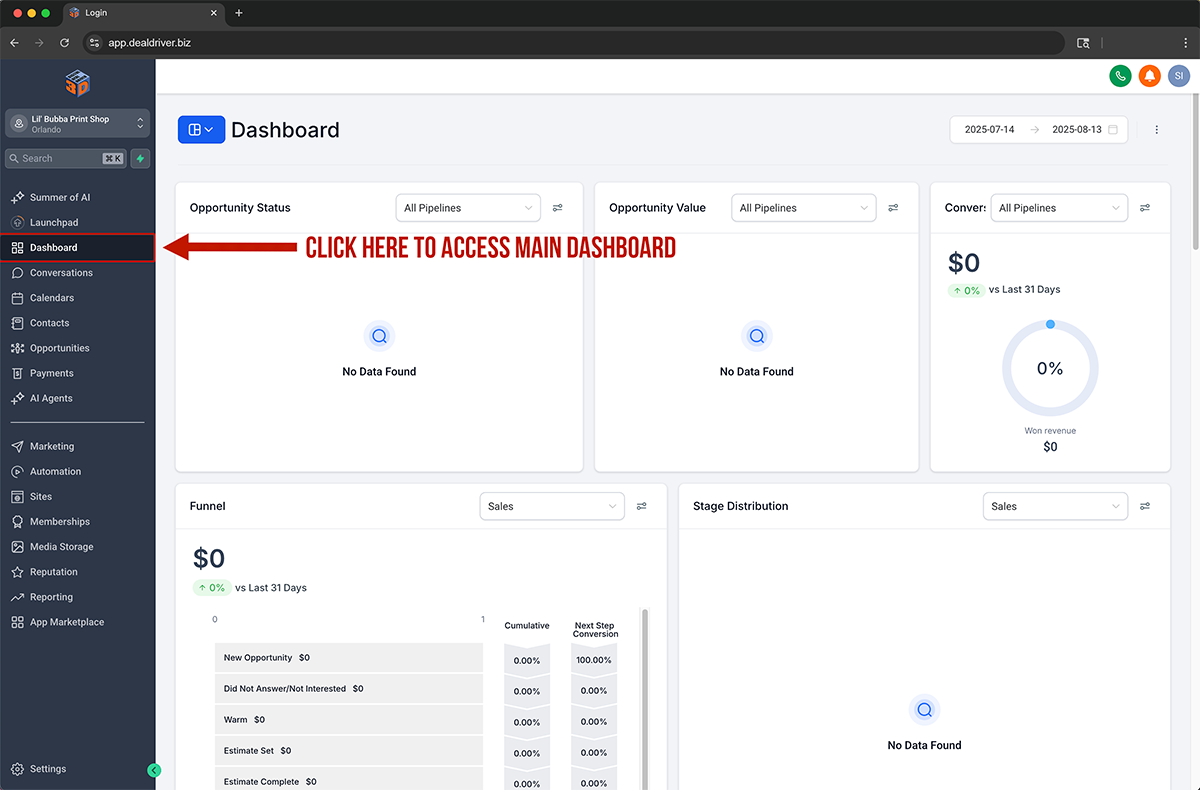
After you successfully log in, use the navigation menu on the left of the screen to reach the Dashboard. Click the Dashboard link to open your main view of pipelines, funnels, and recent activity; use the date filter at the top right to change the time range.
(Image 4).
(Image 5)
To message clients, click Conversation from the left menu where the arrow highlights in the image above. In the middle panel, send messages, then use the SMS tab or Email tab where the arrows point to switch channels; the right panel arrow shows client details like email, phone, tags and automations.
(Image 5).
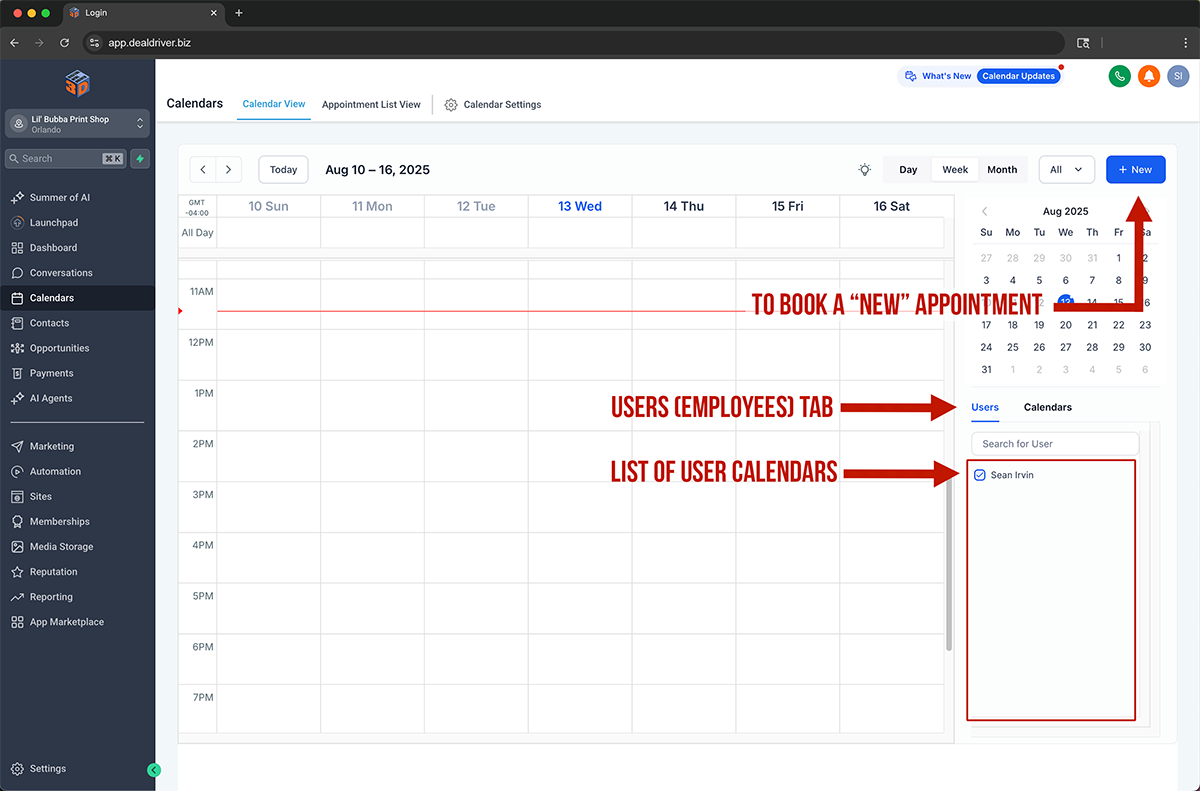
To see schedules, click Calendars. The arrow labeled Users shows where to switch between staff; the list of User Calendars is called out by the arrows on the right; click the New Button where the arrow points to book a new appointment.
(Image 6).
(Image 6)
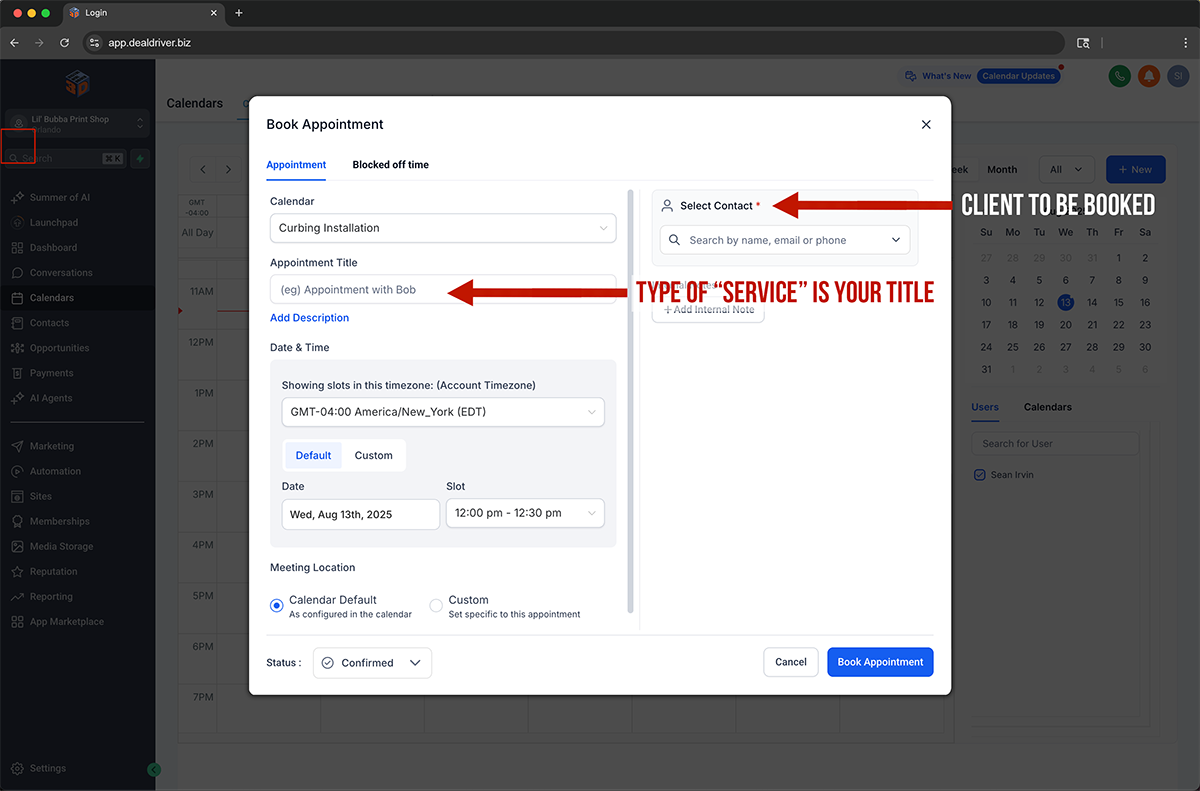
(Image 7)
When booking, fill out the Appointment Title with the type of service as shown by the arrow, choose the Calendar, date and time, then select the Contact using the search on the right where the arrow is pointing. Set Status to Confirmed and click Book Appointment.
(Image 7).
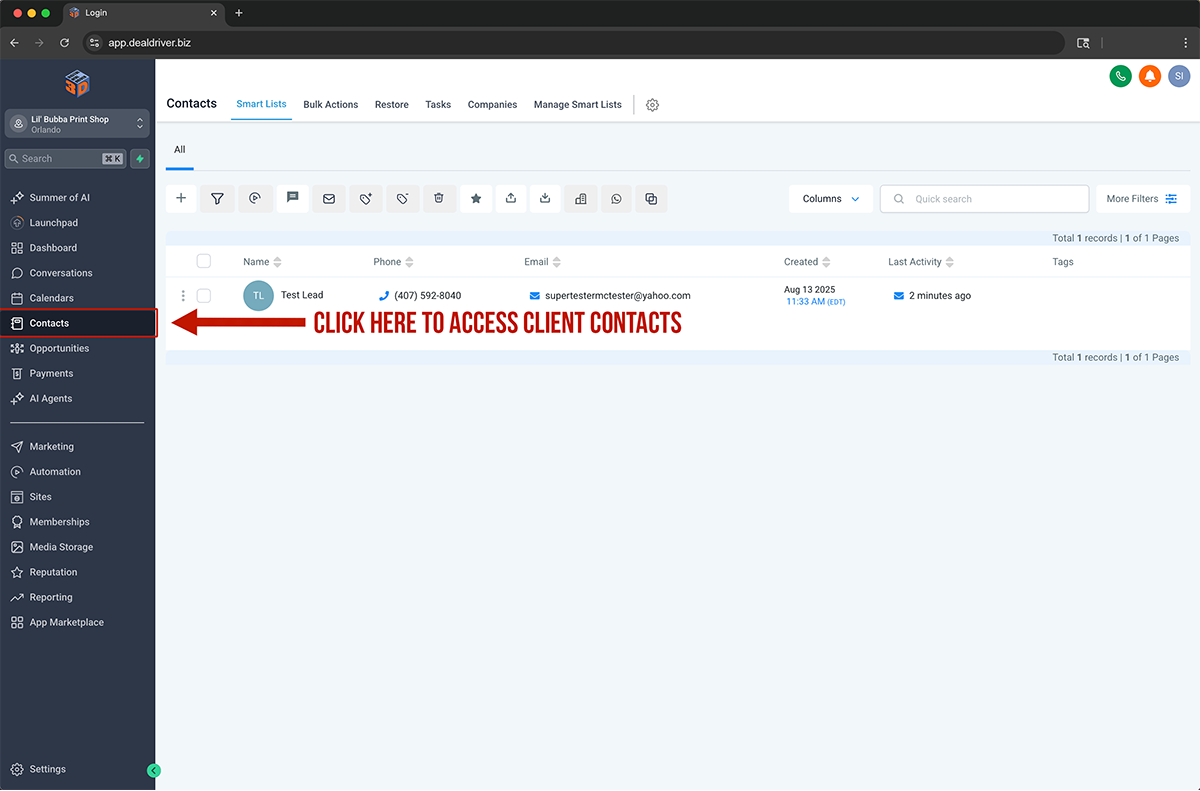
(Image 8)
To manage your list of people, click Contacts in the navigation menu located on the left of the screen where the arrow points. Use the search and filters to find a person, then click the row to open the record.
(Image 8).
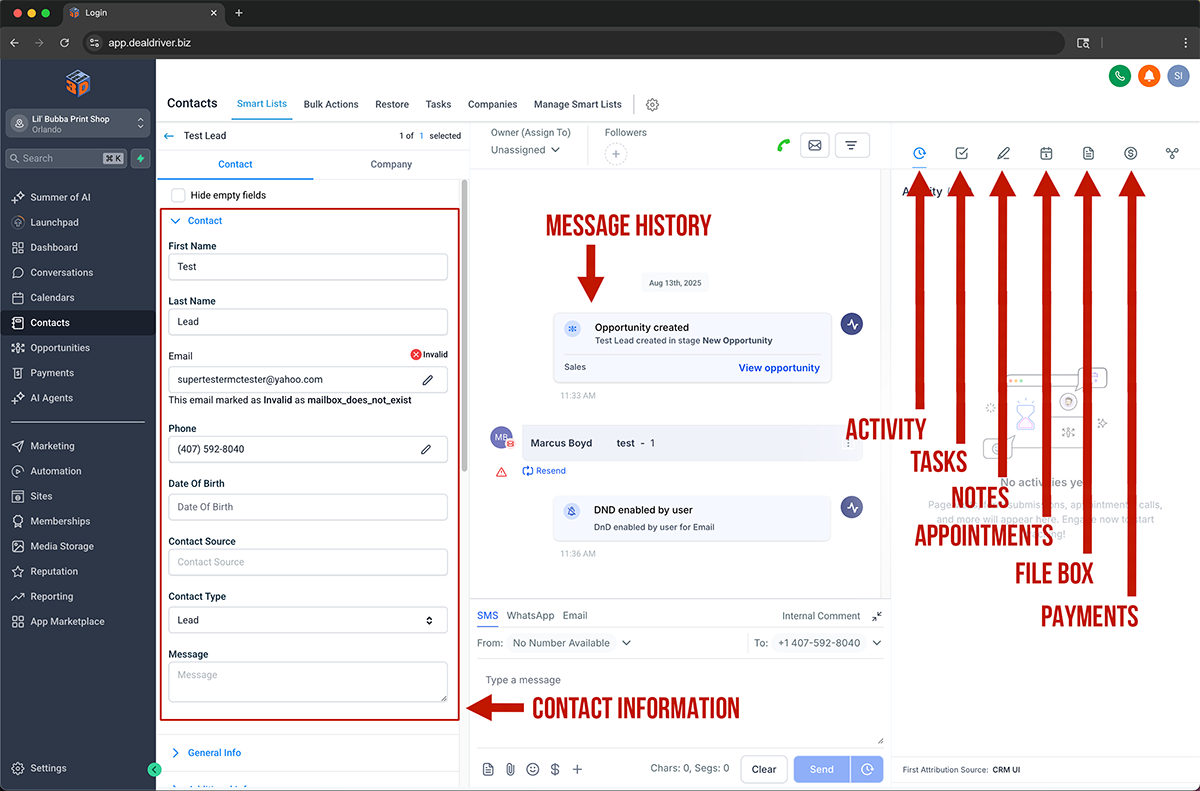
(Image 9)
Inside a contact, the left panel arrow shows where to edit Contact Information. The center arrows mark the Message History and the box to send SMS or Email. The vertical arrows on the right show shortcuts to Activity, Tasks, Notes, Appointments, File Box, and Payments so everything stays in one place.
(Image 9).
(Image 10)
To work your deals, open Opportunities. The long arrow across the top shows your pipeline Stages; the box arrow shows a single opportunity card. Click the card area where the arrow points to open it so you do not navigate away by clicking the name link.
(Image 10).
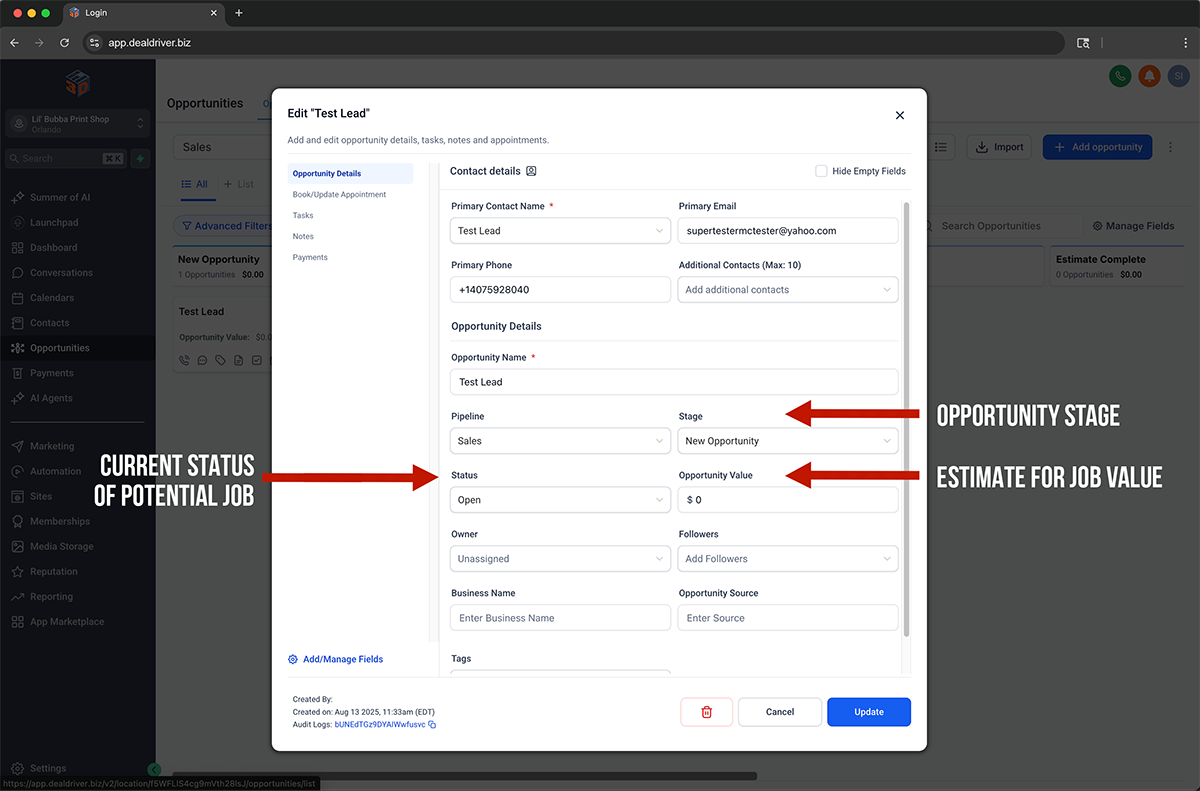
(Image 11)
In Edit Opportunity, set the Status of the potential job where the left arrow indicates, choose the Stage that matches where the job sits in your pipeline, and enter the Opportunity Value where the arrow points so reporting shows expected revenue. Click Update to save.
(Image 11).
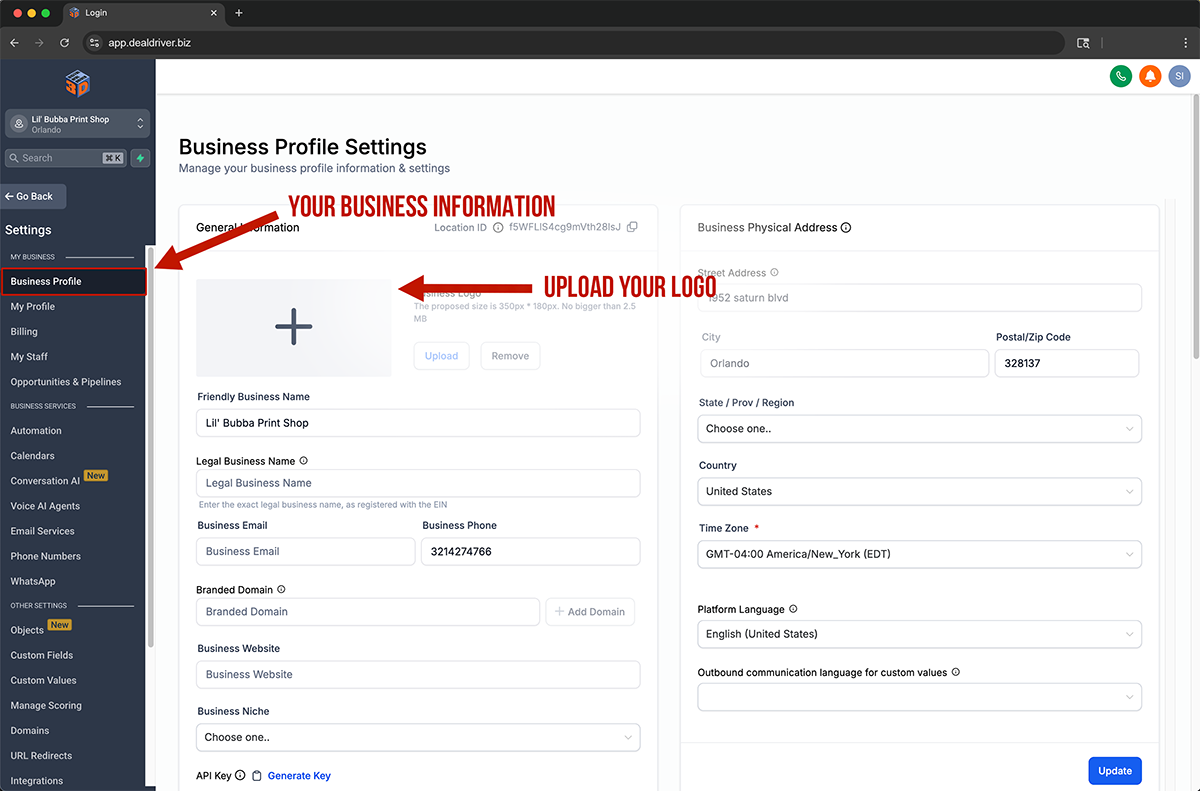
(Image 12)
Open Settings > Business Profile to complete your company info. The left arrows show where to enter your Friendly and Legal Business Names and where to upload your logo as a square image of up to 2.5MB; the right side arrows show where to add your Physical Address, Timezone, and Language, then click Update
(Image 12).
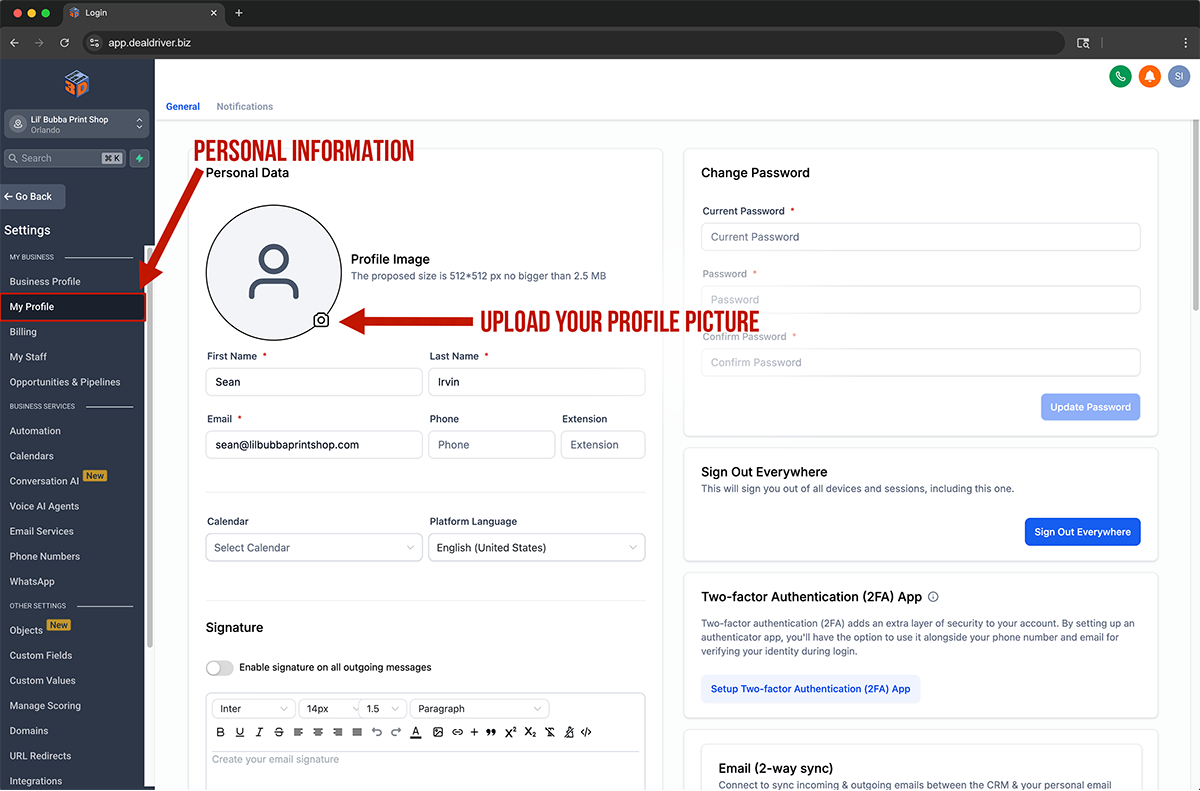
(Image 13)
Go to Settings > My Profile for your user account. The arrow on the left marks your Personal Information; upload a Profile Picture, confirm you Name, Email, and Phone, and choose a default Calendar. On the right you can change your Password, enable Two-Factor Authentication, and set up Email Sync, then save your work.
(Image 13).
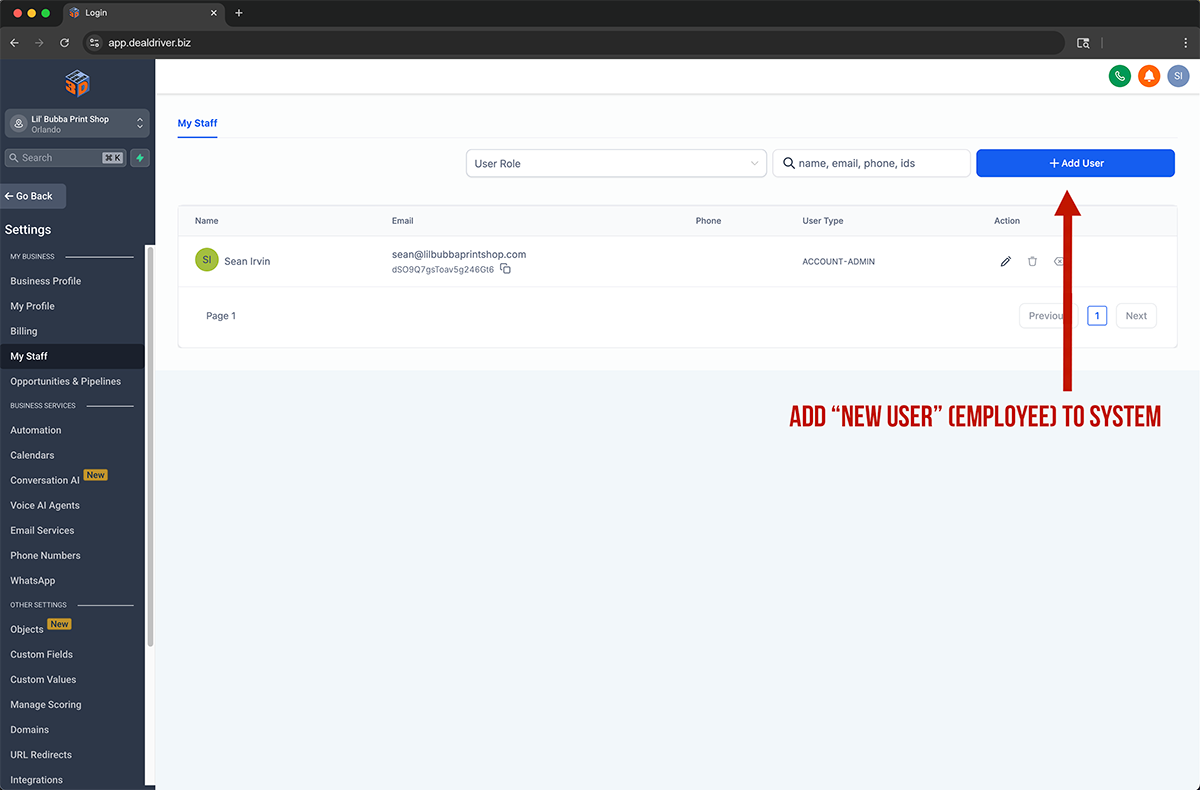
(Image 14)
To manage staff, open Settings > My Staff. Click Add User where the arrow points to invite a new employee; you can also edit and remove users from the action icons in this list.
(Image 14).
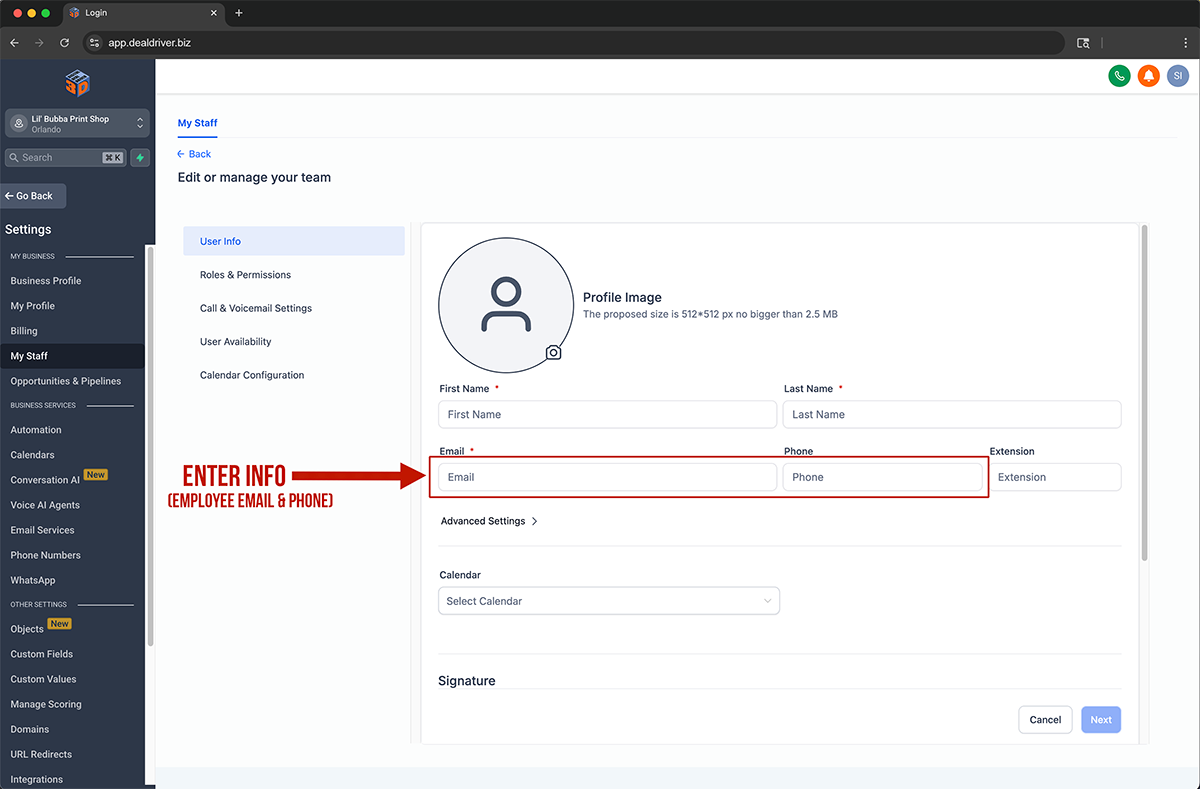
(Image 15)
When adding or editing a user, enter First Name, Last Name, Email, and Phone in the fields highlighted by the long arrow. Assign a default Calendar, then use the left tabs to set Roles and Permissions, Call and Voicemail, User Availability, and Calendar Configuration. Save to finish.
(Image 15).
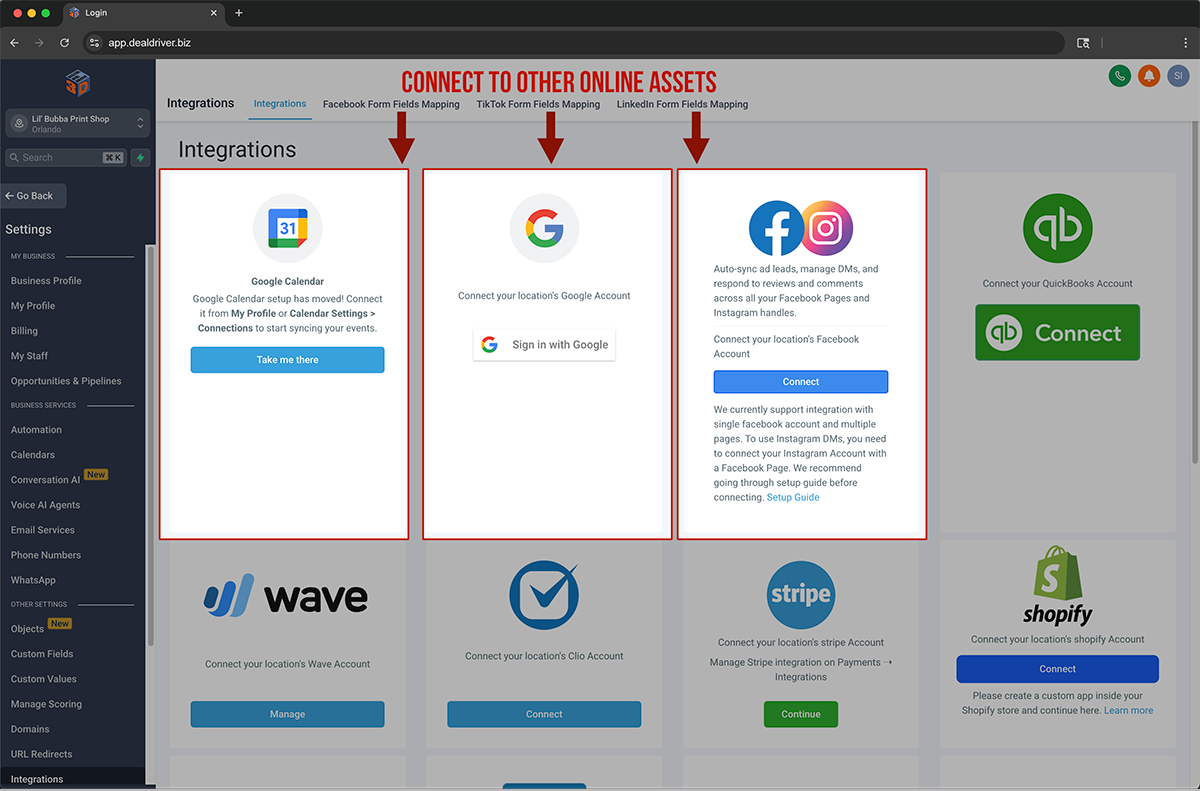
(Image 16)
Finally, open Settings > Integrations to connect your systems. The three highlighted panels and arrows show where to connect Google Calendar, Google Account, Facebook, and Instagram so appointments and messages sync into Conversations. Optional tiles let you connect QuickBooks, Wave, Stripe, and Shopify (if applicable). Click Connect on each and approve the prompts.
(Image 16).